Wednesday, May 27, 2015

A Majestic Wildflower


DSCN3112
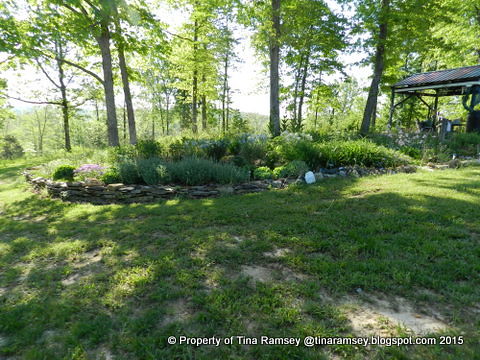
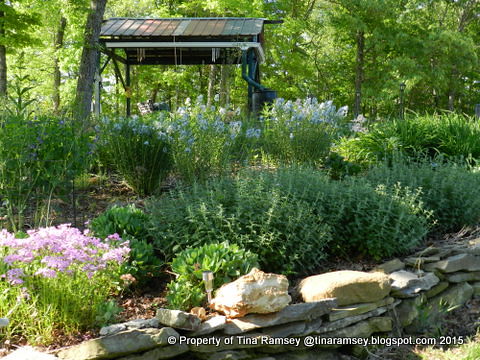
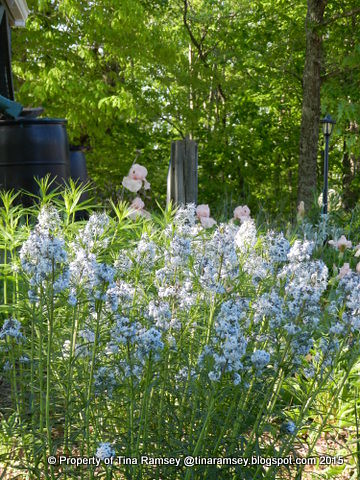
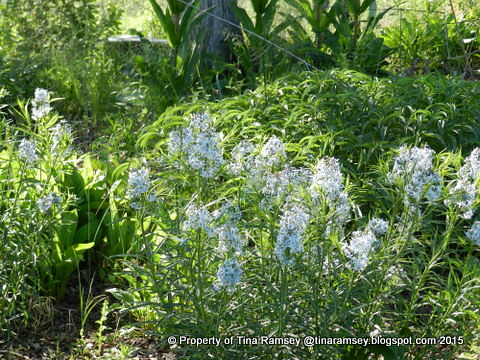
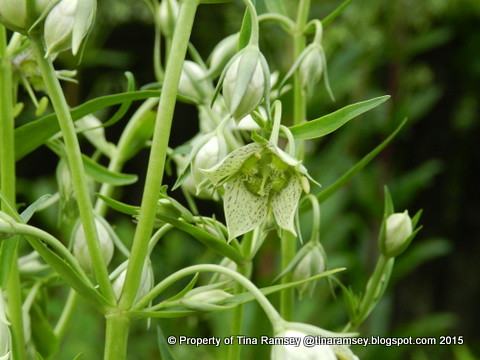
American Columbo is blooming its heart out this year and is looking the best I have seen it in the past three springs. Wowser on the blooms that the bees simply adore. But, as pretty as the little blooms are they are quite hard to really enjoy unless you get up close to the plant. The real show with the American Columbo is the stature of these grand native wildflowers.
DSCN3115
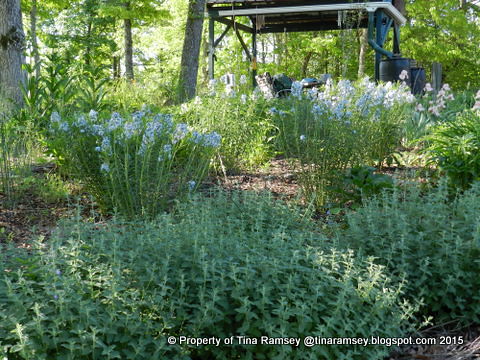
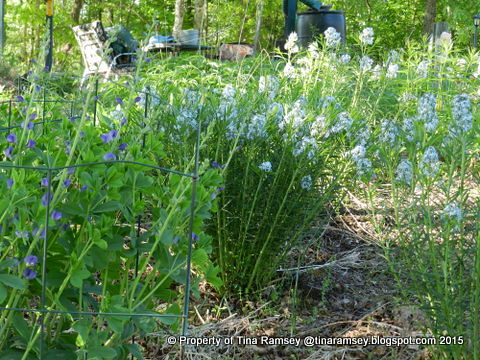
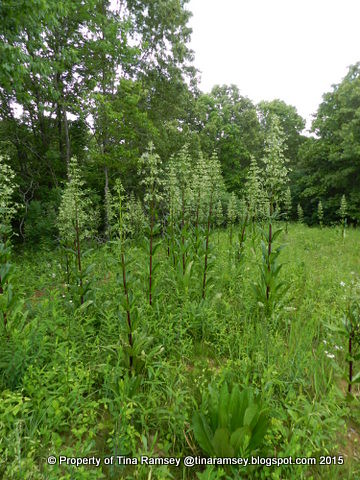
From a distance of over 200 feet the American Columbo will draw your eye to it immediately. The unknowing plant person will likely wonder what the tall and stately plant can be. For you see, in my experience American Columbo is not so common around my area of Tennessee. I am sure many hikers and naturalists are familiar with it but until buying this property I had never seen or noticed it before. An interesting note is that when I was visiting my daughter in Louisville a few weeks ago we took a trip to Bernheim Arboretum (highly recommended trip) I noticed some plants of American Columbo and was most excited. There were only a few plants and none in bloom that I could see but hey, it was a start on finding this cool plant in a spot other than our property.
DSCN3116
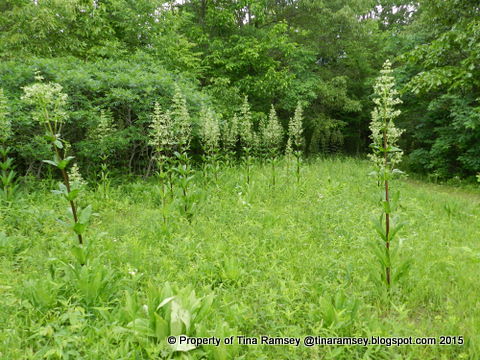
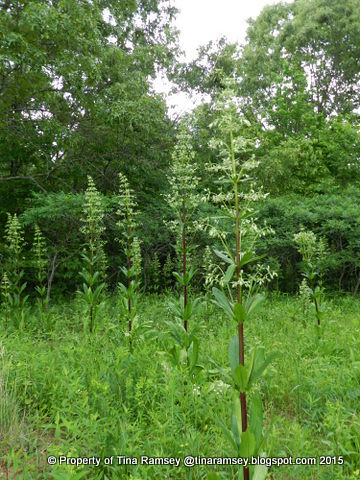
These plants range in height from three to eight feet tall. That is a really tall wildflower and I believe this particular wildflower is one of the tallest wildflowers in Tennessee. In fact, the book Wildflowers of Tennessee the Ohio Valley and the Southern Appalachians says it is one of the tallest in Tennessee. If you saw a mass of them in person you would be awed!
DSCN3111
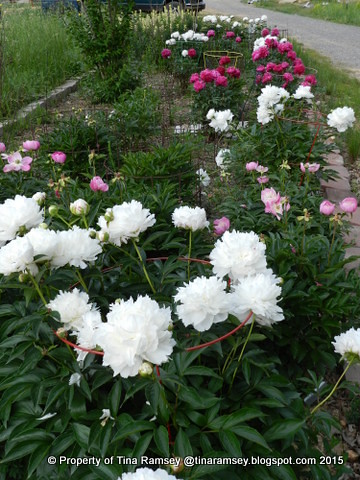
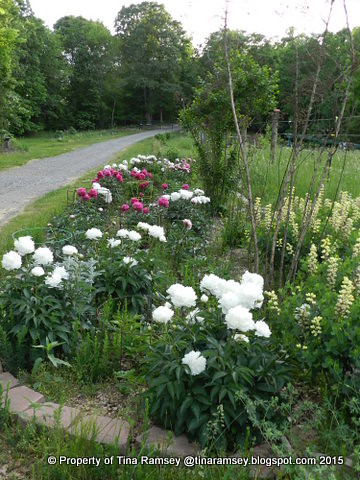
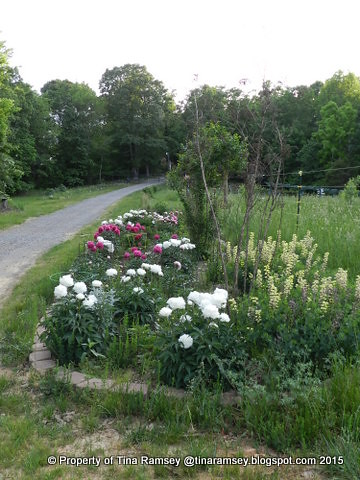
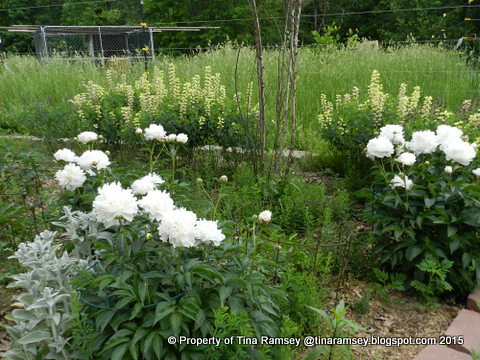
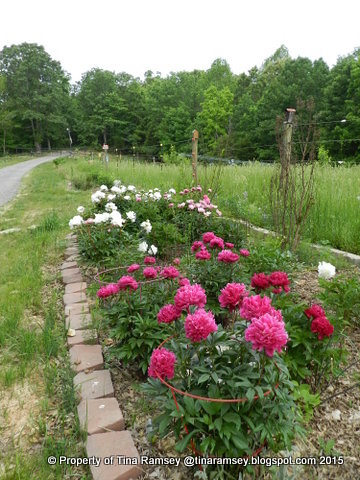
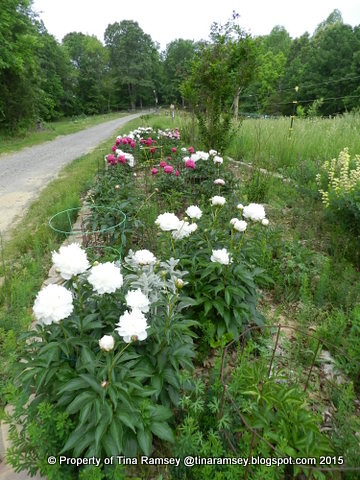
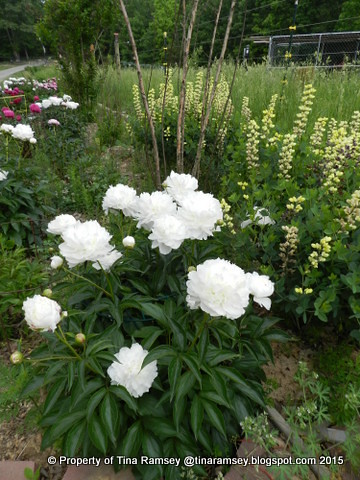
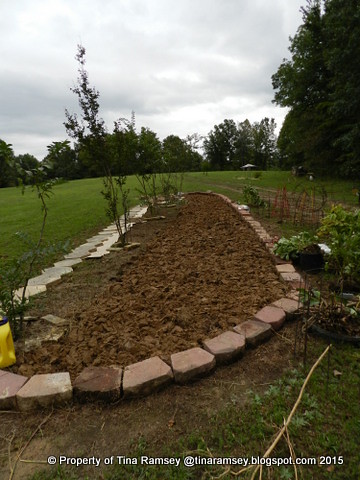
This mass of the wildflower is in the corner of my yard in a native plant area that I try to maintain by leaving it alone. All year long there will be a parade of stunning native wildflowers come in and out of bloom in this area. The butterflies and pollinators are in heaven. I was quite pleased to see the bumble bees and honey bees love the American Columbo flowers. My two beehives are still doing fairly well and the bees have been a lot of fun. I have been stung twice but that's okay and to be expected.
DSCN3110
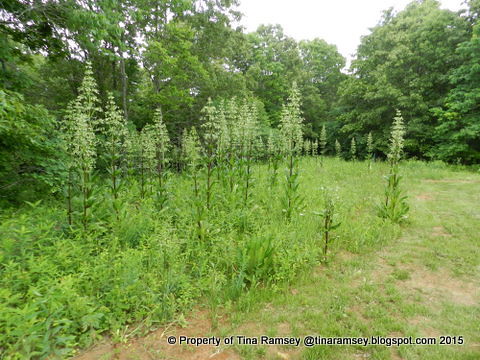
Like I said in the opening of  this post this year makes the best year ever for the American Columbo. The sad thing is that once all of these flowers have bloomed out and the plant has set seed these plants that are blooming will all die. Their dying will leave a void in the area, but a void I hope will be filled with new American Columbo plants from the interesting seed stalks the American Columbo will leave behind. I will do a post on the seed stalks once they come into their glory. I don't think there is a lot of information on the seed stalks but they are most interesting in their own right. This American Columbo grows in this field, in the woods, along side the hills, on road banks, and many places you would not expect it to grow. Despite it being so adaptable it is not an invader or a troublesome plant. Soon all of these plants that are not blooming will go dormant until next year....

in the garden....
Words and Photos Property of In the Garden Blog Team, In the Garden

Monday, May 18, 2015

The Peony Bed


DSCN3072
Welcome to Tiger Way Gardens! The peonies are one of the first things you'll see upon your drive to our home. When I come home I want to stop right here and just sit all day and look at these beauties.
DSCN3071
Leaving you'll get a great view of the peonies as well.
DSCN3070
These plants are so awesome and my apologies to my Facebook friends as I keep posting pictures of them. I guess I just did not realize how much I'd like this bed once it got going. The effect of massing peonies is quite the sight and I wished to share it immediately. It seemed as each hour passed the bed got prettier.
DSCN3068
Moving most of peonies out here to the land in the Fall of 2013 I was in a predicament because I had to have a spot for them to go. The spot had to not be in the way of the house build, be permanent, and the conditions had to work for the peonies. As it was, this bed was a bit in the way of an electrical ditch but the backhoe operator did an awesome job of keeping damage to a minimum. 
DSCN3067
There are five crepe myrtles in this bed. They are the main framework. I moved them here about two years ago. They have constantly been damaged by the winters but come summer when they bloom I really enjoy them so for now the crepe myrtles stay here. It was an easy decision to make a full bed and add the peonies as well. Between each crepe myrtle there are baptisias and daffodil bulbs. Eventually I'll have about a dozen or two of baptisias here but right now there are only about nine. To see them showcased check this post.
DSCN3065
The bed is about sixty feet long. I was able to fit in about 40 something peony plants. I laid the plants out according to colors in a manner I thought I'd find pleasing. The color blocks really work well. I don't think I would've been as happy if I just randomly scattered the colors in this bed.
DSCN3064
The yellow of the 'Carolina Moonlight' baptisias plays well off from the pinks, whites, reds, and maroons of the peonies. The bonus is the flower form of the baptisias is most complementary to the rounded and full bloom of the peonies. Those peonies look like cupcakes to me! That might be why I like them so much because I love cupcakes.
DSCN9050
To show you where this bed started we go back to October 2013. I was surprised to learn I had actually turned over the soil in this bed. Despite this the weeds such as lespedeza have been an issue. Lespedeza had long roots that are wiry and difficult to pull and I would've thought turning the bed would solve that issue. Starting new gardens in a former field is really a big pain. All of the peonies are dejectedly hanging out waiting for planting. The best time to move peonies is in the fall. All but a few of the transplants survived. You must leave a couple of eyes for the plant to grow. On some of the divisions I barely had one eye but that's okay. Dividing plants is free and I have plenty so I have replaced the few that have died.
DSCN9049
Here is another shot of the bed. It is so interesting to me to see how beds transform over the years. Fortunately for gardeners we have that kind of time and before you know it you have full mature gardens. This peony bed will continue to mature and get better as the years pass. One caveat, you might not wish to plant all of one kind of plant in a bed because if a disease or pest does strike it might take out the whole bed. That is an individual decision tho and as for me I chose to garden my way. The peonies have not been bothered by animals, they are in a prominent position and are doing well.....

in the garden....
Words and Photos Property of In the Garden Blog Team, In the Garden

Thursday, May 14, 2015

Mosaic Windows

BY SKEETER
 The Master Gardener here at In the Garden, Tina has inspired me yet again, to create a fun craft for my GEORGIA GARDENS. Click Here for the popular Posting of Tina's Mosaic and how she created it.
Soon after Tina had posted that wonderful tutorial, back in 2009, I decided I needed one as well. I picked up 3 old wooden windows at the Rehab store for a mere $5.00 each. Those 3 windows have spent the past 5 years tucked away in a storage closet just waiting for me and this project. Ha, I have such intentions but as I age, it seems I have issues becoming motivated to follow through with my plans. I am trying to get over this issue but I feel I am fighting a loosing battle at times. Sigh... 
Winter is a great time to take on crafty type projects so finally, the windows came out of the closet and into the sunroom. The windows had been a set of odd windows to a home therefore, there were metal tracks on them. I asked the Saint if he could cut them off for me. With us not having the proper tools for that job, we got assistance from a neighbor/friend with the proper tools. Thanks Dion for your help.
 The cuts exposed holes where the casings and grid were attached together.
 
No problem as I have filled many holes over the years. Out came my wood filler.
I filled the holes using a putty knife removing excess filler.
 These were small holes where hinges were attached.
 Once the filler was dry, I sanded the area smooth.  
 Next, I painted 2 of the window frames black.
 I do most of my craft projects in the sunroom as I enjoy the natural lighting from the surrounding windows.
 I allowed the windows to dry and cure a few days before moving forward with this project.
 I found many different colors of glass rounds at different crafts stores to include Michael's, Hobby Lobby, The Christmas Tree store and even the Dollar Tree!
 The fun part is creating a design using all the different colors.
Once I had my design in place, Out came the E6000 Glue. Be careful when purchasing this glue as you want to use the Transparent color! I found this out the hard way and now have an opened tube of Black Glue. Grrrrr....
 Here is the second pattern I created. As Tina mentioned in her tutorial of Mosaics, be sure to use plenty of glue or the glass rounds may not adhere to the glass panels. 
 I allowed the glue to cure several days before starting the next step.
 Now comes the messy, time consuming, tedious and at times, frustrating part of this craft.
 I chose Black Grout (no sand) to match the black trim of the windows. I had the Saint mix small batches and I put it into a baggie and cut a tip for easy application. More so like when cake decorating with icing.
This was such a slow process for me, that the panels were drying way too quickly. So I would grout a panel then lightly wipe a panel. Then tend to another grouted panel before starting to grout the next panel. I felt I was keeping up doing it this way. It took many times of wet wiping them before they were finished. Very time consuming.
 
 I was finished with the grouting process, on March 11, 2015. The windows have been sitting in the sunroom waiting for the Saint to hang them for me. As me with my "putting off" things to be done, the Saint has been in no hurry to hang them. I have harassed him a bit but he knows that I understand that some things take time. Ha ha.. 
  The windows were now very heavy so the Saint and I had to carefully chose good quality heavy duty hooks and chains for hanging them securely to the front porch. 
 I had the Saint hang them on each end of the front porch.
Opposite side of porch with swing. 
 This one has the morning East Sun shining through it.
This one has the evening West Sun shining through it. I am so happy with the way these two panels turned out. I still have one window that I have yet to create but in time, I will get to it.
I am so grateful to Tina for sharing her Mosaics with us on this blog and inspiring me to make a couple of my very own.
Click Here to see another of Tina's wonderful Mosaic creations. This is a great way to recycle old windows into a work of art. I just love these MOSAIC WINDOWSIn the Garden...

Words and Photos Property of In the Garden Blog Team, In the Garden

Wednesday, May 13, 2015

The Prairie-Rock Garden Update and Amsonia!


DSCN3011
The oldest garden on our property is the garden I call the 'Prairie Garden', tho one might consider it a rock garden as well I suppose. Two years ago I claimed this particular spot for an oasis in a tick infested wild field. The little gazebo was built along with a patio then I set about thinking about a garden. Because one side slopes quite a bit and I had lots of rocks at my other house, I decided to build a small rock wall and back fill the area for a garden. These pictures were taken in the morning when the eastern sun was blocked by the shade trees but generally this garden gets full sun from late morning to the evening. I surmised tough plants that would make a big impact in this area were needed. I like native plant communities so I tried to pick prairie plants to grow in this garden. Finally, I can see the results of my hard work and my intuition paid off in my plant selections. This is a view from about 75 feet away. The house is actually over 100 feet away so individual plants would get lost. Therefore this garden has a limited palette of plants and they are primarily massed. Let's take a closer look.
DSCN3005
When you garden on a hill is makes sense to put taller plants in the lower area tiering to shorter plants as the hill rises. This is so you can see the whole garden and so that you don't feel like you are tipsy. Balance comes into play so that you can see the entire garden from any spot you chose to stand on so you must not only think of tall plants in the lower part of the hill but also you need to tier that part of the hill from a lower spot and not just from a high spot. The gazebo is the high spot in this garden and there are two sections of the garden. This northern side is complete. The southern side is not anywhere close. It was dug up for the electrical lines and will soon be dug up again for another line. My poor plants that I jumped the gun and planted on that side struggle. Looking to the south toward the gazebo we have wild phlox (it was not planted by my hands but I let it grow), catmint, baptisias behind the wild phlox, and amsonias behind the catmint. Groupings in this garden are no less than five to a group. Amsonias and baptisias are spaced at least four feet on center to allow for mature growth of these very large plants.
DSCN3006
There is still space between the amsonias but remember these plants are only a few years old. They will continue to grow and soon this space will be gone. Catmint quickly fills in its allotted space with no problem.


DSCN3010
The amsonia is glorious this year. The blue is rather subtle but really makes an impact. In the background I planted some pink irises. The pink and blue are a great combination.
DSCN3008
The blue of the baptisias play off from the blue of the amsonias. I am okay with all this blue but in hindsight a contrasting color might have stood out a bit more.
DSCN3013
More of the amsonias. Behind the amsonias are very tall plants and a native prairie plant called helianthus. These are small sunflowers and this cultivar is 'Maximillian'. The little cushion of it behind the amsonia will continue to grow to about four feet high (amsonia gets to about three feet) and will bloom beautiful yellow sunflowers in the late summer. I also planted Tatarian asters, cutleaf coneflowers, and 'Northwinds' switch grass alongside the helianthus. All are considered prairie plants.
DSCN3007
Here is a close up of the wild phlox. I did not plant this but it is perfect there. Behind and to the left of the phlox is 'Autumn Joy' sedum. So far the deer have not bothered this sedum in the two years it has been here. They did taste it but mainly leave it alone. The sedum was spectacular last summer and as a bonus the flowers dry on the plant and last all winter.
DSCN3014
The pink irises like this spot. I just moved them here not too long ago but they still decided to bloom for me-that doesn't often happen after a transplant. Gladiolus and asters are in the background while 'Stella de oro' daylilies await their turn in front of the irises to shine with their yellow blooms.
DSCN3015
Changing gears a bit we jump over the southern part of this large garden on the other side of the gazebo. There is not much planted here because like I said, it has to be dug up for electrical lines. I did plop in some catmint and geraniums as well as 'Glow Girl' spirea. The textures and colors are nice together.
DSCN3016
I cannot say enough about 'Glow Girl' spiraea. Proven Winners sent me two plants two years ago and I planted them in this large garden. It is the only chartreuse in the garden but it holds its own. It is a rather slow growing spiraea and it appears it will stay smaller than most spiraea. The blooms stand out quite a bit and the plant is tough as nails. I am really loving this spiraea.

in the garden....

Also in this garden:  cup plant, tatarian asters, native butterfly weed (grown on its own), liatris, salvias, daylilies, coneflowers, Stokes aster, sedums, gladiolus and a few others that escape me right now. All tough plants. 

Words and Photos Property of In the Garden Blog Team, In the Garden

Tuesday, May 12, 2015

Riverbanks Zoo & Botanic Gardens

BY SKEETER
 No, not a new critter in my GEORGIA GARDENS but an adorable Kola Bear instead. The Saint and I took a day to enjoy one of our favorite day getaways. The nearby "Riverbanks Zoo and Gardens" over the Savannah River in Columbia, SC. Tina once accompanied us to this wonderful place. Click Here to see that winter posting.
 Tina talked last week about her Baptisias and after seeing her photos, (Click Here to see) I do believe this to be Baptisias as well. What do you think Tina? These were standing tall and proud.
 I love curvy brick walkways. Wish I could afford to turn all my pathways in my gardens into brick.
 We have had such beautiful weather this spring that most of the rose bushes in the Rose Garden were already finished with their first blooming cycle. But this bush was giving us a real show with Viola's below.
This is one of my favorite views of the garden. I just love water in a garden.
 I looked high and low for tags but could not positively ID this plant. I believe it to be Larkspur.  
 It along with Globe Allium were the blooming beauties during this visit. I do not recall us ever being at the garden in May.
 I enjoy going to the same gardens during different times of the year. They seem so new with different things blooming. I have yet to visit during the heat of summer. Not sure I would enjoy that as I do not like the humidity of summer. Maybe one day I will endure the heat to check out the summer gardens.
 I could not get enough of these two bloomers together! They surrounded the entire garden and I loved the purples together. This garden is in the process of massive upgrades along with the Zoo! Not sure where the funding is coming from but so happy to see it thriving when so many times nature and animals are put on the bottom of the list due to funding.
The reason this is one of my favorite places is Animals and Gardens! My two favorite things together!
We are excited about the expansions and plan to get back to the RIVERBANKS ZOO & BOTANICAL GARDENS, In the Garden...

Words and Photos Property of In the Garden Blog Team, In the Garden