Showing posts with label Clematis. Show all posts

Monday, May 26, 2014

Pawpaw Tree Shelters and Some Spring Bloomers


white milkweed
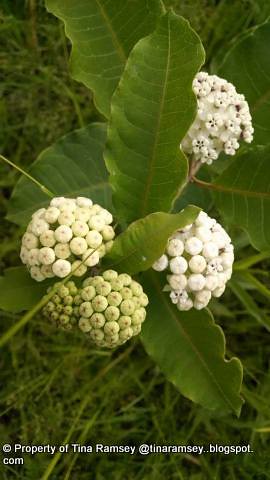
Today's post is really about pawpaw tree shelters but I could not resist putting in a few pictures of flowers on the land. A lot of these flowers are new to me and if you follow this blog regularly, you will know I am enamored of native wildflowers. We have a lot on the land and nurturing them while keeping the forest at bay has been a delicate balancing act for me. Last year the above white milkweed (Asclepias variegata) was bushogged down just prior to blooming. All this time I actually thought this milkweed was common milkweed. I was delighted when it bloomed to finally identify it as white milkweed, aka redring milkweed after initially misidentifying it as whorled milkweed. This plant is really nothing like whorled milkweed other than the color of the bloom being white. Can you see why it is sometimes called redring milkweed? The red rim around the center of the flowers as shown in the fully opened flower on the above picture is where this common name comes from. This milkweed is a milkweed of open forest area and is not usually found in great quantities so the butterflies sometimes don't find it. When they do, however, there is a lot of nectar for them and the bees. This is a native milkweed that likes rocky, dry, mesic soils. This is exactly what this plant and a few other close by ones get on the farm on the back 40 I affectionately call 'Wildflower Hill'. My little group grows on an east facing slope under a dogwood and oak tree. They are in a perfect spot for viewing and that is just what I do.
DSCN1084
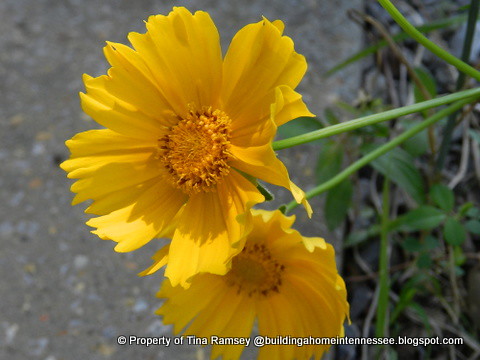
We also have some native coreopsis blooming on the farm and boy oh boy is it ever pretty. Not only do the flowers look great but the buds are quite large and distinctive. I believe this native coreopsis to be Lanceleaf coreopsis (Coreopsis lanceolata). If I am wrong please let me know. Like I said, wildflowers are new to me and it has been a steep learning curve since I really don't actively cultivate many wildflowers in my garden. This one is not a flower I planted, but I have allowed it to grow near the gazebo in a somewhat wild area of the new garden.
DSCN1068
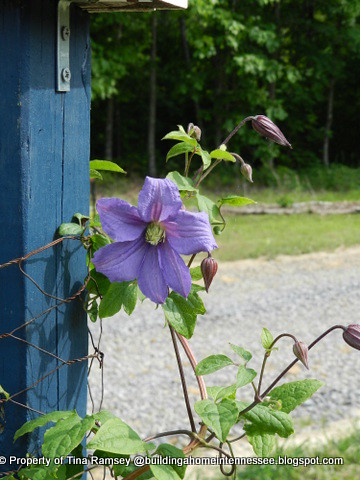
Now this little beauty is one flower I did plant on the farm into the new Crabapple Garden (post coming next Monday). I was thrilled to see it still continued to grow and bloom despite being dug up and moved. Clematis is one of those easy plants to move that does not overly resent disturbance. I have moved several plants that do resent disturbance. At some point I need to prepare a post on my experiences with moving plants. I've moved thousands now which include: trees, shrubs, bulbs, perennials, grasses, vines, and annuals. Some of the plants have really amazed me with their resilience, while others have really shocked me when at first they seem to be doing well but then they die. This mainly happened to shrubs I moved last fall that were not quite ready for our winter. I tell you one key thing with being successful with moving any plant is to time it right. You can move a hydrangea successfully in spring and early summer but if you wait until late summer or fall don't expect it to make it through the winter. Azaleas, camellias, and a few other plants are like this too. For the most part I try to tailor my move times to the specific plant. There is no one size fits all but clematis can be moved pretty much anytime.
DSCN1085
The primary purpose of this post is to talk about tree shelters. I ordered three pawpaw 'trees' last fall from Hidden Springs Nursery in Tennessee. Hidden Springs was one of the nurseries recommended by Kentucky State University's Pawpaw program. I must say I have been delighted with the results! When the little whips arrived last November they looked pretty pitiful. I had little hope they would do well but the one way I could tell they were alive was pretty foolproof for me. Just scratch the bark a bit and look for green. All of mine had green so I planted them as instructed and hoped for the best. 

I had done a lot of research prior to ordering my orchard plants and these new pawpaws were scheduled to go into the orchard. The instructions for planting and the research I found online said to cover the pawpaw seedlings for the first year or two or three to protect them from the sun. It seems pawpaw seedlings do not do well in full sun while young, but once they are mature they will prosper just fine in full sun. This is the reason you see most pawpaw groves in the shade. 

Finding our very own pawpaw grove on our land was a goal of ours and while we hunted very hard for one last year we could not find one. Hence the pawpaw whips purchased for the orchard. Finally this year was the ticket to find a pawpaw grove on our land! The area the grove is in is not only partly shaded, but it is a low area prone to wet periods. which will help with cross pollination of these new cultivated pawpaws. The wild pawpaws do not need any tree shelters but are in a location that will perhaps help out with cross pollination of our cultivated pawpaw seedlings. 

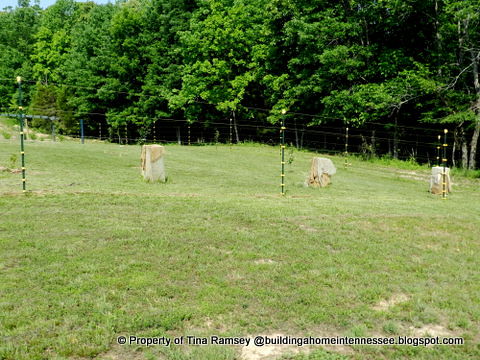
Back to our pawpaw seedlings and how to cover them to protect them from the direct sun. I could not quite figure out how to cover them. It was recommended from several websites to use 'tree shelters'. I am not quite sure what tree shelters might be, and it is pretty hard to buy tree shelters so I created my own. Can you see the bur-lapped boxes in the above picture? Those are my three tree shelters covering my pawpaws (KSU, Overleese, and Sunflower). 

The shelters look really weird and seem out of place in the orchard but are vitally necessary. I made my shelters from some old pepper cages I had on hand and covered them with burlap I had saved from other plants. The burlap allows rain and some filtered light to get to the plants but protects the plants from the direct rays of the sun. I hoped the shelters would work to aid the pawpaw seedlings but I had no idea if the pawpaws even made it through the winter since pawpaws leaf out late. I really have not had the time to check on the pawpaws until recently. Looking in those shelters just was not a priority for me but Mr. Fix-it peeked under the cover and look what he discovered!
DSCN1087
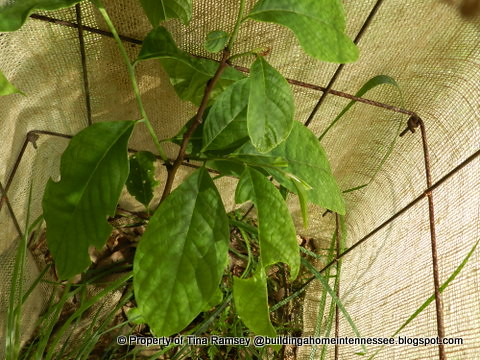
The pawpaw seedlings are doing quite well. All three have leafed out and have put on a lot of growth since the growing season started. While it appears this one is being chomped by some pest, I have not had the time to investigate what it could be or how to treat it. I was just excited to see that the pawpaws leafed out and are doing fantastically. This is more than what I can say about some of my orchard trees that were planted as whips the same time as these pawpaws. Every one of the whips (14 total) have leafed out but some have leafed out better than others. I'll prepare a post on the orchard one day. The orchard has been a dream of my husband's because he believes in growing his own food. Of course in our case I do the growing; he does the picking. Me on the other hand, I know how difficult growing fruit trees can be so I was not as enthused with the orchard idea though it has been a fun experience. I think once the fruits start coming in we'll really be having fun. This year we will only be picking muscadine grapes and blueberries but hey, it's a start. And for now those pawpaw seedlings are looking great and I look forward to picking some fruit from them in a few years. I think by next year I will have to raise the height of the tree shelter to accommodate the growth of the pawpaw seedlings but for now I must say the pawpaw experiment has been an awesome time....

in the garden....

On today's Memorial Day I think of all the brave men and women who have fought for our freedom, but mostly I think of those in my family who have paid the ultimate sacrifice to ensure our country stays free. Take a moment today to give thanks, if only silently, for all you have in life. I will be doing the same...in the garden...

I made a mistake when I watermarked all of the photos on this post and several more that will be posted this week. I forgot to change the url to the correct one for this blog. Rather than remove these, reload the correct ones, and re-tag everything I have decided to leave them as they are. It is not like the watermark really stops folks from lifting photos anyhow as I have so often found but in case you, loyal reader and never a person who lifts the photographs from here, was wondering now you know why. That url on these is one that leads to my private blog about my home build. I will not be sharing that publicly with anyone but did watermark the photos.  
Words and Photos Property of In the Garden Blog Team, In the Garden

Tuesday, May 7, 2013

Clematis Collection

BY SKEETER
 Before we talk about Clematis today, I want to show you something I had been hoping to see here in my GEORGIA GARDENS. The Red Honeysuckle and Yellow Jessamine blooming simultaneously!
 The bright yellow Jessamine has since faded but I was so happy to see the two playing together!
 I have never had luck with Clematis in the past. Looking back, I have learned that I may have been too quick to assume the vine was dead. Thus, they were more then likely pulled from the ground before they awoke from a Winters Nap. I have learned my lesson. Here you see Ernest Markham. This one is located on the left side of the Garden Swing.
 Here you see a Multi Blue mingling with another Honeysuckle vine. These are located on the right side of the Garden Swing.
I love this shade of purple. I hope in time that the Honeysuckle, Multi and Ernest shall meet in the middle and mingle a bit. May have to update these beauties next year.

On the same vine, a bloom a bit older showing a whiter center. Or is this a different vine? Could be, as I planted several last year and I may have lost track of a second one in this area.
 Clematis 'Allanah' a hybrid is located in the Semi-Formal Gardens. It climbs a Shepherd's hook to a Birdcage. 
 After a drought year with me, they all appear to be happy. I hope to add more in time but for now, this is my CLEMATIS COLLECTION, In the Garden...

Words and Photos Property of In the Garden Blog Team, In the Garden

Saturday, May 30, 2009

Bargain Bin

By Skeeter


I am a bargain hunter with pretty much anything I purchase. I do find myself spending a bit too much on certain things but most everything I have has been purchased at a bargain price. Who does not like a good Bargain right? Well here in my Georgia Garden I keep the bargains coming. Such a bargain was this Nelly Moser Clematis I found at the back of Lowes in the Bargain Bin or rack. If you are not aware of this little secret, the next time you are in Lowes, go to the back of the Garden Center and look for a rack of pitiful plants in sad shape. You can weed through them and find some great potential at bargain prices. Most all plants are half price if not more! I do believe Tina has shared this secret with us before. But as a bargain hunter, I must remind you of the bargains out there.
I have never had a Clematis before so did not know much about them. I have seen them in Tina's gardens and other gardens via your Blogs. I knew I had to have one some day. The day came last Fall. I found this pitiful looking Clematis for $2.00 and decided, hey, why not. So, I will order water instead of a drink the next time we eat out. There, I can justify the price of 2 dollars, right?
I planted the thing and watered it well during the drought times last fall. I did not snap a picture of it then as I really did not think it would survive, it was that sad to the eye. Then winter came and plenty of rain so no more care from me. And look what happened this Spring! Nelly has thanked me with blooms! My first Clematis blooms! Of course I planted this on the mailbox post. My mailbox planter has never looked good but 2 times in the 8 years we have been here so I needed something to perk things up a bit.
And Perk, we have done. Just look at that beautiful bloom!
And this one with the sun shining on it. It just glows like the daffys once did in this planter.
And now we will go into the depths of this beauty!

I hope Nelly thrives and continues to give me beautiful blooms. She sure was a find at the BARGAIN BIN, but now In the Garden...

Note: I will show you more bargains soon!

Tuesday, May 12, 2009

Clematis in a Tree


An old gardeners' trick is to plant clematis in a small tree or shrub. Well, not actually in the tree, but at the base of a tree or shrub. Clematis is an ideal vine to plant in this manner since it is a fairly light vine as compared to vines like wisteria and trumpet vines. I would not recommend planting a Sweet Autumn clematis in a tree though, stick with the lighter types like Jackmanii or Nelly Moser, please use common sense when choosing a vine to plant in a tree.

I chose an few varieties that have slowly begun to come into their own. The clematis blooms are a nice surprise to find 'growing' in a tree. The crabapple pictured above has a purple clematis growing in and amongst its leaves. This tree will have these 'purple blooms' off and on all summer as the clematis blooms off and on. I have several trees planted in this way, but this clematis is the only one blooming right now so I can't post the other pictures, maybe later.

Planting clematis in this way is a win/win situation in my book. The clematis gets a good support, and the tree gets some extra blooms. There is one drawback though, since the clematis vines are somewhat shaded by the tree, the blooms do tend to be smaller and it takes longer to get the clematis growing enough to make a big impact. But that's okay with me, I have nothing but time and plants and at some point they will all be mature...

in the garden...

Wednesday, April 30, 2008

Clematis: The Puzzling Queen


Clematis is a versatile and rewarding vine to grow in one's garden. I think of them as the 'Queen' of vines. I love them and find them very easy to grow, but a bit puzzling because of the pruning requirements.

After umpteen years of gardening and doing it a bit haphazardly I might add, I have decided to get organized and to learn so much more. One of the things I need to learn is not only how to prune clematis, but which clematis needs which type of pruning. That would assume the gardener knew what type of clematis he or she planted in the first place! I don't keep good enough records so this is a problem for me. I am slowly working on that problem now that I generally understand clematis.

Clematis are grouped into three groups for the purpose of pruning. You must know the variety you planted in order to know which group it is in and how to prune it. According to Sandra Mason from The University of Illinois (http://web.extension.uiuc.edu/champaign/homeowners/031004.html), the three groups are known as: Group 1, Group 2, and Group 3.


Group 1 clematis bloom on old wood and generally bloom between April and May. Some Group 1 varieties I grow are: C. macropetala, C. montana and 'Snow Queen'. Others in this group include: C. armandii, C. alpina and C. cirrhosa. This group requires no pruning except for the occasional trimming of dead. The four varieties pictured on the arch fall into this group (I think). I believe this is right because I have never pruned these four clematis for fear of destroying them. They have still bloomed wonderfully so I am really thinking Group 1?

Group 2 clematis bloom mid-season and are double or semi-double cultivars. This group will repeat bloom and needs only light pruning. If cut to the ground it will still bloom, though later in the season. Some Group 2 clematis I grow are: 'Nelly Moser' and 'Miss Bateman'. Miss Bateman is growing on a picket fence in my lower garden (fourth picture with birdhouse). I know this because I recently found the label stuck into the ground next to the vine. What a relief! I have now logged it so I do not have to rely only on the label in the future. I have not pruned these clematis either. Come to think of it, I don't prune any of my clematis though I should.


Group 3 clematis bloom on new wood and include many brilliant and favored cultivars. This clematis should be pruned in early spring before new growth begins. If it is not pruned, it will likely produce blooms only at the top of the vine out of sight of the gardener. Some Group 3 cultivars I grow are: 'Jackmanii', Sweet Autumn Clematis, 'Comtesse de Bouchard', 'Ernest Markham', 'Henryi', and 'Crimson Star'.

The black metal arbor over my side gate is the crowning glory of my clematis. Every time I walk through this arbor I feel like I am in Hawaii or some other tropical location. I have never been to Hawaii, but somehow envision it with lovely draping flowers hanging from the trees. The flowers might be mandivilla or bougainvillea and not clematis, but I feel the clematis takes its place here in my locale. It is kind of neat how the flowers open all the way up the arbor and just seem to drape themselves around it. As an added bonus, the spent flowers and ensuing seed heads are so intriguing. They remain on the vine all winter and somewhat resemble spiders with twiny tendrils coming from the center of the spent flower. Not all clematis have the same seed pods, so you might want to be sure and buy it not only for the flower, but for the seedpod.


From now on when buying and purchasing clematis, I am researching and selecting exactly the right clematis for the purpose intended. I recently installed two twin arbors upon which to grow clematis. I chose 'Crimson Star' in Group 3. Crimson Star should bloom a large brilliant red and only on new wood. I desired the Group 3 because I wanted to be able to control its growth. As you can see on the above arbor, clematis can get quite large and bulky. They become a tangled mess after just a few years. Finally, I am getting it together by choosing the right plant for the right spot and for my purposes. It felt good but we'll see if it works out. That is the part about gardening that can never be predicted, whether or not all will go according to the 'best laid plans'.

How do you grow clematis now that you know a little about pruning? Well, I can only tell you how I grow my clematis. First and foremost they need a support on which to twine. The support needs to be fairly thin so the clematis can grasp it with its tendrils. Clematis will not stick to large smooth poles and you will have to tie it up if this is what you are using. I had to add a criss cross of metal wiring between the two support poles of this arbor in order for the clematis to be fully supported. Even then I do have to sometimes tie and direct the growth. Another technique for supporting clematis is to plant a clematis at the base of a small tree or shrub and allow the clematis to twine into the tree or shrub. It is a beautiful effect, but one I have had limited success with since the clematis cannot get all the sun it really needs when planted below a tree. You can see one of my clematis blooming among the crabapple leaves in the last picture. I have planted clematis at the base of all my crabapples and learned this is an old gardener's trick. I love learning secrets from experienced gardeners, secrets not found in gardening books.
Once you have a good support, take time to prepare the hole. I add compost and plant my clematis deeply. Most clematis like full sun with their roots shaded. Shading can be accomplished by simply placing stones on or near the base of the clematis. These four clematis growing on this arbor are planted in less than ideal soil conditions and are cramped, but they have excelled. The clematis growing on my picket fence have much better conditions but only get part sun. They are also doing well. Clematis are truly not difficult to grow, the difficult part is the pruning, but only because you have to keep good records of the 'Queens' you plant in your garden.

in the garden....