Showing posts with label Bricks. Show all posts

Thursday, August 9, 2012

Foundation on the West side

BY SKEETER
Here you see the West Side of the house. Kind of boring with not much going on in my Georgia Gardens back in 2008.
Here you see the blank canvas before the Beach Planter took place. To the right of the cement pad, you shall see another small planter take shape as we scroll.
Here you see the Beach Planter that we talked about on Tuesday.
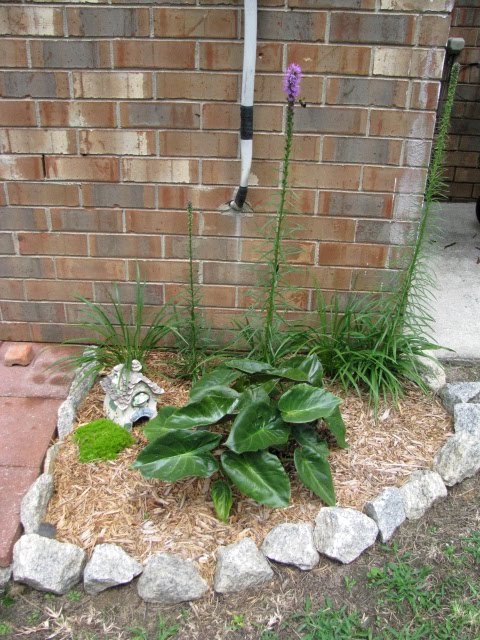
Now to the right of the cement pad. Grass was dug out, holes dug, plants inserted, rocks set into place and mulch spread. The 5 gayfeather bulbs to the back were planted at the same time. They each grew at a different rate. Strange how that happens, eh. The Irish Moss was left over from another project. More on that to come.
We jump to June 7 and see some blooms. Ha, I just noticed a bee buzzing by the gayfeather!
Jumping again to July 19 and we can see that only 3 of the gayfeather bloomed. The elephant ear is from a bargain purchase from McCorkles Nursery last year. It looks as though the ear survived its first complete year with us.
Moving in a bit closer, we see the Irish Moss is doing well. I also see a weed that needs to be pulled. The Toad Abode gives a bit of a fairyland thought to the mind.
Moving to the left side of the AC/Heat unit, we find the Sagina Platform back in April. Click HERE to see how it was created if you missed it.
Jumping to June 27, we find the Black Elephant Ears (also from McCorkles last year) are doing well. I added the green Elephant Ears from those I took away from the Semi-Formal Garden last fall.
All Elephant Ears are doing well in this spot. They get lots of sun and lots of water from the AC run-off. Free watering, HA, not really as every time that AC runs, she is eating up money. This picture was also snapped on June 27. Keep that date in mind.
Pulling back for the long shot, you see the entire West side of the house. What was once boring is now filled with interesting things to view. Hum, how can I hide that darn ugly electric meter?
Jumping to present day, we find that the heat and sun have finally taken its tole on the Sagina. Sigh, I was afraid this would happen.  I am really surprised it lasted as long as it did with our extreme high temps and blazing sunshine of the hottest time of day upon its lush green. I still like the look of this platform and want to keep it similar. Any ideas on what would work in this spot and take extreme heat and like moist areas and stay low to the ground? There you have it, the FOUNDATION ON THE WEST SIDE, In the Garden... 
Words and Photos Property of In the Garden Blog Team, In the Garden

Friday, March 13, 2009

A New Brick Patio Made with Freecycle Bricks

I have been extremely fortunate to be the recipient of many wonderful things for the garden. Last September I posted about Eric and the nearly 400 bricks he kindly gave to me. He was doing a landscaping job for a client and she did not want bricks edging her garden (what was she thinking??), anyhow he gave them to me via Freecycle. I have always wanted a brick patio, but was not entirely sure I could make it work with just 400 bricks, and was not prepared to buy more. I also had no idea where I would put the patio, but knew it should be near Mr. Fix-it's garage since it was to be a gift a for him. After letting the bricks sit on a pallet all winter I have finally chosen the spot, a perfect spot not far from the pool and close enough to a garden and the garage so as to be accessible, yet secret and cozy and private.

Once I chose the spot (next to a wide raised bed with two oak trees and an Eastern Red Cedar growing in it) I dry laid all of the bricks on the grass to make sure my plan would work. This is not as easy as it sounds. While bricks by themselves are rather easy to work with, try laying out 400. Not an easy thing to do. The really bad part was I then had to move them all. Thankfully the Jimster came home from school and took over for me. My body still aches! The rocks show the outline of the new 'Secret Patio Garden'. More on that later.

Now that the bricks were all moved, excavation could start. The area had a very slight slope to it so I had to compensate for this by digging deeper on the upper area of the patio spot. All of the excavated soil and sod was turned over into the garden area surrounding my new patio. What I did was actually turn over the soil in the garden area, then dig the patio area and place that excavated soil on top of the turned soil. This created a raised bed equal to the existing raised bed. I had plenty of rocks to line the new beds around the patio. I had planned for two entries onto the patio. These two entries were
diagonally across from one another with easy access from Mr. Fix-it's garage and the swimming pool. Excavating the site to a good 8" deep on the high side and about 6" on the low side while building the new gardens took about 3 days. Phew!

The next step was to get the #8 drainage fill from a local trucking company. One ton of this fill is enough to do a 10'x 10' square area 4" deep. I knew one ton would be more than enough since my patio was a 10' circle, and not a square. The extra was placed under the roof overhang on Mr. Fix-it's garage. Thank goodness Mr. Fix-it downloaded the gravel for me. He made it all look so darn easy!! I made sure the gravel was fairly level and packed tightly before moving on to the next step. You can see we were working in the dark trying to get the job completed.

The next step involved another trip to town to get 1 ton of sand to cover the gravel to a depth of about 2-3". One ton more than did the job, but I made sure I kept the extra to apply to the top of the bricks after they were laid and to fill in low spots as I laid the bricks. However, before I applied the sand I laid a good quality landscape fabric on top of the gravel. I prefer this separation between the sand and gravel and have had good results in the past. I always overlap the landscape fabric and leave plenty of extra around the patio. I started down the middle of the patio by laying one complete row of bricks. This would be the baseline. It is vital to get it perfectly level.

Once the sand was spread and leveled it was time to lay the bricks. Initially I had desired a circular pattern for the bricks, but there was no way I was going to chip every single brick. Economically and realistically using a basket weave design made much more sense to me, and it was the design I had dry laid earlier. I love the basket weave design and tend to use only that pattern when laying pavers
or bricks. It is simple, attractive and quite functional.
I used both a level and a small 2x4 to ensure the sand was level and packed down. I also checked my brick level ensuring I had about 1/4 of drop per foot in order to allow for drainage of standing water. I did not want water puddling in the patio. You cannot even tell the patio is sloped but it sure helps with drainage and is very important. I built my patio away from my home, but if you build one next to your home drainage is vitally important-always drain away from your home.

Finally I swept extra sand into all the grooves and packed it down as best I could. I let the rain do the rest. I find regular sand works fine and packs down really well over time, but many folks and experts recommend polymeric sand; which is a sand that expands when wet. This is a hard sand to find in my area. I know Cameron said she found some in bags at a store in her neck of the woods in North Carolina, but it is nigh on impossible to find it here in my area. If you can find this sand, it would not be a bad idea to use it and I may add it to my patio at some point. With light traffic and proper building techniques I believe I'll be fine with mine the way it is for now.

This entire patio costed
me a total of $70; which included $15 for the landscape fabric, $25 for the sand, $8 for a composite edging, and $22 for the gravel. A real steal that required only a bit of labor on my part, and the kindness of strangers who are willing to give away products that would otherwise wind up in the dump.

And now the patio is complete! Don't mind the sand. I am letting the rain wash it down to ensure the bricks are very tightly packed. Now all we have to do is sit back and enjoy-yeah right! Seriously, Mr. Fix-it and I have been enjoying this new sitting area tremendously. It is quite comfortable, small and cozy. We do relax here often.
I'll post on the surrounding garden at some later point. Stay tuned for a very BIG addition to this garden and a fellow blogger's signature plant that is so 'squeaky' it just must go....

in the garden....

Can you guess what kind of plant might squeak? Do try to guess prior to checking out the link if you are of a mind. Another tip is that the plant is also known as pigsqueak. You all have a great weekend.

Tuesday, September 9, 2008

Thanks Adam and Freecycle!


I have spoken of Freecycle many times before and will continue to do so because I just love this group! I have been fortunate to be the recipient of many wonderful things for my garden. Some things include pickup trucks full of Stella de Oro, limestone blocks, concrete chunks, concrete pillars, irises, peonies, millstones like things, metal fencing, and bricks, to name just a few.

Adam recently posted on Freecycle "Offer: Bricks". I can tell you that caught my eye quickly! I LOVE bricks in my garden. All stone is good because it does not rot and fits right in. I can usually maneuver it easily and bricks are my favorite material to work with. It is so classic and fits into all landscapes. I responded right a way and was stunned I was chosen to pick up these beautiful bricks.

Adam said he had about 150 of them when he posted. When all was said and done on the sunny day I picked them up, there were 340! Adam worked very hard at digging them out of an old and established garden. The homeowner wants to remake her garden and she left the job in Adam's capable hands. I did ask Adam several times if he was sure he wanted to give all these bricks away and he assured me yes. He was planning to edge the new gardens with a more modern type of edging material. I know, I know-maybe bricks aren't modern but they sure are classic and I can't imagine not using them in my garden, but I am betting Adam will make this garden beautiful and perfect for the homeowner.

I convinced Adam to pose for a picture with the bricks for my trusty camera and he was okay with being posted on here. I want to say thanks Adam! And be sure to email me when you are have the rest out!

There is no guarantee you will get some great bricks, but I do guarantee you will not be disappointed with this worthy email group. If you have a good story to share about Freecycle or friends sharing with you-do let us know here at....

in the garden....

Adam, the election will be a very interesting thing and thanks for making my day with you kind comments about my email and blog! I hope I didn't disappoint. Glad to see this blog works!