BY SKEETER

The Master Gardener here at In the Garden, Tina has inspired me yet again, to create a fun craft for my GEORGIA GARDENS. Click Here for the popular Posting of Tina's Mosaic and how she created it.
Soon after Tina had posted that wonderful tutorial, back in 2009, I decided I needed one as well. I picked up 3 old wooden windows at the Rehab store for a mere $5.00 each. Those 3 windows have spent the past 5 years tucked away in a storage closet just waiting for me and this project. Ha, I have such intentions but as I age, it seems I have issues becoming motivated to follow through with my plans. I am trying to get over this issue but I feel I am fighting a loosing battle at times. Sigh...

Winter is a great time to take on crafty type projects so finally, the windows came out of the closet and into the sunroom. The windows had been a set of odd windows to a home therefore, there were metal tracks on them. I asked the Saint if he could cut them off for me. With us not having the proper tools for that job, we got assistance from a neighbor/friend with the proper tools. Thanks Dion for your help.

The cuts exposed holes where the casings and grid were attached together.

No problem as I have filled many holes over the years. Out came my wood filler.

I filled the holes using a putty knife removing excess filler.
 These were small holes where hinges were attached.
Once the filler was dry, I sanded the area smooth.

Next, I painted 2 of the window frames black.

I do most of my craft projects in the sunroom as I enjoy the natural lighting from the surrounding windows.

I allowed the windows to dry and cure a few days before moving forward with this project.

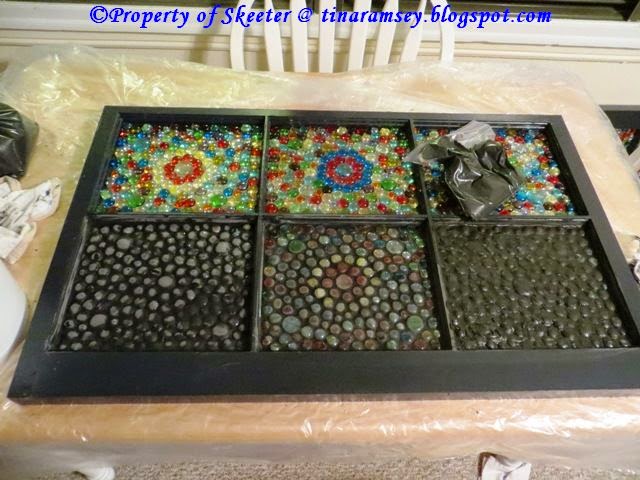
I found many different colors of glass rounds at different crafts stores to include Michael's, Hobby Lobby, The Christmas Tree store and even the Dollar Tree!

The fun part is creating a design using all the different colors.

Once I had my design in place, Out came the E6000 Glue. Be careful when purchasing this glue as you want to use the Transparent color! I found this out the hard way and now have an opened tube of Black Glue. Grrrrr....

Here is the second pattern I created. As Tina mentioned in her tutorial of Mosaics, be sure to use plenty of glue or the glass rounds may not adhere to the glass panels.

I allowed the glue to cure several days before starting the next step.

Now comes the messy, time consuming, tedious and at times, frustrating part of this craft.
I chose Black Grout (no sand) to match the black trim of the windows. I had the Saint mix small batches and I put it into a baggie and cut a tip for easy application. More so like when cake decorating with icing.
This was such a slow process for me, that the panels were drying way too quickly. So I would grout a panel then lightly wipe a panel. Then tend to another grouted panel before starting to grout the next panel. I felt I was keeping up doing it this way. It took many times of wet wiping them before they were finished. Very time consuming.
I was finished with the grouting process, on March 11, 2015. The windows have been sitting in the sunroom waiting for the Saint to hang them for me. As me with my "putting off" things to be done, the Saint has been in no hurry to hang them. I have harassed him a bit but he knows that I understand that some things take time. Ha ha..

The windows were now very heavy so the Saint and I had to carefully chose good quality heavy duty hooks and chains for hanging them securely to the front porch.

I had the Saint hang them on each end of the front porch.

Opposite side of porch with swing.

This one has the morning East Sun shining through it.

This one has the evening West Sun shining through it. I am so happy with the way these two panels turned out. I still have one window that I have yet to create but in time, I will get to it.
I am so grateful to Tina for sharing her Mosaics with us on this blog and inspiring me to make a couple of my very own.
Click Here to see another of Tina's wonderful Mosaic creations. This is a great way to recycle old windows into a work of art. I just love these MOSAIC WINDOWS, In the Garden...
Words and Photos Property of In the Garden Blog Team, In the Garden


 We had a nice breakfast then trip to Lowe's for supplies. We picked out three 10 foot treated 2 x 4 pieces of wood. We carefully measured and cut them into 40 inch pieces and gave each side a 45-degree angle cut.
 Little did we know we would have to replace the top 4 x 4 with a new piece. So off to Lowe's a second time for a new 4 x 4. Back home and as the Saint was removing the screws, two of them snapped in half, argggg. The screws were not galvanised/zinc so over time, they rusted. We make sure to always use the correct items when doing outside projects. Too bad the previous homeowners did not install the swing frame correctly. So back to Lowe's again for 6 inch Zinc Lag Screws. Keeping up? That makes 3 trips to town for supplies, consisting of 4 pieces of wood and 6 screws!


