Showing posts with label Freecycle. Show all posts

Tuesday, July 5, 2011

Renovation update and "Freebies"

By SKEETER We, (Okay I) seem to keep getting us side tracked with our Home Renovation Project. Well, the Saint had us sidetracked for a bit with poison ivy in the eye, legs and arms. Yikes, that set us back a few days. McCorkles Nursery Bargains set us back and now Bricks become the culprit. Look at this haul and all for FREE! Who do you think loaded the Left side of the truck neatly while the Right side is kind of well, just tossed around? I believe I mentioned I have a wee bit of OCD in my bones. Neatness is one of my vices. Tina shared a little secret called Freecycle a while back and I signed up in hopes of finding some freebies for my Georgia Gardens. I have yet to find anything but have been able to pass along some old watches to a crafter and about 100 plastic garden containers to an avid gardener. I was happy to keep those items out of the land fill and given to someone else that can reuse them. I also discovered Free Items on our area Craigslist. Saturday morning, I spotted Free Bricks. What luck as this offer was from a nice person a few miles up the road in our same small community. We met with "Bee" and her nice husband and chatted up a storm as the Saint and I loaded the bricks into our truck. We had the best chat as we had so much in common with hubby's, both working on Ft. Gordon, us all living overseas and all loving animals! You all know the animal topic alone is enough to get me talking. LOL. Just look at those beautiful 480 clay bricks! Yes, I counted them. Another issue from OCD...
As we went into Bee's backyard, I noticed garden beds full of veggie's. She informed me this was her first go at gardening. I was very impressed as the beds were full of goodies. I have never seen such large bricks as this stack of 25. I am not sure when I will be able to work with these bricks, not until the heat departs for sure. Thank You so much "Bee" for the wonderful gift! I will be sure to let you know what I end up doing with these beautiful treats and good luck on your first gardening experience...
During our 4 day weekend, we were able to get some work on the Bath/Closet Renovations. Floor tile is in place and ready for grout.
This was our first attempt at tiling and it is truly a learn as you go experience. I hope we never have to tile anything else in the future. But one thing I have learned in my years is, Never Say Never... Well, we still have the shower to go. Yikes, that one scares me. We have all the tiles measured and cut for the shower so that much is finished.
The Closet is coming together and I am seeing light at the end of the tunnel. What was once my side of a small closet, is now all shelving. We shall move them to what ever height we desire. The Closet is painted and now has a new light fixture with a light shining on each of the three areas of the closet. The color of the light ties in with the faucet fixtures we chose for the sinks.
We have cut and installed the baseboards...
As well as the door trim. I shall get them painted in the next day or so. The door from the closet into the bathroom shall be a folding door. I hate doors as they take up so much room so a folding door works for me. For the main door from the hallway, we are going to install a pocket door.
I have the doors primed and ready for a final coat of paint. They are taking up most of the sun-room. I am sitting in between the two doors now as I type in a hard wooden chair as the cushy office chair will not fit. Not to mention, I don't want paint on my nice chair.
We are trying to save money by painting a few things. Here you see the brackets that will hold the clothes rods for the closet. This little guy, (actually pretty big guy) was on the back of a rocking chair on the front porch looking in the window as we worked. We got a kick out of him and today I spoke to him as we set up the Miter Saw on the porch. We feared a pop-up storm so we opt for the porch as our work area. No rain thus far but hearing a lot of thunder off in the distance. Come on rain. 
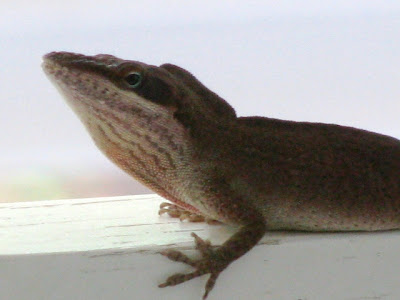
We were not sure what type of lizard this was as we have never seen one before. Upon my close up chat with him today, I noticed he was indeed an Anole Lizard that we see daily. But we have never seen one with a crown on its head and with such colors in its body. Reminded me of a Salmon Fish during mating season. Anyway, our little friend was happy on the porch watching us work.

I hope everyone had a wonderful 4th of July! We live behind the county Fairgrounds and soon will be hearing the Public Fireworks Display as it is becoming evening. Our 4 day weekend was full of RENOVATIONS AND FREEBIES, In the Garden...


Note: Lowe's in our area now recycles plastic garden pots! Check to see if your Lowe's will take your old pots...

Words and Photos Property of In the Garden Blog Team, In the Garden

Wednesday, June 1, 2011

A Broken Concrete Patio

100_2904
It is done-it's finally finished! And how I love my new broken concrete patio. The idea of building a patio from broken concrete was a good one-I thought anyhow. The only cost would be for the gravel and metal edging. Concrete is durable and easily found if you know where to look. I just knew I had a good idea to build this patio out of broken concrete until...
100_2559
We started the patio a bit differently than we normally would. I decided to lay out the landscape fabric first then add the gravel. I did not plan to add any sand to the base of this patio. I theorized the gravel would allow me to level the chunks of concrete and the sand would just wash away anyhow. Normally I would put the gravel down, then the landscape fabric then about two inches of sand. Not with this patio. All was well until....
100_2558
We (Mr. Fix-it and I) began placing the huge chunks of concrete in their places. The right side of this patio is higher than the left so we had to compensate for the grade change. We did this by building up the lower side with more gravel and by using the thicker pieces of concrete on that side. By the way, we drove to Evansville Indiana for these chunks of concrete. Mr. Fix-it and I loaded his truck-in the pouring rain. What a mess! I think it was worth it though. The concrete came from a man who broke it up and replaced it with flagstone. Funny enough you can see this concrete once started life as a broken concrete patio too-but the person added in mortar to hold the pieces together; whereas we only added gravel. 


When we first laid out all of these chunks of concrete I was quite skeptical. I thought the idea of a broken concrete patio was not going to work. The concrete did not fit together well at all and the gaps between the chunks were dangerous. One could easily break an ankle if one was not careful. The patio sat without a gravel filling or edging for about a month and it was not used at all. Finally, I had enough time to insert the metal edging ($15) along the outside of the patio (the back and sides are held in by limestone blocks) in order to level the patio and hold in the gravel. I then added two and one half wheelbarrows of crushed limestone. The crushed limestone worked like a charm to make a sturdy and firm footing for the concrete chunks! Due to the wide range of sizes of the grave the gravel packed into the cracks and gaps wonderfully and the patio became a real work of art. A work of art that was very sturdy with no fear of breaking one's ankle in the cracks. I'd say it is even strong enough to hold a chair leg in the cracks that is how well the crushed limestone packed down. I was so happy it worked out well and I did not have to start from square one again. The broken concrete of the patio base ties in with my other beds out front where I use broken concrete as garden edging and is a simple natural way to reuse what otherwise would be bound for the landfill. The broken concrete serves a purpose and looks good to boot. I find I am now spending a lot of time in the chaise out front....


in the garden....

Come back Friday to see how this patio is tucked into a large island bed garden. 
Words and Photos Property of In the Garden Blog Team, In the Garden

Friday, March 13, 2009

A New Brick Patio Made with Freecycle Bricks

I have been extremely fortunate to be the recipient of many wonderful things for the garden. Last September I posted about Eric and the nearly 400 bricks he kindly gave to me. He was doing a landscaping job for a client and she did not want bricks edging her garden (what was she thinking??), anyhow he gave them to me via Freecycle. I have always wanted a brick patio, but was not entirely sure I could make it work with just 400 bricks, and was not prepared to buy more. I also had no idea where I would put the patio, but knew it should be near Mr. Fix-it's garage since it was to be a gift a for him. After letting the bricks sit on a pallet all winter I have finally chosen the spot, a perfect spot not far from the pool and close enough to a garden and the garage so as to be accessible, yet secret and cozy and private.

Once I chose the spot (next to a wide raised bed with two oak trees and an Eastern Red Cedar growing in it) I dry laid all of the bricks on the grass to make sure my plan would work. This is not as easy as it sounds. While bricks by themselves are rather easy to work with, try laying out 400. Not an easy thing to do. The really bad part was I then had to move them all. Thankfully the Jimster came home from school and took over for me. My body still aches! The rocks show the outline of the new 'Secret Patio Garden'. More on that later.

Now that the bricks were all moved, excavation could start. The area had a very slight slope to it so I had to compensate for this by digging deeper on the upper area of the patio spot. All of the excavated soil and sod was turned over into the garden area surrounding my new patio. What I did was actually turn over the soil in the garden area, then dig the patio area and place that excavated soil on top of the turned soil. This created a raised bed equal to the existing raised bed. I had plenty of rocks to line the new beds around the patio. I had planned for two entries onto the patio. These two entries were
diagonally across from one another with easy access from Mr. Fix-it's garage and the swimming pool. Excavating the site to a good 8" deep on the high side and about 6" on the low side while building the new gardens took about 3 days. Phew!

The next step was to get the #8 drainage fill from a local trucking company. One ton of this fill is enough to do a 10'x 10' square area 4" deep. I knew one ton would be more than enough since my patio was a 10' circle, and not a square. The extra was placed under the roof overhang on Mr. Fix-it's garage. Thank goodness Mr. Fix-it downloaded the gravel for me. He made it all look so darn easy!! I made sure the gravel was fairly level and packed tightly before moving on to the next step. You can see we were working in the dark trying to get the job completed.

The next step involved another trip to town to get 1 ton of sand to cover the gravel to a depth of about 2-3". One ton more than did the job, but I made sure I kept the extra to apply to the top of the bricks after they were laid and to fill in low spots as I laid the bricks. However, before I applied the sand I laid a good quality landscape fabric on top of the gravel. I prefer this separation between the sand and gravel and have had good results in the past. I always overlap the landscape fabric and leave plenty of extra around the patio. I started down the middle of the patio by laying one complete row of bricks. This would be the baseline. It is vital to get it perfectly level.

Once the sand was spread and leveled it was time to lay the bricks. Initially I had desired a circular pattern for the bricks, but there was no way I was going to chip every single brick. Economically and realistically using a basket weave design made much more sense to me, and it was the design I had dry laid earlier. I love the basket weave design and tend to use only that pattern when laying pavers
or bricks. It is simple, attractive and quite functional.
I used both a level and a small 2x4 to ensure the sand was level and packed down. I also checked my brick level ensuring I had about 1/4 of drop per foot in order to allow for drainage of standing water. I did not want water puddling in the patio. You cannot even tell the patio is sloped but it sure helps with drainage and is very important. I built my patio away from my home, but if you build one next to your home drainage is vitally important-always drain away from your home.

Finally I swept extra sand into all the grooves and packed it down as best I could. I let the rain do the rest. I find regular sand works fine and packs down really well over time, but many folks and experts recommend polymeric sand; which is a sand that expands when wet. This is a hard sand to find in my area. I know Cameron said she found some in bags at a store in her neck of the woods in North Carolina, but it is nigh on impossible to find it here in my area. If you can find this sand, it would not be a bad idea to use it and I may add it to my patio at some point. With light traffic and proper building techniques I believe I'll be fine with mine the way it is for now.

This entire patio costed
me a total of $70; which included $15 for the landscape fabric, $25 for the sand, $8 for a composite edging, and $22 for the gravel. A real steal that required only a bit of labor on my part, and the kindness of strangers who are willing to give away products that would otherwise wind up in the dump.

And now the patio is complete! Don't mind the sand. I am letting the rain wash it down to ensure the bricks are very tightly packed. Now all we have to do is sit back and enjoy-yeah right! Seriously, Mr. Fix-it and I have been enjoying this new sitting area tremendously. It is quite comfortable, small and cozy. We do relax here often.
I'll post on the surrounding garden at some later point. Stay tuned for a very BIG addition to this garden and a fellow blogger's signature plant that is so 'squeaky' it just must go....

in the garden....

Can you guess what kind of plant might squeak? Do try to guess prior to checking out the link if you are of a mind. Another tip is that the plant is also known as pigsqueak. You all have a great weekend.

Friday, September 12, 2008

To Save a Life...or Two or Three

This post is actually about saving several lives. Freecycle is a really cool Yahoo Mail Group that I participate in. I talked about it on Tuesday when I received a bunch of bricks. I love getting free things and also offer up many things too. Plants always catch my eye when they are posted. The two yews you see below were not posted, but the lady who owned them gave them to me and Mr. Fix-it anyhow. We had visited her home to pick up some fencing and she said she was remodeling her porch, so they had to go. I volunteered to take them. These yews are 30+ years old and had been in place for that long! They were not going to come out willingly.

Mr. Fix-it was kind enough (he always is) to help me dig these out. Actually, digging wasn't cutting the dirt. No pun intended. Nope, we had to pull out the ratchet straps and pull the yews out with the truck. The ratchet straps were also no competition for the yews as one was snapped. Urrr! Next, out came the heavy duty chain. That did the trick. Both of these yews were yanked-yup-yanked out. You can just barely see the damage to the base of the trunk on the yew pictured above.
The second yew fared a bit better since it was smaller. Both suffered in the move and have been in my garden for about four months now. They finally have died. I just took them to the dump recently. How sad. No success here and I learned you cannot successfully yank old yews out of the ground. Maybe digging gently would work, but somehow I doubt it.

Anyone who reads this blog or who knows me, knows I like hydrangeas. They are my favorite genus of shrubs, with the oakleaf being my very favorite shrub. A close third would be the mopheads. The mopheads remind me of Maine and my mother and I love them very much. If they weren't so persnickety I might like them best, but that is not to be.

A couple of months ago someone posted on Freecycle the following, "Snowball bushes, blue-purplish, two, you dig-bring a shovel." Cindy posted this ad. Sadly, Cindy's health does not allow for much gardening anymore and she chose to offer her ten year old hydrangeas to fellow Freecyclers. It seems Cindy just cannot kill anything or let it die, so in a valiant to save her mature hydrangeas, she offered them to anyone brave enough to dig them out. I jumped right on the offer. You see, I too can't see letting these beautiful shrubs die, and if I can save one or two or three or four-I am there!

I was not the first person who responded to Cindy's ad. Some other lucky gardener or two beat me to it. I was heartbroken when I saw her ad saying the 'snowball bushes' were taken.

I did not entirely give up though. On a whim I decided to email Cindy and see if the snowball bushes had indeed been taken. She responded NO! The man and woman who had attempted to dislodge the hydrangeas from their comfortable spot spent four hours trying to dig them out with no success. Actually, there were a few casualties in the process. They broke three shovels. That was pretty funny to Cindy. Oops, doesn't look too good for me. Cindy said I was welcomed to give it a shot but to be prepared and bring a few shovels. The hydrangea pictured above is the result of the other two folks attempting to dig it out.

I thought to myself, this did not sound like typical hydrangeas. The hydrangeas I know are generally shallow rooted and fairly easy to dislodge. In Mr. Fix-it's truck down the road I went, hi ho, hi ho, hi ho! Here I come Mr. and Mrs. Hydrangea to save you!

Honestly, I really did try to explain to the shrubs it was in their best interest to come along nicely. Mr. Fix-it's truck was never going to fit in the backyard to pull them out the hard way like the yews had to suffer through. Nope, a shovel and hand held pruners was all I had at my will.

The first hydrangea was about 75% dug out, thanks to the previous attempt to remove it. I could not figure out what was holding it in the ground. I gently dug down (barehanded of course) and felt around for the roots. Upon finding them, I cut them with my handheld pruners (love those things!), dug a bit more, cut a bit more, pushed the hydrangea around a bit, and success! It took me about one hour to dislodge this hydrangea. Cindy was truly impressed. I was puffing with pride. That hydrangea is pictured above still in Cindy's garden. It is pruned back hard and missing some leaves due to the previous trauma. Now on to the other hydrangea.
This one seemed like it would be harder since I was starting from square one and since it was intertwined with some 'Jane' magnolia tree roots. But really, once it saw its buddy gave up the fight, it must have felt it was in its best interest to also let go. Some gentle digging-note I said GENTLE-do NOT break shovels digging plants out because if you do, you are doing it wrong. A bit of pruning and the second hydrangea was soon to join its buddy in the back of Mr. Fix-it's truck. It took me a total of two hours to get them both out.

Planting was going to be much easier, I just knew it and that kept me motivated. Plus, no way were these guys going to defeat me. By the way, these hydrangeas were dug from a home in Chandler, Indiana and were transported all the way to Tennessee on a hot sunny day in the back of a truck. Not ideal, but necessary. Once home, I soaked them in BJ's swimming pool, dug their holes and planted them with lots of yummy compost and moist soil. I have babied them for several months now and they are hanging in there. I was also able to separate the hydrangeas into a total of five fairly large hydrangeas. Did anyone know you can split hydrangeas? I didn't. The hydrangea that was already partially dug is pictured above. It is actually doing worse than the other hydrangeas, BUT! Do you see that one little branch with some green leaves? It lives still. One of the other hydrangeas actually has new growth on it. The real test of saving these lives will not be finished until next spring. At that time if they show new growth, then success. If not, that is fine too. At least I tried, just like with the yews. Something tells me though, that no matter my failures, I will continue to transplant big plants and take my chances. That is how life is sometimes.

I am thrilled with the new mopheads I received from Cindy's beautiful yard. There was color everywhere in her yard, and I am so surprised she let them go. Thanks Cindy! And you can be sure I will do my best to save their lives and ensure they live a happy, long and healthy life....

in the garden....

Tuesday, September 9, 2008

Thanks Adam and Freecycle!


I have spoken of Freecycle many times before and will continue to do so because I just love this group! I have been fortunate to be the recipient of many wonderful things for my garden. Some things include pickup trucks full of Stella de Oro, limestone blocks, concrete chunks, concrete pillars, irises, peonies, millstones like things, metal fencing, and bricks, to name just a few.

Adam recently posted on Freecycle "Offer: Bricks". I can tell you that caught my eye quickly! I LOVE bricks in my garden. All stone is good because it does not rot and fits right in. I can usually maneuver it easily and bricks are my favorite material to work with. It is so classic and fits into all landscapes. I responded right a way and was stunned I was chosen to pick up these beautiful bricks.

Adam said he had about 150 of them when he posted. When all was said and done on the sunny day I picked them up, there were 340! Adam worked very hard at digging them out of an old and established garden. The homeowner wants to remake her garden and she left the job in Adam's capable hands. I did ask Adam several times if he was sure he wanted to give all these bricks away and he assured me yes. He was planning to edge the new gardens with a more modern type of edging material. I know, I know-maybe bricks aren't modern but they sure are classic and I can't imagine not using them in my garden, but I am betting Adam will make this garden beautiful and perfect for the homeowner.

I convinced Adam to pose for a picture with the bricks for my trusty camera and he was okay with being posted on here. I want to say thanks Adam! And be sure to email me when you are have the rest out!

There is no guarantee you will get some great bricks, but I do guarantee you will not be disappointed with this worthy email group. If you have a good story to share about Freecycle or friends sharing with you-do let us know here at....

in the garden....

Adam, the election will be a very interesting thing and thanks for making my day with you kind comments about my email and blog! I hope I didn't disappoint. Glad to see this blog works!

Wednesday, February 20, 2008

Freecycle and Concrete

Here is yet another plug for Freecycle. I have posted about this organization before, but love it so much I want to be sure to get the word out. As of February 19th, there are 2373 members subscribing to this group's emails in the Clarksville area. That is quite a few folks. I have been a member for about one year, and love it! Let me explain.


Freecycle is a Yahoo Mail Group and the Clarksville Club web page can be found at: http://groups.yahoo.com/group/ClarksvilleTNFreecycle/ There are groups all over the world. It's purpose and primary intent is to keep unwanted items out of the dump. On the converse side, if you have a need for something you think someone might have just laying around, like broken concrete, then you can post a "Wanted" ad and ask for it. All posting is done anonymously and is moderated by local Clarksville members.

I recently posted I wanted some broken concrete. You would not believe how MUCH ends up out here at Bi-County. I have even gone to Bi-County to ask if I could have it, but laws forbid such a thing from happening in the landfill industry.

Matthew, a really nice guy who lives off from HWY 41A responded. He was the same man who posted an offer for PVC pipe last fall. I was the recipient of a lot of PVC pipe to be used somehow in my garden. Already knowing Matthew made things easier for Mr. Fix-it and I to pick up some of the broken aggregate concrete he had in a huge pile by his house. Thanks Matthew and family!

The second picture shows all of the concrete laid out where it is to be dug into the ground. This particular area of my yard is sloped, and just happens to be Mr. Fix'it's 'driveway' to his garage, seen in the background. The concrete stabilizes the soil, helps reduce run off flow, and helped me to level this area out.

Broken concrete really does work well in the garden. I love my path around my deck leading to the side gate (last picture). This area is in full shade and doesn't grow grass well, but is now stable and decorative and I don't have to get muddy walking in the garden. I am hoping for the same effect on Mr. Fix-it's 'driveway' to his garage. I couldn't have done it without the generosity of Matthew and all the other freecyclers who have gifted my garden with their 'junk'. You know what they say, "One man's trash is another woman's treasure". Or something like that!


in the garden....

Sunday, October 14, 2007

Found a Home for the Millstone Like Stones


Re-working the vegetable garden enabled me to find a home for the round stones similar to millstones. In the middle of my garden is a huge banana. Yes, I said banana. Unknown to many people there is a hardy banana we here in middle-Tennessee can easily grow. It is Musa bajoo. I bought mine at the University of Tennessee Summer Celebration in Jackson last summer. But just this summer I saw some Musa bajoos for sale at Rural King during their big summer sale, so you can find it locally as well. Despite the late frost of this April, this banana has grown and thrived. I now have five little banana trees growing around the initial planting. The tree is over 10 feet tall and still putting out new leaves! Needless to say it is a focal point in my vegetable garden. I had to plant it in the vegetable garden because the vegetable garden gets the most sun and I knew it would grow best with sun. Since I moved the vegetable garden over and since this plant is so large I wanted to make it the focal point and center of the garden. I placed the millstones around the bananas creating a seven foot raised bed circle to hopefully control the bananas. I was amazed that six feet away from the bananas I was digging into banana roots. These bananas are quite hardy and vigorous! There will be a garden bed both to the left and right of the banana circle, and three more raised beds to the south of the bananas. The bananas will shade the vegetables somewhat during the summer which is OK with me. During the very hot and bright days of summer I think vegetables can stand some shade-I know the gardener wants shade when she is picking vegetables.


The beds will eventually be enclosed with pressure treated lumber and the pathways between the six beds will be bricked in with old bricks. The garden will be very formal and user friendly. I have made the pathways much larger in this new and improved garden than in the old vegetable garden. We found the vegetables tend to take over the pathways and surrounding areas if left alone. While the effect was lush and full, I did not like having to step over pumpkin vines and dodging errant flower blooms. I will keep you posted on the progress.

in the garden....

Tuesday, October 2, 2007

What in the World Are They?


Here is a picture of the round stones I recently got from a fellow freecycler. I think they might make a good wall for a raised bed in the center of my vegetable garden in order to contain my banana tree. I will probably use them like castle rock and stack them on top of each other offset. I like the ridged edges. Does anyone know what these might have been used for and where they came from originally? My husband was kind enough to download them from his overloaded truck onto his trailer. He said he knew he wouldn't kill anything in the trailer by placing them there and not on the ground!

in the garden.....

Wednesday, September 26, 2007

Homage to Freecyclers


As a member of Freecycle.org I have been able to obtain free things for my garden AND keep these same things out of the landfill, which is very important to me. These concrete blocks that line my newest garden are stuccoed on one side which makes them something special in my view. I obtained all of these blocks and the top blocks from several freecyclers and I thank them all! This garden was designed to take away weedwhacking chores by the oak tree and it also was designed to have a European flavor. I lived in Germany for over ten years and have always loved European gardens and have tried to make my garden have some elements with a 'continental' feel. Neatness, shade and the feeling of age are all elements I have found in European gardens.

This garden is filled with Hydrangea paniculata 'Grandiflora', aka the PeeGee Hydrangea. I love this hydrangea because it requires very little care when compared to the typical mophead hydrangea (Hydrangea macrophyla), which requires alot of watering. The PG will grow to about 5-7 feet tall with the same spread. It covers itself with pure white hydrangea flowers about as big as a mans fist in August and the flowers persist until the next year. These little hydrangeas don't look like much now, but in about two years they will be quite impressive and fill in this bed. I strongly recommend this hydrangea to anyone who likes hydrangeas.

Thanks again to all fellow freecyclers!

Saturday, September 22, 2007

Round Stones (Millstones?)


Hi everyone. I need some help. I am a member of Freecycle.org. Freecycle.org is an email organization which facilitates exchanges between members. The whole purpose of Freecycle is to keep things that would otherwise go to the landfill out of the landfill. Last night I picked up a pickup truck load of round stones that look like millstones but with edges like a gear (not smooth). Most all of them are broken in half but there are two that are whole. The gentleman I picked them up from (Tim) said the man who had his house before used them standing up on end to edge his garden. This sounds like a great idea but I was wondering what other people think would be a good purpose for them. They are concrete colored, about 5 inches thick and 18 in diameter. Just imagine a millstone cut in half. Let me know as I truly do not know where I will use them in the garden.......