 February 7, 2013
I've been waiting quite a while to post this post about our new land. I am finding that with the garden move and the impending house build taking the different moving parts and focusing on them one at a time is a good thing. Well today we are looking at one section of the driveway area of our new gardens. I love before and after pictures so have saved up several to post here. If you look in the distance on the right you will see an elm tree that has a crooked trunk. This crook is so pronounced that you could sit on this crook. It is about five feet off from the ground. I tell you this so you can get a good perspective of all of the pictures. These pictures are all taken looking east but some are closer or further to the tree.
February 7, 2013
I've been waiting quite a while to post this post about our new land. I am finding that with the garden move and the impending house build taking the different moving parts and focusing on them one at a time is a good thing. Well today we are looking at one section of the driveway area of our new gardens. I love before and after pictures so have saved up several to post here. If you look in the distance on the right you will see an elm tree that has a crooked trunk. This crook is so pronounced that you could sit on this crook. It is about five feet off from the ground. I tell you this so you can get a good perspective of all of the pictures. These pictures are all taken looking east but some are closer or further to the tree.
We had to excavate the driveway down to a solid base in order to bring in our 6" of gravel and the geotextile fabric. The driveway is 700' long and we excavated it to be about 10-12' wide. The depth of the excavation varies from 4" to about 14" due to the varied terrain. Parts of the driveway that were in the field and were of a lower elevation needed more excavating than the area of the driveway in the woods where there was already a great base of gravel and tree roots. Just kidding on the tree roots, though there are a lot of tree roots in the parts of our driveway.
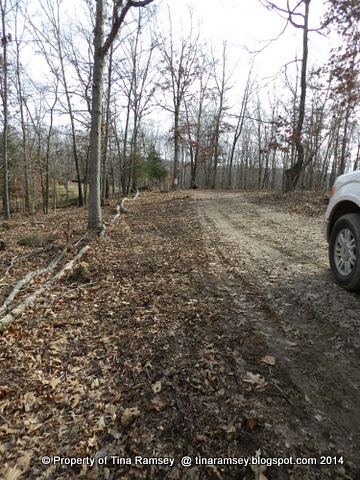
We bought our land on February 22nd of 2013, but if you look at the date on the above photograph you can see we were at the land a lot last year even before we closed. We even went so far as to plant daffodils in the field prior to closing--shhhhhhh! When we first visited the property (early February) the above picture is what the driveway area looked liked. It was drivable; which was great; but there was little else it offered. The area was strewn with tons of trash including a sofa, mattresses, play sets, and berms of household trash that our neighbors and the like had dumped on the property for years. Broomsedge grass and blackberries were growing in and along the driveway.
 October 8, 2013
While the driveway is 700 feet long in its entirety, I am only focusing my attention on planting gardens in the wooded section of our driveway' which is approximately 250' and which is the feature of today's post. Past the end of the wooded part of the driveway is where we open to a large field and that is where a lot of other gardening takes place, but that area will have to be a subject of another post, though I will show you some of the 8000+ daffodils I have planted on the land so far. They can be seen in the last picture. At any rate, due to all of the clearing of the interior portion of the land we had to do behind this part of the driveway we did not actually get to this area until last fall. The first thing we did was rent three 20 yard dumpsters in order to dispose of all of the trash along this section of the driveway. It took us three weeks of scooping with the tractor to get the majority of the trash off from this driveway area. I will not bore you with the details but let's just say anyone who dumps trash on land in other than approved dump sites is shameful! Those people deserve to get their trash back and more dumped right into their living rooms. If I could legally do this and find out who the dumpers were I'd gladly do the job myself. I don't care if everyone dumps in a local place, just because one person dumps there does not make the area a dump! There are approved locations for disposing of trash and we in this area pay for these dumps each and every month, so people use them! Not your neighbor's property!
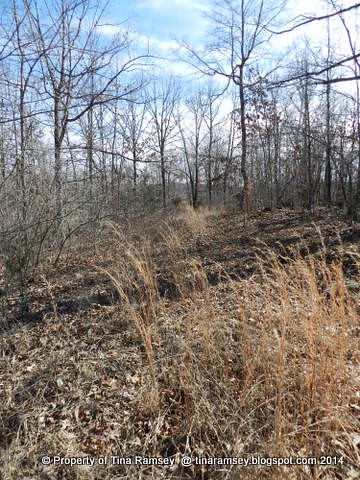
The long term consequence of all of the trash is the fact that we will always have broken glass in the soil and perhaps even chemicals from oil, and other household wastes. While the land recovers itself with time, certain things never decompose and that includes glass. There is so much glass that we have had to cover it up with fresh dirt from the driveway excavation. This glass cuts up wildlife and could pose a danger to a gardener or other humans that may like to walk in this area. Glass is not a good thing for land. There is a great variety of antique bottles and if junkers like this kind of thing and are local, just email me and I'll let you know when you can come and get some. There is still a large area across the street that needs to be cleaned and has junk but that will come later. We found countless moonshine and liquor bottles, even completely sealed bottles of beer on the ground. What, do folks offer bottles of beer to the land or what? So, long story short, the above picture shows what this particular area looked like prior to us beginning the clean up. Clean up was a major part of this garden area. Again, if you look down the driveway on the right there is a pronounced crooked trunk. This is the elm you can use as a reference point.
 December 22, 2013
By Christmas the trash clean up was completed. We paid nearly $700 to rent the dumpsters and spent a good amount of hours working on the clean up all to take care of others trash. It was not a fun time but cleaning the land was necessary and now finally done. We also cleared some trees and the blackberries growing alongside the driveway. I stacked the tree trunks along a soon to be garden area. My wish for this area is to make the area user friendly and low maintenance where the trees and native flora will not encroach on the driveway space. I also do not wish to do heavy gardening in this area due to all the glass remaining in the soil. Therefore I have selected mainly bulbs, shrubs, and hearty perennials for this area of the driveway. There will be some grass in this area but mostly there will be bulbs, wildflowers, perennials including mainly hellebores (deer resistant), Japanese maples, hollies, kerrias, St. John's wort, and a few other deer resistant shrubs. The color theme is predominantly yellow, red, blue, and white. I'll show the gardens later once the azaleas bloom and things are leafed out a bit.
December 22, 2013
By Christmas the trash clean up was completed. We paid nearly $700 to rent the dumpsters and spent a good amount of hours working on the clean up all to take care of others trash. It was not a fun time but cleaning the land was necessary and now finally done. We also cleared some trees and the blackberries growing alongside the driveway. I stacked the tree trunks along a soon to be garden area. My wish for this area is to make the area user friendly and low maintenance where the trees and native flora will not encroach on the driveway space. I also do not wish to do heavy gardening in this area due to all the glass remaining in the soil. Therefore I have selected mainly bulbs, shrubs, and hearty perennials for this area of the driveway. There will be some grass in this area but mostly there will be bulbs, wildflowers, perennials including mainly hellebores (deer resistant), Japanese maples, hollies, kerrias, St. John's wort, and a few other deer resistant shrubs. The color theme is predominantly yellow, red, blue, and white. I'll show the gardens later once the azaleas bloom and things are leafed out a bit.
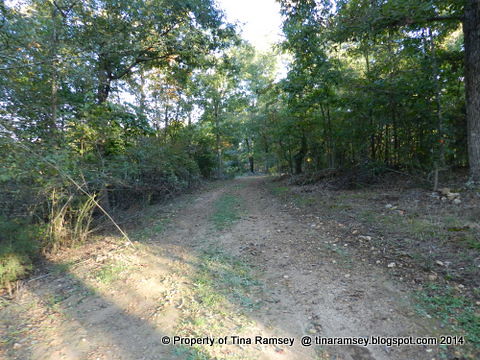
 February 27, 2014
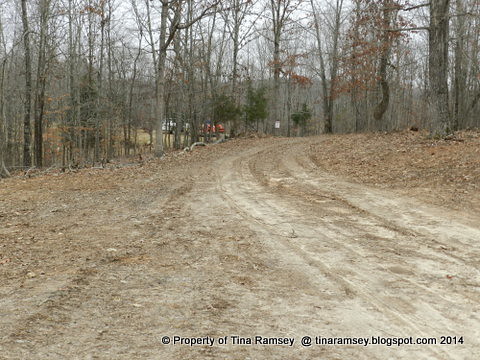
This picture shows the same area after the winter just prior to excavation for the gravel to come in. We must have a driveway in order to access the area of the house. As you can imagine, a dirt driveway in the winter is not a fun thing to traverse and is at times impossible to drive upon. There were many times I had to park the truck out in this area and walk back to the field but that will not be the case anymore now that the gravel is in.
February 27, 2014
This picture shows the same area after the winter just prior to excavation for the gravel to come in. We must have a driveway in order to access the area of the house. As you can imagine, a dirt driveway in the winter is not a fun thing to traverse and is at times impossible to drive upon. There were many times I had to park the truck out in this area and walk back to the field but that will not be the case anymore now that the gravel is in.
 February 27, 2014
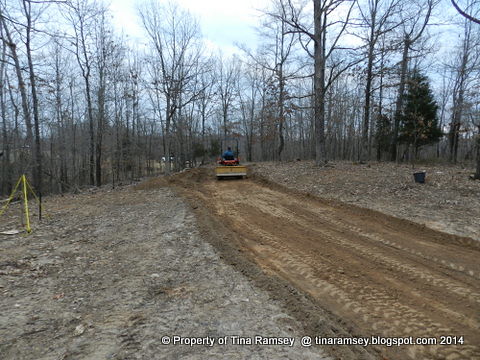
Mr. Fix-it excavated the entire driveway with his small tractor (27 HP Kubota). I helped a little by mainly moving soil and fine tuning the lines. It was quite a job and we were stymied by rain several weekends during the process; which set us back considerably. The rain was a good thing to make the clay and rocky soil soft, but then we had to deal with the muck. It was a tradeoff for sure but the job was finally completed last weekend.
February 27, 2014
Mr. Fix-it excavated the entire driveway with his small tractor (27 HP Kubota). I helped a little by mainly moving soil and fine tuning the lines. It was quite a job and we were stymied by rain several weekends during the process; which set us back considerably. The rain was a good thing to make the clay and rocky soil soft, but then we had to deal with the muck. It was a tradeoff for sure but the job was finally completed last weekend.
 April 1, 2014
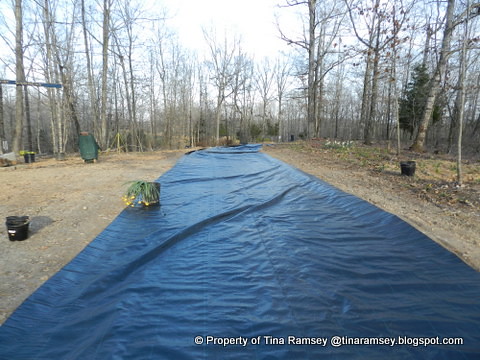
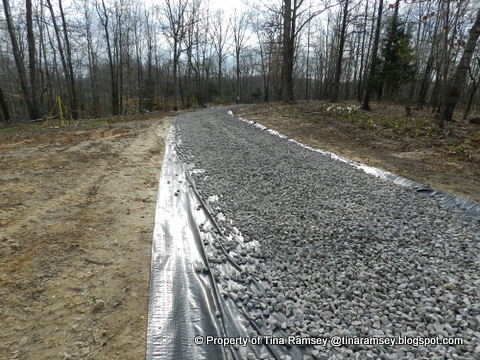
After the excavation and prior to the gravel being delivered Mr. Fix-it and I went out to the land and laid out the geotextile fabric. This was an extra step we took to help ensure the longevity of our driveway. Geotextile fabric is used to help stabilize roads and stop erosion. I had done a lot of research on building a gravel driveway and found this is an essential component in the driveway if you wish to do it right. We want to do everything right or at least as best as we can. I researched online and found this fabric available at a very reasonable price when you compare it to the cost of gravel. I ordered the adequate amount we needed. In our case our geotextile fabric is 12' wide and each roll was 300' long. We needed three rolls to cover the 700'. It kind of looks like blacktop doesn't it? Not too many people around here use it, at least not in my area. One of the drivers of the dump trucks told me Fort Campbell applies geotextile fabric under their roads. That was a good thing for me to hear.
The purpose of the geotextile is to separate the gravel from the mud and help to provide a barrier to the gravel sinking down in to the mud. It allows water to easily pass through and is woven and is fairly strong too. Mr. Fix-it and I weighed the fabric down with rocks and even pots of daffodils that need to be planted in order to hold the fabric in place. We were lucky in that the evening we laid out the fabric the wind was calm and remained so the next morning as well. You really need a calm wind when laying out this fabric.
April 1, 2014
After the excavation and prior to the gravel being delivered Mr. Fix-it and I went out to the land and laid out the geotextile fabric. This was an extra step we took to help ensure the longevity of our driveway. Geotextile fabric is used to help stabilize roads and stop erosion. I had done a lot of research on building a gravel driveway and found this is an essential component in the driveway if you wish to do it right. We want to do everything right or at least as best as we can. I researched online and found this fabric available at a very reasonable price when you compare it to the cost of gravel. I ordered the adequate amount we needed. In our case our geotextile fabric is 12' wide and each roll was 300' long. We needed three rolls to cover the 700'. It kind of looks like blacktop doesn't it? Not too many people around here use it, at least not in my area. One of the drivers of the dump trucks told me Fort Campbell applies geotextile fabric under their roads. That was a good thing for me to hear.
The purpose of the geotextile is to separate the gravel from the mud and help to provide a barrier to the gravel sinking down in to the mud. It allows water to easily pass through and is woven and is fairly strong too. Mr. Fix-it and I weighed the fabric down with rocks and even pots of daffodils that need to be planted in order to hold the fabric in place. We were lucky in that the evening we laid out the fabric the wind was calm and remained so the next morning as well. You really need a calm wind when laying out this fabric.
 April 2, 2014
The builder and dump trucks arrived right on schedule the next morning. On our driveway we wanted the large rock (1"-1 1/2") as a base of about 3", then about 2" of 3/4"-1" medium rock, then finally about 1" of crush and run. Each dump truck held approximately 23 tons of gravel. We had three trucks of the large rock, three trucks of the medium rocks, and finally two trucks of the crush and run. Gravel is sold by tonnage. Each ton of rock will cover approximately 20 cubic feet but that amount varies by the size of the rock. We had approximately 3500 cubic feet to cover with gravel. Eight trucks brought approximately 184 tons of gravel, which easily covered our 3500 cubic feet. Everything worked out well. The above picture shows the large rock in place.
April 2, 2014
The builder and dump trucks arrived right on schedule the next morning. On our driveway we wanted the large rock (1"-1 1/2") as a base of about 3", then about 2" of 3/4"-1" medium rock, then finally about 1" of crush and run. Each dump truck held approximately 23 tons of gravel. We had three trucks of the large rock, three trucks of the medium rocks, and finally two trucks of the crush and run. Gravel is sold by tonnage. Each ton of rock will cover approximately 20 cubic feet but that amount varies by the size of the rock. We had approximately 3500 cubic feet to cover with gravel. Eight trucks brought approximately 184 tons of gravel, which easily covered our 3500 cubic feet. Everything worked out well. The above picture shows the large rock in place.
 April 2, 2014
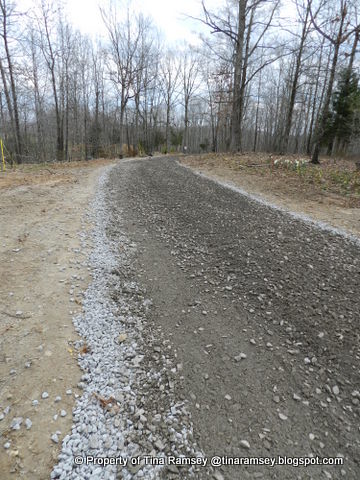
This picture shows the driveway immediately after the gravel was delivered. Those dump truck drivers (there were two that made all of the trips) were awesome!! They poured the gravel in place and knew exactly how fast or how slow to travel to get the right depth. Everything worked out very well. It took a few hours to complete the job due to our distance from the quarry but overall the process was easy for me.
April 2, 2014
This picture shows the driveway immediately after the gravel was delivered. Those dump truck drivers (there were two that made all of the trips) were awesome!! They poured the gravel in place and knew exactly how fast or how slow to travel to get the right depth. Everything worked out very well. It took a few hours to complete the job due to our distance from the quarry but overall the process was easy for me.
 April 6, 2014
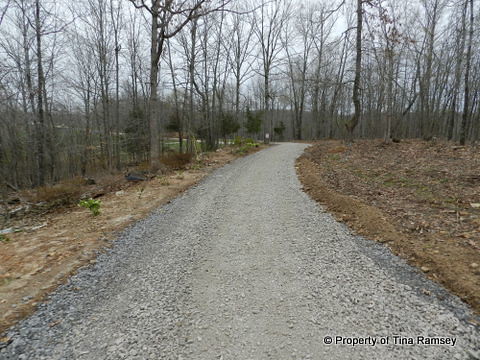
Finally we come to completion. Mr. Fix-it had to use a landscape rake to level out the gravel. The initial load of large rocks went in fairly level but as the gravel was built up we wound up with a crown in the middle. The landscape rake quickly took care of that. Now all we have to do is pack it down by driving on it and varying our tire tracks. Heavy rain came in right after the gravel was delivered and helped to wash the crush and run down to lock all gravel in place. We have one low place where the water sits despite all of this gravel. We plan to dig a trench and put in corrugated pipe along with some gravel in order drain off the water to another location at some point. But overall we are quite happy with the results. We can drive down the field with no fear of getting stuck and without mud everywhere! The total cost was less than .75 cents per square foot, mainly because we did all of the labor. We know that us doing the work took a bit longer than a bulldozer would have, but we like to put sweat equity into our home and this sure counted.
April 6, 2014
Finally we come to completion. Mr. Fix-it had to use a landscape rake to level out the gravel. The initial load of large rocks went in fairly level but as the gravel was built up we wound up with a crown in the middle. The landscape rake quickly took care of that. Now all we have to do is pack it down by driving on it and varying our tire tracks. Heavy rain came in right after the gravel was delivered and helped to wash the crush and run down to lock all gravel in place. We have one low place where the water sits despite all of this gravel. We plan to dig a trench and put in corrugated pipe along with some gravel in order drain off the water to another location at some point. But overall we are quite happy with the results. We can drive down the field with no fear of getting stuck and without mud everywhere! The total cost was less than .75 cents per square foot, mainly because we did all of the labor. We know that us doing the work took a bit longer than a bulldozer would have, but we like to put sweat equity into our home and this sure counted.
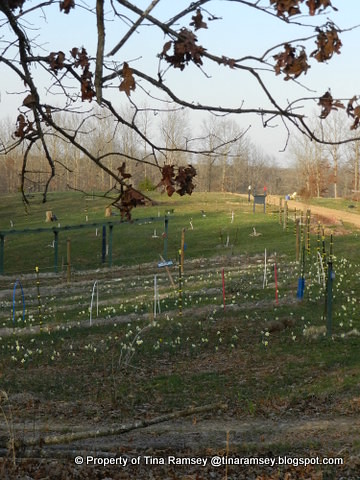 As promised, here is the last picture and this picture is actually taken from the wooded part of the driveway I just showcased. The white dots in the field are 'Ice Follies' daffodils planted last spring. I planted approximately 1850 'Ice Follies' in this location of the field. In one marathon planting day I managed to get 900 into the ground. That was tough! I hand plant all of my flowers the old fashioned way. Dig a hole, place the bulb, and cover it up. So far I have planted nearly 9000 bulbs on the land. All bulbs came from my current garden. Anyone can have thousands of bulbs in just a few years just like I do if they consistently divide their bulbs. I started my daffodils back in 2003 with a few hundred bulbs in my current garden. Over the years I have divided the original daffodils time and time again. The 'Ice Follies' and 'Tete-e-tetes' are some of the most stoutest bulbs I have and they barely wink before they get settled in. They are the ones that have bloomed prominently this year. That is why they are so dominant in this landscape. Daffodils are an awesome bulb that is easy to grow, multiplies itself readily, blooms a fairly long time, and is deer resistant. Their cheery colors brighten early spring so much that I just tend to go overboard with them, but hey, can you blame me....
in the garden....
Don't forget about the giveaway found here!
Words and Photos Property of In the Garden Blog Team, In the Garden