
The first of tens of thousands of daffodils have begun blooming in Tiger Gardens! All the other foliage you see in the above picture is muscari foliage-they'll be coming into bloom in another few weeks to a month or so.
25 January 2012
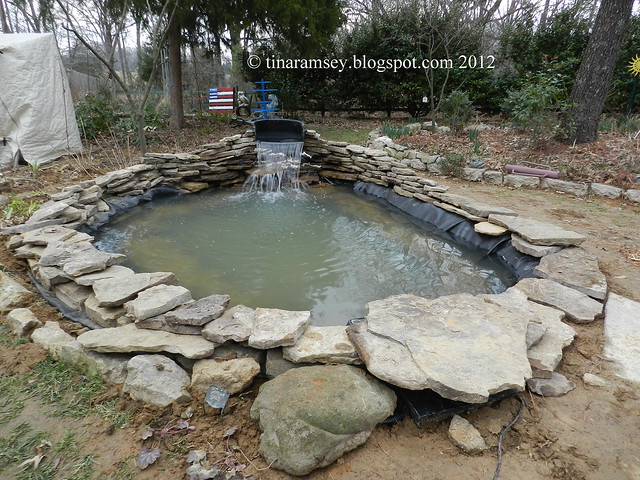
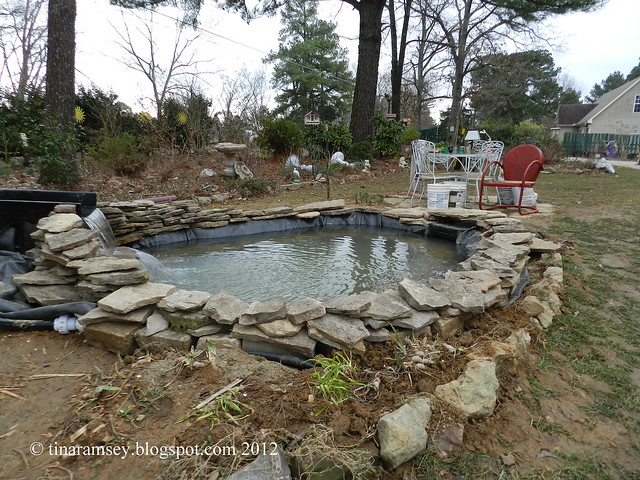
Despite bad weather and other commitments the pond is still progressing. Mr. Fix-it and I turned the pump on for the first time on 24 January 2012 and it was a happy day! The waterfall makes a wonderful sound (video below) and helps to block out the traffic noise. It was such a delightful thing hearing and seeing the waterfall that I kept coming out of the house during the night just to listen to it. We do have some issues though. Mainly, the water falling from the waterfall hits a lower rock that is causing the water to hit further back rocks (left side of waterfall in the above picture) which is causing the water to leak out of the back of the wall of rocks. So, it will be back to the drawing board for us. My problem is not so much the rocks but the fact I did not seal the gaps adequately with waterfall foam. I could not find any black waterfall foam in Clarksville so I had to order it online. That means the pump goes off and we will wait until the rocks completely dry then try to either restack the rocks or seal the rocks so that the waterfall does not leak anymore. Right now the leakage is very slight and is contained in the liner portion behind the rock waterfall but it is an issue we must deal with before we consider the pond ready for operation. That being said this post is about the steps we took to get to the point where we are now. I have tried to show pictures from the same vantage point in this post of the before and after work but some pictures may be out of order.
I'll talk you through it so you can see the changes and the work involved. It's a messy yucky job but with us building our own pond we saved more than 60% of the amount it would have costed us to have professional pond builders build this pond (based on comparatively sized ponds built in the local area). 60% is a huge savings when you are talking building a pond! I must admit though that we are blessed here in Tiger Gardens with great soil that is not rocky so the digging was easy. I also had plenty of spots for the excavated soil so those two problems were easy for me to manage. If you can't manage those two things you might with to hire out the building of your pond if you are thinking of installing a water feature. I enjoyed digging the hole. That is about all I've enjoyed about the pond building process but only because I was overly cautious with all of the other steps simply because I did not feel like I knew enough about the process to be confident. I am certainly good at digging holes so confidence was there for that part but the rest was a challenge for me. Thank goodness for my husband who did all of the plumbing and built the waterfall. He was with me every step of the way and is enjoying the pond as much as I am.
The above photo and the one below are views from inside of the house or on the porch. What a difference some rocks and trimming the liner makes. You can still see the liner in the pond but the fact that it is black is a good thing as I feel it will disappear at some point. Truthfully it does not bother me but Mr. Fix-it wants to completely cover the liner with rocks. That will involve buying more rocks and rocks are a bit expensive. In our case the total cost for the nearly two tons of rocks involved in building our pond accounted for 23% of the total cost of the pond. That's a lot of money for rocks and I don't like buying rocks. Think about it, most people give them away for free but to find the right kind we had to buy a pallet of rocks. It just doesn't seem right to me.

Monday, 16 January 2012
Pond view from the house after the liner was installed and before it was trimmed or rocked. 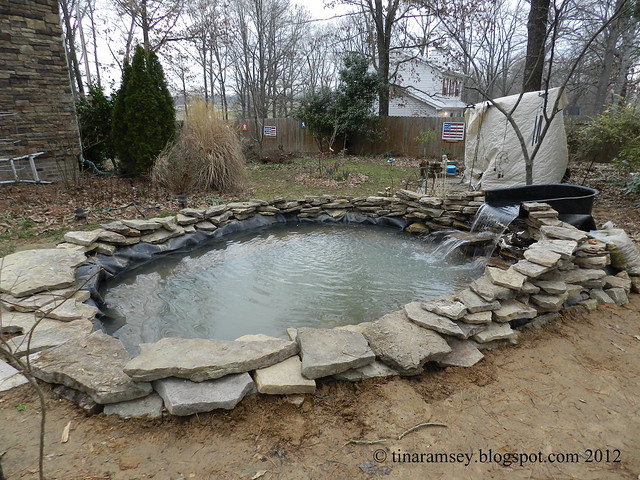
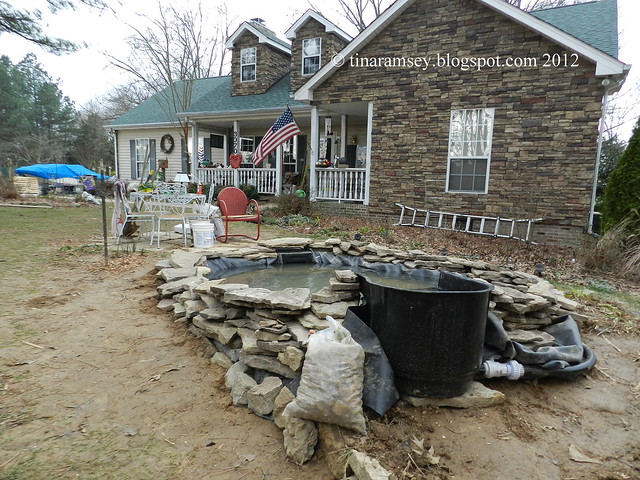
25 January 2012
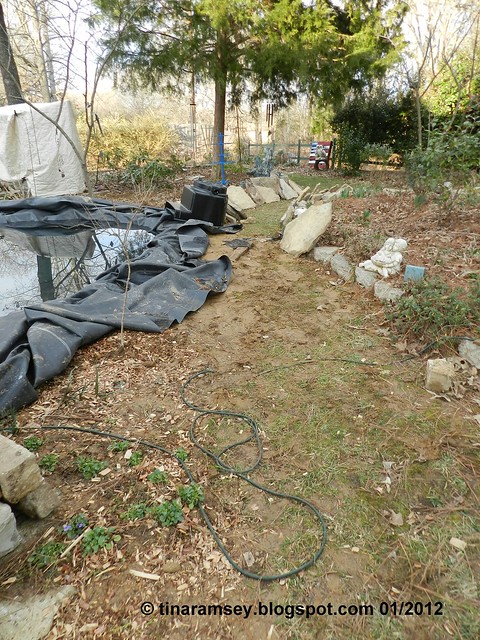
This view is while I am standing in front of the Front Center Garden facing northwest toward my sideyard and backyard. The big tan tarp is covering a swing which resides on the Broken Concrete Patio. The sound of the waterfall will carry to this patio but it is a bit muffled due to the fact the rock wall is between the patio and the waterfall. The rock wall really muffles the sound because while standing in front of the pond on the newly installed broken concrete patio the sound is quite a bit louder-very loud indeed.

22 January 2012
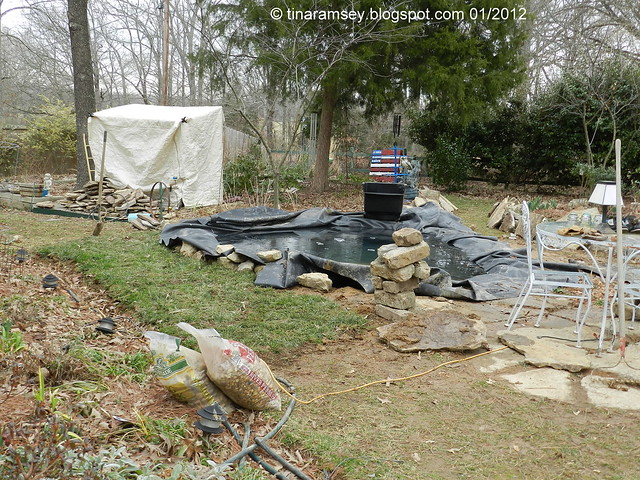
This is the same view as the above photo but prior to the rocks being installed and the liner trimmed. This picture was taken this past Sunday when we began installing the skimmer and rocks. The weather was very bad this weekend and we did not get much accomplished but the skimmer was installed. I had drained the pond down quite a bit once I found out where the water level would be. The hole I dug for the skimmer was nearly two feet deep and more than two feet wide and nearly three feet long. I made sure to mount the skimmer on undisturbed soil and it was leveled front to back and side to side. Our plumbing from the pump (which sets inside of the skimmer box) exits the skimmer box above water level on the side of the box toward the house and circles the pond to the waterfall box where it enters the waterfall box below water level. These points are important to note when designing your pond. The fact our connection to our waterfall box was at the bottom of the box meant that we could not bury the waterfall box. Therefore we had to design the rock wall around the box and leave access to the connections in that area.
22 January 2012
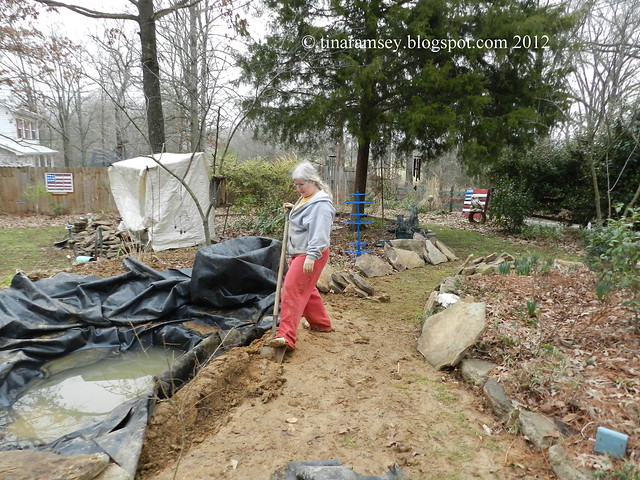
Here I am in my typical work clothes this past Sunday. I am beginning to bury the liner. When I am in the garden I either have a shovel or pruners in my hands and I am dressed in bag lady clothes-they are comfy to work in and for me that's what it is all about! I had no idea how to trim the edges of the pond and this fact has bothered me more than any other fact of building the pond. What I had to do was dig a trench and build up a little mound where the liner would drape over then lay in the trench. I then took square limestone rocks and put them in the trench placing them on the liner to hold the liner in place. In order to cover the liner I was then able to place flat rocks on top of the mound and limestone rocks creating a little wall that was somewhat level and stable. I still have to either plant grass seed or move sod into this area of the pond The other side is edged a bit differently.
22 January 2012
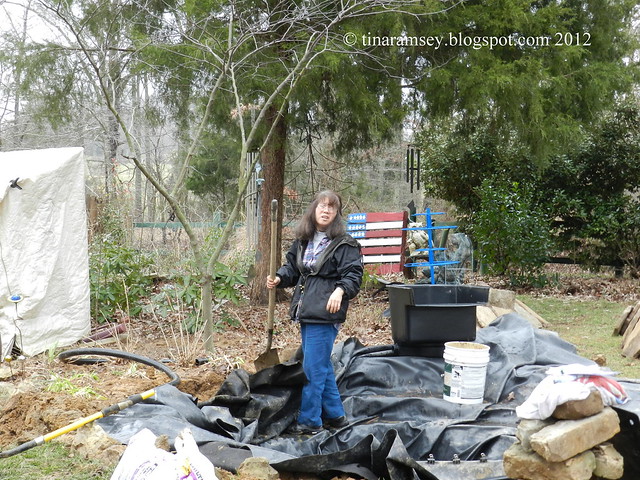
My friend Naomi is dressed nicely when she works in the garden. She came up from her nearby log cabin home to help out and to see the process of installing the skimmer. Naomi has a very large concrete pond of her own that she personally built. The waterfall of her pond is about 10 feet tall and comes down from an old furnace area on her property. I have posted about Naomi's pond before but in case you want another look check out the above link. Naomi does not have a skimmer in her pond but is interested in installing one so she was very interested to see how ours would work. Cutting the liner for the weir door while installing the skimmer was very scary for me. I just knew I'd get it wrong but with Mr. Fix-it's guidance it seems that everything is working out well and it is sealed. Fingers crossed it stays that way!
Thursday, 19 January 2012
The above picture shows the pathway between the pond and the Front Center Garden. I simply show it because I had to build up this area a bit so I used some subsoil from the pond hole. The path is now very mucky and messy but I'll soon cover it with some sod from a new garden that is scheduled to be dug into this area-by me of course.

Thursday, 19 January 2012
This is a picture of the left side of the pond area prior to it being covered with sod. I have been wanting an iris bed forever and finally think I have found just the spot in the backyard. In order to get the sod for this pond area I began digging the iris bed (which is in the backyard) and moved all of the sod to this spot to not only build it up but to cover up the sticky subsoil. I always sprinkle bonemeal under new plants including under this sod. I hope it helps the sod settles in nicely. The black material is actually tar paper I laid down in order to be able to walk on something not so mucky.
Saturday, 21 January 2012
Here we are looking at the same side after the sod from out back has been laid down. I always remove sod from new garden areas. I either use it to build up low spots or to fill garden areas (after turning it upside down). Moving sod in this way is time consuming but not difficult and it makes all the difference when establishing new gardens. It also gave my pond an instant finished look and sure made for walking in this area much easier.
25 January 2012
Here we are looking up towards the east and the driveway. The house is on my right and we can now see the new concrete patio area with the small metal dinette situated on it. The newly installed sod has built up this side of the pond nicely. I also added a rock wall on the outside of the trench on this side. The liner and plumbing pipe are buried in a trench in this garden. I also used the rectangular rocks in the trench on this side. I have not backfilled the small garden on the outside of the trench as of yet. I intend to grow only moss phlox in this area. The moss phlox should drape over the rocks edging the garden and fill in among the rocks lining the pond in a nice manner. I think it will carpet the area in one year or so. Moss phlox is evergreen and makes a great groundcover. It will not block our views of the pond from the house at all. In the foreground you can see part of the Redbud garden. I do have a few variegated hydrangeas and perennials in this area. I suspect this garden will evolve as the pond evolves. I jumped the gun by planting and rearranging in this area prior to the pond being installed. I've had to make quite a few changes already and many plants have been trampled.
22 January 2012
This view looks toward the house and is simply showing the line up of the waterfall to the skimmer. Ideally these two parts of a pond should be directly across from each other like we have them here. This ensures there is a good water flow to the skimmer from the waterfall. I can vouch for this action because while the waterfall was running the water has an evident current directing everything on the pond surface to the skimmer box. I cleaned the filter in the skimmer box and found a lot of pine needles in it already. I plan to net my pond to keep out debris and also to keep out the herons which are quite common in my neighborhood.
25 January 2012
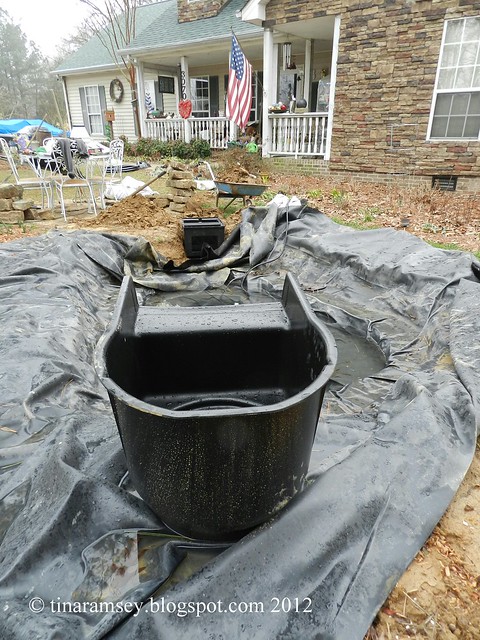
This is the same view after the plumbing has been installed. We are not yet done with this area. Because our plumbing enters the waterfall box on the bottom (you can see the white fittings on the right side of the waterfall box) we cannot bury the pipe or block this area. I have a UV light that will be put into place in this area should it be necessary once the water heats up. While I cannot see this utility area from the main enjoyment area of the pond you can clearly see it from this view. In order to reduce the view a bit I plan to plant a few evergreen shrubs. I haven't chosen which ones yet but am leaning toward aucubas. This area is shady and backed by a mature cedar tree which gives the area some shelter from the sun. There is a shade garden which is walled in this area. I have paths that traverse this area. This area also faces the road and is a little used area but I still want it to look good. The location where water is leaking from the waterfall is along the liner on the right side of the box in this picture. Water is very tricky and always takes the path of least resistance. We wish it had found that path straight into the pond but it's okay, we'll fix it soon.
Here is a short video showing the waterfall in use where you can hear the sound. I used YouTube's newly established enhanced privacy code in order to embed my video. It restricts cookies on your computer when you view the video. I really appreciate all of these enhanced privacy controls and hope improvements continue to be made.
in the garden....
Dear Tina, I am in awe at what you have achieved. Saved a lot of money and gained heaps of satisfaction. It looks and sounds fantastic. looking forward to seeing it soften as the plantings get established. cheers, cm
ReplyDeleteGet out of here! Fantastic job and it looks and sounds so delightful. You are going to have many enjoyable days gazing into your pond. How nice of you neighbor to drop by and check on your progress.
ReplyDeleteWhat a labor of love. I know you will have such pleasure hearing the waterfalls as you work or relax in the garden come summer. I don't think we could dig that deep in our clay. All I can say is wow. wow wow wow.
ReplyDeleteTina,
ReplyDeleteNever heard of waterfall foam. I thought concrete was the sealant. The pond looks great and even sounds better. I'm with Mr Fix it bury the liner in rocks.
Looks and sounds great!!! I still go outside just to listen to the waterfall on mine. The waterfall on ours still isn't quite how I would want it and occasionally I go out and re do it. Good thing you do wear old clothes (like I do) to work in the yard. The last time I used waterfall foam I did wearing a brand new shirt and completely ruined it and the pants I had on.
ReplyDeleteSplendid! I'm loving following this process.
ReplyDeleteYep, I agree with Mr Fixit on this one. Hide the lining with rocks or plants :-) I so love the sound of the waterfall. I know it will keep the street traffic at bay. The job you have done thus far is so impressive! You never cease to amaze and inspire me girl....
ReplyDeleteThanks for your comments. I have taken to heart about covering the liner. Tomorrow we'll be ripping up all of the rocks on the liner, digging a coping shelf for them then putting them back on the liner and putting the mound behind the shelf. It should make a BIG difference. We learn every day and I think I have it visualized now how to edge the pond-still an issue but won't be after tomorrow. I'm hoping no rain! Everyone have a great weekend!
ReplyDeleteI think you've done an incredible job! :o) It's frustrating how expensive rocks can be. I bought some tumbled Canadian granite boulders for my teeny frog pond and they were the most expensive part. Are you going to add fish?
ReplyDeleteTina I needed this post...the sound of your waterfall is so like mine...ours went off in Nov and won't be heard again until April...my Wed post highlighted my pond too...it was the one thing that I had to have...can't wait to see yours as you continue to plant it etc....what an incredible job you did...I know how much work it is...
ReplyDeleteWhat an amazing achievement - well done to both of you.
ReplyDeleteI agree with your OH that the black needs to be covered more. My old pond always had the black liner showing and I regretted not getting it right right at the start. I tried everything and it was never right. Also dont forget that the water level will drop when it is warm sso more will be on show
Love the sound, now if I can just commit to all the work....
ReplyDeleteIt is magnificrnce!! So much hard work. It will bring lots of pleasure for sure. Can you grow the pong lilies in it or do they need muck? I have always wanted a pond but I wanted it for the pond lilies. There are 6 ponds on our road but they have all been dug up by a backhoe and have the pond lilies except for 1 that has been stocked with fish. They used to stock fish in the one behind us but not sure if they do now or not.
ReplyDeleteHi Mom, Not sure if I'll grow pond lilies or not. Everyone says I should but pond lilies need still water to bloom, but I may still try. I redid the entire edging today. You can no longer see the liner. It was a big job but we think it will be better. We are still sealing the waterfall so hopefully by tomorrow it will be running.
ReplyDeleteLooking good! Love the waterfall. And the daffodils. Which at first I thought were growing in the pond, lol! :)
ReplyDeleteWow Tina, that is quite a project! Maybe some day we'll get a pond in here too. Hey, do me a favor and make a note of my new blog address, as mine was deleted due to someone else's fraud. Grrrr!
ReplyDeletehttp://lifeinrobinsnest.blogspot.com/
Hey Tina, truly awesome!!!! You sure stay busy -hope all is well. Looking forward to the spring -several flowers are popping up over here too -I'm scared for a freeze. You know how I love my lilacs:) Ciao
ReplyDelete