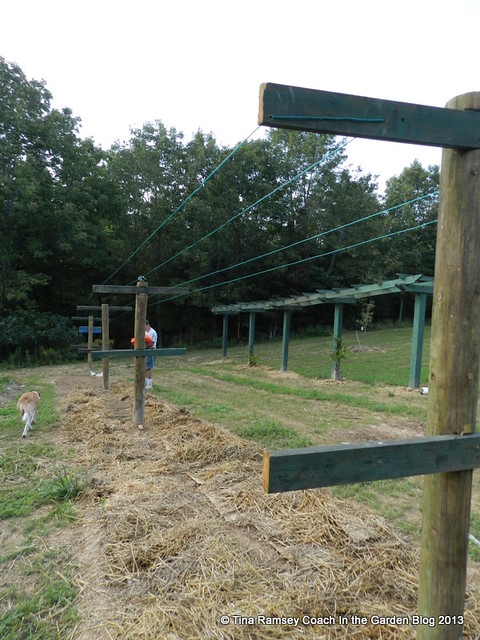
Good morning everyone! Today I will share how Farmer Fix-it and I made our blackberry and raspberry trellis. We started with our area; which is 48' long by about 4' wide. We 'planted' four fence poles 16' feet apart in concrete. Next we notched these fence poles at about 3' and 6' above ground level. Farmer Fix-it installed the cross beams which are pressure treated 2" x 4"s in the notches. The next step involved tilling up the bed area. Farmer Fix-it also did this and he used a small cultivator to till up the area. Normally I use my trusty shovel to turn the whole area over but timing just did not work out for me to get the area turned over so he did it his way. I much prefer the soil after my shovel has worked it over versus how a tiller works over the soil. While a tiller will pulverize soil it does not get really deep into the soil bed and so pulverizes the soil that I think the soil can wash away and compact faster than when I use my method of turning the soil with a shovel. When I am done turning the soil with a shovel the soil is raised up about 4-6" and has varying degrees of clumps in it. I feel air and water can reach the lower depths much better but that is just my way. Since you can eat raspberries and blackberries Farmer Fix-it took over and he was a big help.
Once the soil was prepared we purchased 50' coated cable packages at Lowes. We looked at cable but they were quite expensive so opted for the packaged clothesline type cord. I requested two lines on the 3' crossbar to hold the canes up at mid height, and four lines on the top crossbar to allow the canes to rest on. My reasoning is that lower down on the canes the area is not as wide as it is at the top of the canes. My blackberries are predominately 'Apache' and my raspberries are 'Canby'. Both types are thornless and are semi erect in that they grow up then grow laterally. The blackberries in particular can grow 10' across easily at a 4' level.
The dog you see in the above picture is our little 'adopted' dog called Buttercup. She actually lives on the corner of the road about 600' feet away. We noticed she was a bit on the skinny side so we began feeding her-down by her house and not on our land. Now she has become our dog it seems. We love her and she is most sweet and gets along with our Deacon but every night when we leave it is an ordeal. She jumps in the truck and we cannot get her out! She chases the truck and it really breaks our heart leaving that old gal. Her owner does not seem to care about her at all as she is always outside and he never misses her--even when she is gone all day visiting us! We do not want to take on another dog and perhaps we should not have fed her but she was really hungry and not being fed. We felt it was the right thing to do. At least when she is with us she has been safe in that she is out of the road (except when we leave at night) and is fed and has water. She is a comfort when we are out on the land because she is also an alarm dog if anything or anyone comes around. Normally I would be most upset about dogs running loose but do understand it often happens and have really softened up in my old age because it is not the dogs fault. Once we move here I suspect she will be moving in.

Farmer Fix-it spent an afternoon digging the bramble out of my potager. It was a big job for him because beside the fact he is not much of a gardener, he found that things were planted very closely in the potager. He had to do some detangling and pruning. Farmer Fix-it is very afraid to prune. I don't know why folks are afraid to prune because pruning is a good thing! After he dug out all of the bramble and had it laying on the ground in a tangle I had to go out with my pruners and lop off all of the long pieces. This was just to get the canes to a manageable size and to limit stress on the canes. You see, when you dig plants and they come up with barely any soil the roots can quickly dry out and will not support a great deal of leaves. Removing those leaves helps to relieve stress on the plants. Most of our blackberry canes were cut down to 3-4' feet. The raspberries (closest to you in the picture) were left a bit longer.
We already had a soil test in this area and know our pH is much too low for raspberries and blackberries. Ideally the pH should be about 6-6.5 and ours is about 5.2 so we added lime. I also added greensand. Greensand is an organic amendment that will help to break up the clay soil in this area. I would rather have gotten a trailer load of manure to add to the beds but it just wasn't meant to be due to time constraints. I will most likely come back and fertilize with cottonseed meal once we get a few good rains in the area. I plan to use organic amendments on the field because this field slopes down to our pond and I do not want to damage the pond in any way.
Once all canes were planted we mulched with cardboard, newspapers, and wheat straw and watered everything. We wound up with about 30 canes of the 'Canby' raspberries; which are planted between the first and second fence poles, and about 35 canes of the 'Apache' blackberries. They are planted the rest of the way down the row. One last step saw Farmer Fix-it tying the long canes to the trellis system. The canes you see here are primocanes, we cut off the florocanes prior to planting. Primocanes grew this year and should flower and bear fruit next year. The florocanes we cut off of course were primocanes last year and bore fruit this year. They die after they bear fruit. My plan is to keep the two types of canes separated with them growing in opposite directions on the trellis; which will make pruning and picking easier. We will have to prune the berry bramble each year after fruiting in order to maintain a good stand of berries. Air flow will be perfect because the row is oriented south to north and the prevailing winds flow west to east. I suspect these canes will settle in nicely and give us lots of fruit for many years to come. The only problem we next have to contend with is how to keep critters out of the patch-both the four legged type and the flying type! We'll tackle that next year.
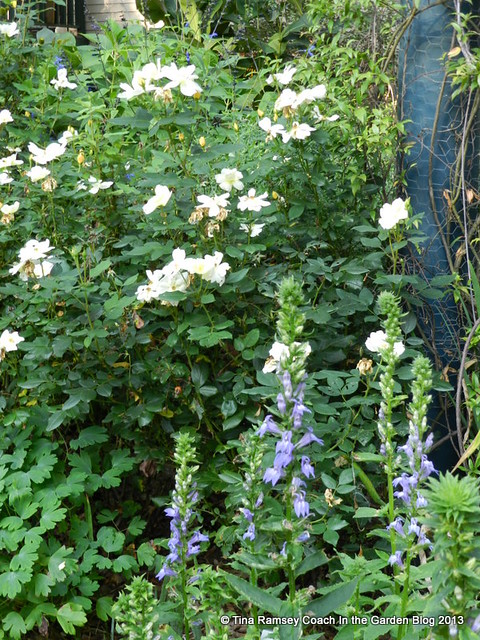
A few pictures from Tiger Gardens I show the Great Blue Lobelia, Sunny Knockout roses, and Black and Blue salvia blooming strongly.
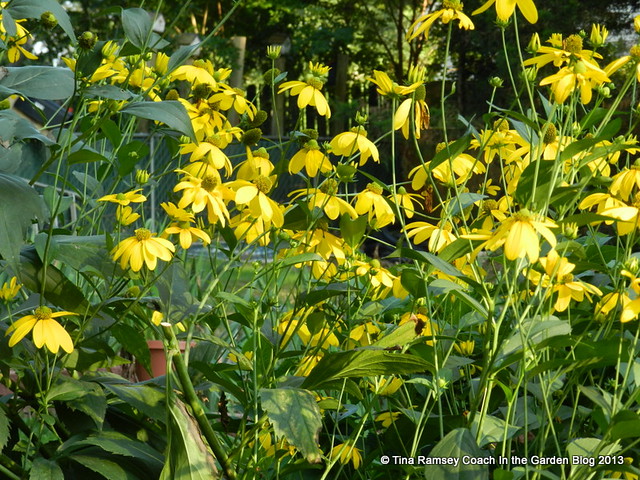
The cutleaf coneflowers are STILL going strong. These are such a sunny yellow and make a huge impact in the garden. They will, however, be moved to the wildflower field within a few weeks. I will miss them here.
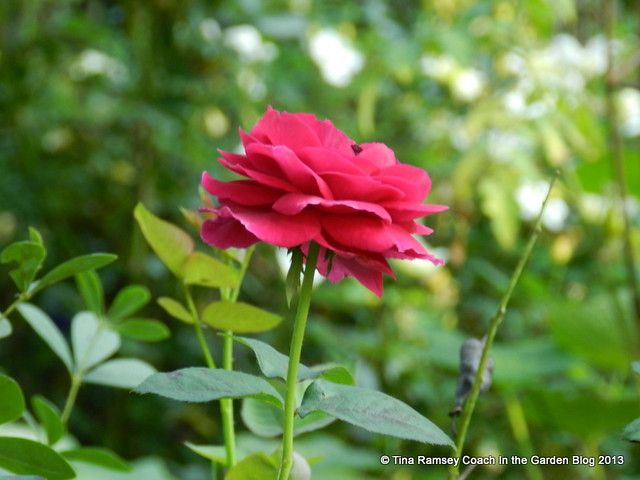
Lastly we have 'Falstaff' David Austin rose on its second flush of blooms. This year really did not see an Japanese beetle invasion and the roses have enjoyed it mightily, as have I. Next up will be a vegetable garden update. We have veggies both here and on the land and I hope I can show some good things with them both. You might notice the baptisia seedpod in the background. I think baptisia and roses go together like peanut butter and jelly so I often plant them side by side in the garden.
Here's hoping you are....
in the garden....
Words and Photos Property of In the Garden Blog Team, In the Garden
I enjoy reading about what you are doing at your new place. How sweet that you have a new 'friend'. It must be heart breaking to leave her every time you head for home.
ReplyDeleteThe flowers in your gardens are oh so lovely.
Thanks for sharing and have a great Wednesday.
FlowerLady
Sometimes those dogs that "find" you are the best. I hope it fares well with you. Your blackberry/raspberry project looks great. I hope it all takes. That tall lobelia is gorgeous. I too have been in the garden...watering. Still no rain here. What an August we have had. Less than a 1/4" and no rain in sight. We normally have 3+" in August. Pray for rain...
ReplyDeleteHi Tina! It has been a while since I have checked any blogs. I had a few minutes and wanted to stop by to say "hello"! Hope you are doing well. I hope to get back to blogging soon. Until then, I'll just have to keep up with you on your facebook posts! :) I am going to make it a point to give a few minutes every day to checking up on my blogging buddies. I'll be back soon! -Carla
ReplyDeleteYou may as well get "use" to the idea of stray dogs and cats on your new land. Country "Folk" just don't seem to have the education they should to have a pet. Sad but true... I hope Buttercup becomes your fur baby someday....
ReplyDeleteThe trellis are looking so good. You sure are keeping Farmer Fix-it busy this summer. What luck for you that he is home to help out and not working long distant! Hope you are still getting plenty of rains to keep things happy. Toting water in buckets up the hill from the pond could be tiresome...
Looking Good!
And here's me wondering how to get rid of our raspberry and blackberries - they attract Japanese beetles and are prickling up our paths. We don't get any fruit from them. I suppose cultivating them in a field rather than having them run wild in the woods would be better. Best of luck with the work!
ReplyDeleteEverything looks just beautiful and your raspberry patch is just exceptional looking. I haven't done well with raspberries, but yours are an inspiration.
ReplyDeleteSo nice to see the latest on your new property. That is going to be an amazing berry bed! You have really thought it through.
ReplyDeletePretty cute about your adopted dog. Hard to leave her each time I'm sure but that is where she knows the area. She'll be happy once you move there.
This is a great tutorial for anyone wanting to plant blackberries or raspberries! A lot of work, but I can see your trellis covered in delicious fruit next year. I forget, what is going on the trellis behind this?
ReplyDeleteSounds like you have made a new friend; she probably can't wait for you to move in!
That's the grape arbor in the background Rose~!
DeleteThanks for that cyber lesson! :-) As usual, your photos are so beautiful. Many thanks.
ReplyDeleteGreetings from London.
With best wishes;)
ReplyDeleteI was waiting to see you plant those berries...great job and love the trellis.
ReplyDeleteThanks for the tutorial. Plainly I know nothing about raspberries. Following a laissez fair policy over the years with some success this years crop was a total bust and I don't have a clue....:(
ReplyDelete