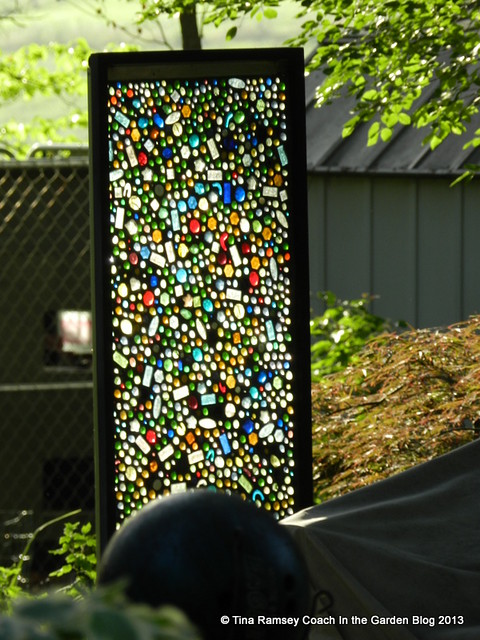
A while back when I said I was taking a break and had one more post in the hopper this was the post! Instead I have been posting weekly. I am afraid if I get away from blogging totally I might not come back to it. As much as I love to garden I am getting to a point I wish to do it a bit more intimately-with me and the garden only. That and the fact it takes a lot of work to blog have me kind of up in the air with blogging. At any rate today is a post about a craft and a specialty of mine. I started making mosaics for my garden more than 4.5 years and believe it or not that above mosaic and its twin have been mounted in my garden all that time!!!! I don't bring them in or anything. This particular mosaic had a large tree limb fall on it when I recently had a LOT of tree damage from a small cell that went through my area. I lost more than 30 feet of height from one oak tree alone but in total there were five oaks that lost limbs. We had to use the chainsaw to clean the mess and all total I took two trailer loads of limbs to the dump. The loss of my tree limbs was very sad for me. I adore my oak trees and in the twelve years I have lived here we've never had this kind of damage.
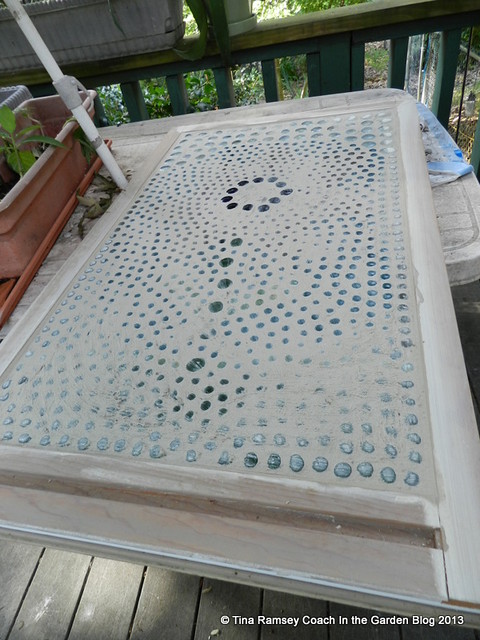
Damage and asides did not keep me from completing my most recent mosaic but the side trips did slow me down. The above mosaic is what it looked like in the dry fit state. I'm ashamed to say this mosaic sat like this for several weeks in my living room. I just could not seem to get the motivation to begin gluing the gems onto the window and grouting the whole thing. I am happy to say I've finally completed it so that is one less project on my list.
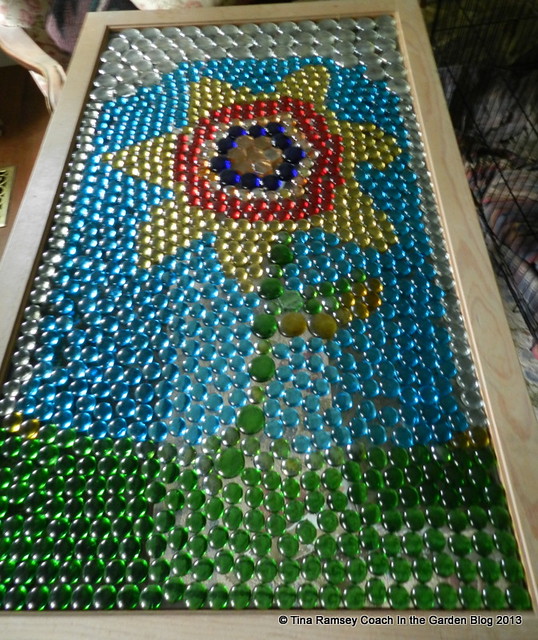
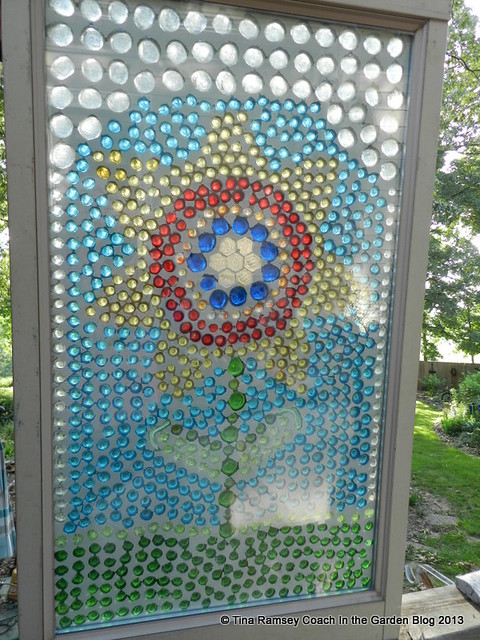
I always dry fit my mosaics to both get the pattern and to determine if I have enough glass gems to complete the design. This particular one started with a $5 window purchase at the Nashville Habitat Re-Store. Normally I make random patterns or have chosen a color scheme or the American flag as designs on my mosaics. This one I wanted to be different and since I love flowers thought a flower would be good. I pondered how to fill up the frame and make the picture look not so realistic yet realistic and fun on a mosaic. The above is what I came up with based on my gem colors and idea of a flower.
The next step was to finally get around to gluing the gems on the window. What a problem this was! I usually use E6000 glue. This glue is very strong, dries clear, and is good for outside purposes, but it did not hold all of the gems onto the glass. It was most frustrating for me. I spent a few sessions gluing but then when I ran my fingers over the design the next day the gems started coming off. Geez, I have never had that happen before so this was very weird for me. I wound up picking off most of the blue and green gems and regluing them only to find that the same thing happened again! The white gems stayed in place no problem. The situation was troubling for me because I could not figure it out. I surmised that perhaps I needed to add pressure to the gems and to be sure I applied a lot of the glue to them. This finally worked. E6000 is not a glue like superglue where only a drop will work. Apparently you need to be quite liberal with it and apply pressure; which I did by placing some handy heavy garden books on the gems as I reglued them all. Finally, a few weeks after beginning the glue process I was ready for grout.
You want to do the grouting outside as it can be messy. I usually use a charcoal or black grout but since the frame of this window was tan I wished to color coordinate the grout so I used an almond grout I had on hand in the garage. I barely had enough but as you can see it all worked out. Mix up the grout (I used sanded) with water to make the consistency of cake frosting, then put it all on your glass gems and begin spreading it around-I find it easier to do this with my hands. Be sure to wear some good gloves on your hands when you do this as grout can be caustic to skin. Once I have all the cracks and crevices filled I make sure I have a good seam with the wooden window frame then I let it sit up for a while. Normally after about 30-45 minutes I will check to see how set the grout is then begin wiping it away from the glass gems using a large wet sponge that I wring dry. The clearing of the gems takes time and patience. You don't want to take away too much grout yet you need to make sure the grout is all uniform and smooth. It works best to do this in stages.
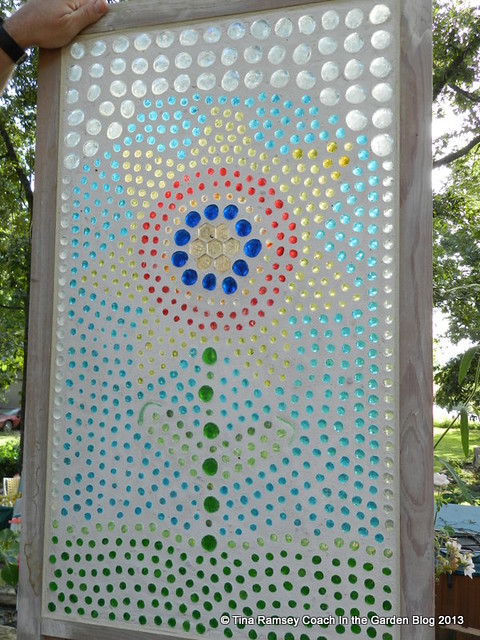
The grout dried overnight and walah this is the finished project from the grouted side of the window. I will hang this somewhere that the light can shine through it and that the grouted side is the side that is protected from elements.
The window side looks quite different. The light comes in through the back and spreads out to give one a look that kind of says the mosaic is lighted from behind (which it is but by the sun). This isn't the best picture since I have glare on it from this side but you get the idea.

Is is that patriotic time of the year and I thought the above picture was patriotic. There are three bunches of glads here with the red white and blue bird house but only the red ones decided to bloom. Darn. The other two were a plum color and a yellow. This picture is from the land and one of my new gardens. Those gardens are doing well all on their own and since I spend so much time out there I thought I'd share a picture from there.

These rudbeckias are also from the land. I plopped them in a hole I dug in the ground back in May and they've been doing find all on their own. I haven't even had to water these very tough plants. That is what I want out there until we get the chance to start building our new home. Even though there are plenty of wildflowers out there I want cultivated areas. As you can see the local insects seem to be enjoying these flowers....
in the garden....
Next week we'll talk about making new gardens without a tiller.
A woman of many talents. I love the mosaics. What fun to have a bit of art in the garden. I could see this being used as a screen. Have a fun 4th of July.
ReplyDeleteYou too Lisa! Looks to be a good one with rain! Which will mean no fireworks which is fine with me as long as they don't schedule a make up day in September like they did last year. Would rather a quiet holiday.
DeleteWOW! Your mosaics are fabulous and so beautiful, tina. I remember you once said that you liked Impressionist paintings. The first mosaic reminds me of jewel-like multiple reflections on the water!! Thanks so much for sharing.
ReplyDeleteYou bet Sapphire! It's always so nice to hear from my friend in Japan! Glad you like them. The first mosaic is definitely my style.
DeleteWhat a beautiful mosiac! I like the way it looks different on each side.
ReplyDeleteSo sorry about your storm damage; you can always replace a plant in the garden, but the old oak trees are irreplaceable. I hope they recover.
I've noticed a slowdown for many bloggers lately, which is understandable when there is much to do out in the garden, and you in particular have certainly been busy! I hope you keep on writing, Tina; even if it's only once a month, we'll be here!
Hugs Rose! That's so very nice of you!
DeleteNice mosiac for a new land. You are so talented. It DOES feel good to work new land.
ReplyDeleteYou all have a great 4th.
Lola, It is so a work in progress and we feel so good at the end of the day but the battles. Woo, not sure who will win-us or the land, the weeds, the ticks, the wildlife. Just don't know but we try. Have a great 4th.
DeleteGreat tutorial for making a useful mosaic. I might not get around to trying to copy that but:
ReplyDeleteGladioli planted next to a post! Why hadn't I thought of that? When the rain is over, I'm going to the rustic cedar pile and start next spring's plan.
My thought exactly. I'll be able to tie them up discretely when they begin falling over. Works good. You could make a smaller mosaic Nell Jean. They are pretty nice once done.
DeleteIt turned out wonderful like I knew it would when I saw it in May stretched out in your living room while under construction! You are brave to leave it there for so long with your fur babies running around it. My cats would have jumped up on it and messed up my creation! I am finding my projects these days seem to move along slowly. I have too much going on at times but nothing like you with your land and all your projects... Your birdhouse looks wonderful in its new spot!
ReplyDeleteHaHa! The stupid cats did jump on it!@ After I finally got it glued and was ready to mosaic I moved it out front on the porch and the stupid cats just could not stay off it. There is probably gray cat hair stuck in the grout. Ah well at least the mutts did not knock it over. I could just see that and would've given up I tell you.
DeleteYour mosaic has me sitting here with a huge smile on my face. How wonderful it would be to see that every day in different lighting in your gardens. You did a fantastic job. Love the blooms in your gardens too.
ReplyDeleteHave a great 4th and a nice weekend ~ FlowerLady
Happy fourth of July! Love your mosaics, great job.
ReplyDeleteI love it and you make it seem so simple!
ReplyDeleteLove the flower mosaic. It makes me smile.
ReplyDeleteGorgeous! I do a few mosaics too, but I've never done one on glass. I was recently telling someone about your lovely shower door mosaic. I think I'll try the glass thing some time!
ReplyDelete