Showing posts with label Propagation. Show all posts

Monday, March 5, 2012

Dividing Daffodils

DSCN1072
If you are a gardener it is safe to say you like daffodils. If you like daffodils you most likely grow daffodils or know someone who does. A funny little trait of daffodils is that they multiply--exponentially! The above 'Ice Follies' daffodils were planted in my Front Foundation Garden a mere three years ago and they are really beginning to take off as you can see. Soon they will need to be divided. Dividing is not a chore I relish simply because it is very time consuming. Especially when you have as many daffodils as what grows in Tiger Gardens. Since I have been busy dividing daffodils I thought I'd share the process with you.
DSCN1075
Each year I dread daffodil time yet I so love daffodils that I also eagerly anticipate daffodil time. The blooms are so cheery and refreshing after the short and dark days of winter-even one as mild as this one still had short and dark days. Normal daffodil time in my Zone 7A Middle Tennessee garden is anywhere from February to late May. This year the first daffodils bloomed in my garden on January 26. I have been keeping records of when flowers bloom here and since 2008 no daffodil has ever bloomed in January. The earliest one bloomed was last year when the first bright yellow bloom appeared on February 21st. The peak for daffodils will normally be in mid March but this year they are a bit early--not that I'm complaining or anything. 

Each year since I retired from the Army in 2003 I have been planting daffodils. I first started with a few bags of bargain daffodils. Some were mixed, some were all the same and included varieties such as 'Tete e Tete' and 'Ice Follies'. Still other daffodil bulbs were given to me by friends while even more (probably over 1000) were dug with a backhoe from a neighboring yard and deposited in my front yard. I enjoy each and everyone of them but as my garden grows some of the locations I initially planted the daffodils are no longer good locations. The daffodils are becoming overcrowded, shaded, and just not doing so well. Each year I divide daffodils by digging some clumps and transplanting the bulbs to better spots. I divide my daffodils any time of the year when I can see their location-early to late spring. Sometimes I dig up daffodils in the summer when I am planting perennials and I have to divide and replant clumps then. You can pretty much divide daffodils before bloom, during  bloom, or after bloom as daffodils are not picky about division and will still bloom even if divided before the bloom. I prefer dividing mine either before or during bloom but not after the bloom. But actually, in order to have an undisturbed show of blooms division after bloom would be a good thing. Daffodils are pretty much bulletproof so don't worry about killing them when you divide. 

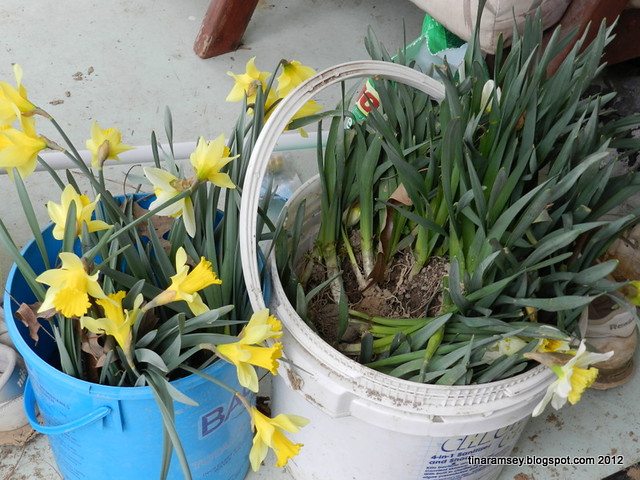
A few years ago I felt I had run out of room so I began planting some daffodil bulbs in Mr. C's cow pasture directly behind my property. While that was a good idea at the time the problem was I planted those daffodils when they were dormant and I was not sure of the type of daffodil they were. The majority of them turned out to be 'Tete e Tete'; which are short but floriferous daffodils. I could not see them planted in my neighbor's field because they were so short. I decided to dig them up and put them elsewhere in my garden this year. In addition to digging the 'Tete e Tetes' I noticed my 'River of Daffodils' consisting of all 'Ice Follies' had become a bit overgrown and over crowded. I decided to divide them as well so this post will show you a few divisions of daffodils due to the busy work I've been doing here in Tiger Gardens. The two buckets in the above picture show some daffodils waiting to be planted. I am not sure of the cultivar of the daffodils in the blue bucket but the ones in the large white bucket are 'Ice Follies'.
DSCN1055
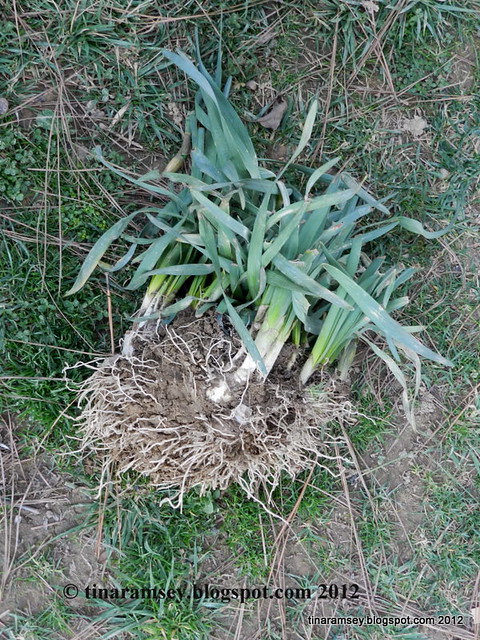
Let's begin with this clump of 'Ice Follies' from the 'River of Daffodils'. There is a major problem with my river this year in that it has turned into more of a trickle than a river. The cause is not overcrowding of the daffodils but of trampling by three very large and bad dogs. I have actually had to fence off what is left of my river due to the dogs trampling and destroying almost all of the daffodil blooms this year. This problem has never happened in the past and I blame our new dog AJ. He is just a bull and can't help himself. I had left an area near the daffodils for the dogs to run but he doesn't understand that and just runs over the plants themselves. They are not looking well at all. Just look at the clump above. It is only half as tall as it should be and the blooms are missing. Sigh. At any rate they can still be divided as they have gotten a bit crowded. You don't have to divide daffodils if they are still blooming well. But, if you wish to increase your stock or the blooms have dwindled on clumps then dividing is the best route to go.


I dug this clump from the river of 'Ice Follies'. And to think I planted only ONE daffodil bulb here in 2003! The best thing to do when dividing daffodils is to dig deeply underneath the clump and gently lift all daffodil bulbs out of the ground. I use a normal shovel but some people use pitch forks or long bladed shovels as well. I then lay the clump of bulbs on the ground and try to break it into manageable chunks so I can hold the grouping in my hands when I gently begin separating the bulbs. I personally just gently tug the bulbs apart but if you have the time and the wherewithal you could dunk the clump of bulbs in a bucket of water and separate them in the water. Generally speaking one way is not better than the other but water separation might be easier on the roots of the bulbs. The only problem with water separation is you usually divide daffodils in the winter so water might be a bit cold. However you do it the point is to gently separate all bulbs into individual bulbs.You can easily tell what can be separated but if you don't see a seam between bulbs it might be best to leave them together unless you can be sure the off set has a good set of roots.
DSCN1058
Laid out on the ground or placed in a wheelbarrow or bucket for placement in their new planting spots the gardener can really see what she has after separating the bulbs. In this particular clump I managed to get 35 daffodils bulbs. The one bulb I planted in '03 has now turned into 35!! Daffodils are such a great plant because they normally aren't bothered by pests (except dogs who trample and dig them) and they readily multiply each year. Who can beat that?
DSCN1057
Division is necessary because as the bulbs grow and multiply they tend to get crowded and compete with one another for food and water. Over time flowering can decrease so division will improve flowering. As a bonus you get more plants! The drawbacks of division are where you may have had 35 blooms you will now only have one. But never fear, within two years one bulb will become three or four bulbs and they will begin increasing exponentially each year after that and before you know you know it you are overloaded with daffodils. 


The big black dog in the above picture is Mr. C's pet dog Deacon. Deacon is a people's dog. Even with over 100 acres on which he can roam Deacon chooses to come and visit us and many other neighbors at least once a day. We love Deacon and think he is a fine dog. He never bothers other animals and is a well mannered dog. He doesn't fight with our dogs (though they go berserk and need to be penned in the garage when Deacon visits) and he never bothers the rabbits in the front yard. Deacon loves to hang out with me in the garden and even laid on the daffodils as I was planting! There is a problem with Deacon though. When he wanders off from his property he is wandering onto a very busy highway. I worry myself sick he will be hit by a car any day. Usually I will load him up in one of the trucks here and run him home but on this day I had only my car. Deacon is far to smart to get into a car as he has decided he only rides in the back of trucks. He is a super good dog other than his wandering. Mr. C is the kind of old time farmer who sees no need to tie up or otherwise contain his dog. So far he has been lucky in that Deacon seems to be smart enough to stay out of the road. I truly hope this smartness keeps up with him.


DSCN1071


The Tete e Tetes I dug from Mr. C's field wound up in my front lawn. I don't particularly like planting bulbs in the lawn because I like a nice and tidy lawn and planting bulbs in the lawn means I will not be able to mow the lawn until late May when the foliage on these bulbs has ripened. There are a total of three very large sections of the front lawn that are now planted with hundreds of daffodils. The other two types are 'King Alfred' bulbs and 'Ice Follies' in order to complement the very short Tete e Tetes. I was sure to leave paths among the bulbs in order to walk but the paths are rather small and I am thinking I will soon not have any space for daffodils or paths! Perhaps by the next time I divide daffodils I will be giving them away instead of planting them here as the gardens are getting pretty full but dividing is part of what makes daffodils so rewarding so it is all okay with me.


When you replant your divided daffodils be sure to put a pinch of either bonemeal or bulb fertilizer in the hole prior to planting the bulb. Plant the bulbs at the same depth at which they were growing or a little deeper. I like to try to get my bulbs planted so they are perpendicular in the ground. Slanted bulbs do not straighten themselves out. The foliage that emerges from slanted bulbs will grow straight but the bulb will stay slanted as I have discovered upon digging mine. Sometimes I get so behind I try to hurry dividing daffodils and just dig a slit in the ground to pop in the daffodils which causes the daffodils to be slanted in the ground. It pays to dig a nice big hole and plant the bulbs for longevity so don't rush the planting. Dividing daffodils can be so fun and rewarding....


in the garden.....

Words and Photos Property of In the Garden Blog Team, In the Garden

Wednesday, February 9, 2011

Greenhouse Lessons and Advice

From In the Garden
I wanted to share some fun I've been having in my small 6' x 8' greenhouse but before I do let me share 'The Birds'. We have been inundated with what seems like millions of birds. I'm sure it is more like thousands-tens of thousands because it is a LOT of birds we've been seeing here lately. This time of the year is the time for birds to begin thinking about spring and large flocks of blackbirds are common during migrations. But have you ever just sat and watched them? They are really quite a sight. I wish my camera was better at capturing them but here I show you just a few of the birds here in Woodlawn. Some folks are concerned and even alarmed at the sightings of the all the birds but I think it is perfectly normal and nothing to worry about. Just watch your bird feeders because they will quickly wipe you out! Now on to the greenhouse and some busy seed starting and plant propagation fun.
From In the Garden
It was almost like a wondrous Christmas when I read in the most recent issue of The Tennessee Gardener that you can start impatiens from cuttings. I had no idea! I've started many impatiens from seeds over the years and of course impatiens self seed in my garden yearly but to be able to start them from cuttings was literally Christmas for me! Since I winter over a few mother plants in my greenhouse I figured I'd try the cuttings with impatiens. So I cut small 3-4" sections of plants from my mother plants, dipped the sections in rooting hormone and plopped them in a seedling tray with a good well draining seed mix for potting soil. Within two days the cuttings had roots! They look a little yellow and weak but it has only been one week since I took the cuttings and they will fill in soon. I was able to get about 40 cuttings from just three mother plants and haven't stopped yet. It will be so nice not to have to buy impatiens flats and to just bring out my flats and plant them. Impatiens are workhorses in my garden since I have a rather shady garden. These little annuals can't be beat for all season long color.
From In the Garden
Emboldened by my success with the impatiens I've been trying all sorts of plants as cuttings in the greenhouse and have begun some seedlings. So far I've sown only cold weather plantings of things like chard, kale, and lettuce. I'll soon be sowing seeds of spinach in the greenhouse and will begin hardening off the seedlings later this month so they are ready for planting in the vegetable garden within the next few weeks. I am very excited about my vegetable garden and will be talking about it in next week's post. The success with the vegetable seedling only adds to my excitement. 


This is my first year with the greenhouse and while my little greenhouse is only 6' x 8' feet it is an excellent size for all of my plants. I keep telling my husband it keeps me honest in that I am limited by the number of plants I can store in it so I am not tempted to overdo tropicals and tenders. They are just too much work even though I do enjoy them all. One fault of the greenhouse is that even though my plants fit in it comfortably, I am stretching for space for the new seedling and cutting trays. Additionally, there is not much room in it for me when I need to water by the time you factor in the space the rain barrel, shelving, a huge tree houseplant, and the heater takes up in the greenhouse-quarters are cramped. You can probably tell from the pictures above. 


Heating the greenhouse has been a very simple matter. The small 1500 watt radiant heater I have placed in the greenhouse works like a charm. I have it set to keep the greenhouse temperature above 50 degrees. During sunny days the greenhouse temperature can easily reach 80+ degrees! It is an awesome place to hang out on sunny days. No matter how hard and frigid the wind is blowing outside it is always toasty in the greenhouse on sunny days. The problem this winter is that we've had more cloudy days than sunny days and the heater has been running more than I'd like it to. Our electric bill has felt the pain as well. I'm not sure how much it costs to heat the greenhouse but I estimate between $30-$60 a month. The small size of the greenhouse makes it economical to heat but it also means the plants can go through some extreme temperatures (80 degrees during the day and down to 50 at night).One very nice note is that when we lost our power three nights ago from approximately midnight to 3:00 am, the plants did not suffer so I think that either the plants are quite flexible and adaptable (a great trait!) or that my greenhouse is well insulated and has enough passive solar heating to compensate. I'll soon be switching from the heater to only seed heat mats and passive heating as the days get longer. All in all heating the little greenhouse has been easy and rewarding. 

I must mention the bubble wrap I used as additional insulation. I covered all of the inside panels of the greenhouse with 4 foot wide large bubble bubblewrap. The only area I could not cover with bubble wrap inside of the greenhouse was the greenhouse door. I had to tape the bubble wrap to the outside of the door in its case due to the way the greenhouse door was configured. The bubble wrap along with the caulking and polystyrene panels has made my little greenhouse a well insulated cocoon. I am quite pleased with this fast as I was a bit afraid the cold of the snow and outside would penetrate inside, and vice versa that the heat from inside would be felt outside. That has not been the case at all. You can find bubble wrap in the wide widths (four feet wide was the widest I could find) on the Internet. I could not find any bubble wrap wider than two feet in any stores or shipping stores like UPS-and I tried, believe me. I finally had to order my wide bubble wrap from Starboxes and found they had excellent customer service and reasonable prices. I did not use the entire roll I ordered so I have some for next year. I will probably remove all of the bubble wrap from this year and may try to salvage some of it. A good amount of it is dirty from the plants though so I am not so sure how realistic that will work for me. If you ever use bubble wrap for insulation make sure you install it before it turns cold outside or you'll have a condensation problem inside the greenhouse. Condensation will cause problems with the tape if you plan to tape on the bubble wrap like I did. I will be cognizant of this mistake come this fall and will be sure to put up the bubble wrap before it gets cold. It was not fun insulating it in the cold. The bubble wrap has made a great difference. On some of the forums gardeners with bubble wrap recommend using solar pool covers. I don't like this method because the solar pool cover bubbles are so much smaller and thinner that it doesn't seem like the layer makes much of a difference. Not only that but large solar pool covers are hard to work with in cutting them to size. I will stick with large bubble wrap for my greenhouse. You can see the bubble wrap in the pictures but in case you missed or forgot how I insulated this greenhouse you can find those posts here.  


The plants in the greenhouse have adapted and are doing well. Most of the plants have remained in full bloom this winter. My best greenhouse plants have been: lantana, 'Diamond Frost', 'Slightly Strawberry' Cape Mallow (Proven Winners), angel trumpets, and geraniums. All of these plants are blooming non-stop. I have to remember to add fertilizer to the soil as I water so that these plants don't burn themselves out. Some of my other plants have had issues and don't look so great. Mainly the pineapple sage I wintered over as cuttings is mottled and looks like it is stressed even though the plants are about one foot tall and green. Perhaps the humidity is too high for the sage I am not sure. But now that I am thinking about it the same pineapple sage looked terrible last year when I wintered it over in my unheated garage. I think that particular sage just prefers a hotter environment in general. Coleus has been a problem for me as well. I've lost several plants from what I assume to be root rot. Once I realized there was a problem I stopped watering them and am letting them dry out a bit now. The lettuce seedlings I started back in November haven't grown any so I never was able to harvest lettuce from the greenhouse. Those seedlings will be planted in the garden soon and before I know it head lettuce will be ripe for the picking. A plant doing well in the greenhouse that I did not plant is love in a mist. I harvested seedheads from my garden last year and hung them in the greenhouse to dry. Unbeknowst to me many seeds fell out of the plants onto the brick floor of the greenhouse. Those seeds have germinated and are nice and green in the greenhouse. They grow alongside one area of the brick floor; which is unreachable to me. That is where they'll stay because I can't get to them to do anything with them and they aren't bothering anything anyhow.I do hope they don't flower and go to seed in the greenhouse though as I don't particularly want flowers on my brick floor in the greenhouse. Basically I can say the plants are doing well in the greenhouse and the expense and time I took to install the greenhouse was well worth it.

Pests have not been a problem in the greenhouse but there have been a few. Due to the lovely new growth on most of the plants aphids have had a field day. The aphids especially love the angel trumpets. I keep a bottle of houseplant pest spray on hand and spray as needed. Ants are a common presence in the greenhouse but there is not much I can do about them; they are everywhere in the environment so I just leave them alone.


The rain barrel I placed in the greenhouse to use as a water source has worked better than I expected. I filled it up once when it was about half way empty. It is a 55 gallon barrel and I estimate that between the fill up and what I've used thus far this winter I have used approximately 30-50 gallons of water. That sounds like a lot of water but this greenhouse is full of large and small plants and there is barely a free spot in it! I have to fill a two gallon watering can in order to water most plants since the rain barrel outlet hose is fed by gravity. I do have a short hose on the tap but since many of the plants are up on shelves the water will not flow to them. This is not so bad but when you are watering a great deal of plants filling the water can on the floor then watering all of these pots by hand gets old in such a cramped space. I may try to rearrange a bit next year in order to make watering all of the plants a bit easier. I do heartily recommend putting a water source such as a rain barrel (fill it with the hose) in a greenhouse if you do not have a hose tap close by. Not only is water close by but the heating of the water during the day helps to maintain a reasonable temperature during the night. The mass of the water also makes less space the heater has to heat.


I guess that is about it for the greenhouse this week. Next week I will be posting on my vegetable/fruit/ornamental garden. I may just begin calling it a potager due to the variety of plants I grow in it and I think it is quite pretty and functional, albeit a bit small....


in the garden....

One more note on the greenhouse, I garden in Tennessee just south of the Kentucky border. My zone is Zone 6B or 7A depending on what reference you use. Our low temperatures sometimes get down to 10 degrees but generally run around 25 degrees on average in the winter. We also are subject to strong winds. After gardening in this greenhouse for nearly one year I can honestly say it is good little hobby greenhouse and should work for most needs a gardener could desire.

I know this post is long and I apologize. Since I've cut down posting a bit I seem to be trying to fit so much more into my posts. I may pick up posting a bit more to see how it goes. The beauty of blogging is that it is quite flexible!
 
Words and Photos Property of In the Garden Blog Team, 
 
In the Garden

Wednesday, November 12, 2008

Plant Cuttings in the Fall


When people come by the garden they often ask me where I get all my plants. This is a complex question which could take me all day to answer. Some answers might be easily acceptable, some not so easily understood. But all people like to hear about my free plants. Who doesn't love free plants?


You can get free plants from division, seed collecting, cuttings, layering, and friends (the best kind). This post is about cuttings, specifically cuttings I take in the fall to increase my stock of plants or to save tender plants which will not winter over in my Zone 6/7 garden.


I don't have a book that tells me when to take cuttings, it is kind of a trial and error thing on my part. Some cuttings that work in the spring will not work in the fall, and others in the fall won't work in the summer and so on. Still others there may be no right time to take cuttings but I sure love increasing my stock of plants from cuttings.


I have found that most cuttings I take from spring on into September will actually bloom that first year if they are an herbaceous perennial. See the Pineapple sage in the upper right corner that is blooming in the flat? I took that cutting on the 9th of September and the picture was taken just three weeks later. I am amazed how plants, even severed plants will still bloom when they are supposed to bloom. It must be in their genes.


The long window box flat is full of PeeGee hydrangea cuttings. Now in my experience the shrubs started from cuttings will take much longer to bloom and almost certainly will not bloom the first growing season they are planted out in the garden. But, as it is with gardeners, we have to have patience and soon enough we will be rewarded with blooms.


Here are some cuttings you might want to take now: lantana, hydrangeas, coleus, sage, Powis Castle artemesia, heliotrope, and datura.


For more ways to increase your stock of plants see Dave's blog for great information on propagating plants.


in the garden....

Monday, May 19, 2008

Not Seedlings-But Cuttings

Dave and I have more in common than just being Tennessee garden bloggers. He is a big cutting fan, and so am I. I have this awful thing about not throwing away anything. Plants need trimming during the growing season to stay bushy and compact; which leaves me with many trimmings-perfectly viable and live plant material. I decided to save the trimmings, stick them in some 'Rootone' hormone and plop them into seedling trays or window boxes. About two months later I have a plant ready to be planted out in the garden. Now that is the problem. Where shall I put all these plants??


These are certainly seedling trays, but there are cuttings in these trays. My poor deck looks like a nursery! I really hate it that I tend to get it so cluttered during the growing season, but the deck is the most convenient spot for both me and the cuttings. The deck is ideal for me because it is handily accessible to a water source from the kitchen, and the plants like the deck because it is in partial sun to mostly shade. Cuttings don't do well in full sun for me.

Some are destined to be given away, but most will go in my garden. I want the full, very full effect so all of the plants are used.

Good plants to propagate from cuttings are: mums, veronica, cleyera, sedums, helenium, Russian sage, salvias, and others. Some of the others I have tried include things like helianthus. I don't like doing helianthus though because you can easily divide these perennials in order to make more. I do cut them back but leave the cuttings where they fall.


I simply cannot take a picture without my dogs in it. I understand the dogs think I might get lost without their constant company, but urrrrr-it doesn't make it easier to swallow when they ruin a picture. This little gal in the first picture is CeCe . Her name is comprised of my twin daughters initials doubled for the twin aspect. BJ's name is comprised of my sons first names initials.


The last picture is of more clutter on my deck rail. Sigh. More plants of course. These are callas and one pot of my tuberoses Nina gave to me. They are all growing nicely. The window pictured is my kitchen window so I get a good view of the flowers and hummingbirds which like to visit these flowers.


in the garden....