 |
| From In the Garden |
See that huge sand pit in my yard? The area used to house a nice above ground pool that at one time looked like this:
 |
| From In the Garden |
We spent one hot day in early August taking the pool down. It was hot, sweaty, and dirty work. At least we were in the shade while taking the pool down. Because we didn't want to leave the very nice buyer out in the cold in the 100 degree heat in full sun without a pool we (Mr. Fix-it and I) offered to help him set it up. I'm not going to make this a long story but after taking the pool down and nearly having the frame set up in its new home a strong gust of wind came through and blew the pool down. It was not a pretty sight. Then a strong thunderstorm came through. Whew! From sweating in 100 degree heat to freezing and soaking wet we had quite the day with this pool. Fortunately, Sunday dawned nice and the new owner of the pool did some work on the pool overnight so that when we convened to work on setting up the pool again, all went smoothly. It helped that his neighbors came over and helped too. You really need a lot of hands when setting up a pool. The big rush with the buyer of the pool was that his wife was due to have a baby within the week and they really wanted their new pool set up. Mission accomplished but not without some pain and some good memories. Just let me tell you that taking down pools and setting them up is not for the faint of heart. It is a very difficult job! But when all was said and done Mr. Jacob got a very nice pool for a very reasonable price and we got this....
 |
| From In the Garden |
13 September 2010
 |
| From In the Garden |
26 August 2010
First of all it took me a few weeks to find the time and energy to start back filling the large hole where the pool used to be. The delay was in part due to the intensely hot temperatures we experienced in August, but I also needed to really get myself psyched to do what needed to be done-namely to back fill the large hole left by the pool. Since our property slopes the pool was dug into a slight hill where at its highest point there was a two foot drop off from the outside garden to where the pool used to be located. Here we can see where some of the drop off has been filled in. I used fill from edging my other garden beds where I moved approximately 40 wheelbarrows full of soil and grass. This soil was unceremoniously dumped into the hole. I wished I could have edged all the beds because that would've cut down my trips to get soil, but with the drought the ground was practically like rock and no edging was going to work. Enter the local quarry for some soil for back fill. |
| From In the Garden |
2 September 2010
I took five trips downtown (about a 13 mile trip one way) to the local quarry where I had Mr. Fix-it's truck loaded with about 1.5 tons of soil each trip. This soil, while not ideal, was handy and available and they loaded it for me. I had to unload it -with a snow shovel. Surprisingly it only took me about 1.5 hours to unload the truck after each trip. These trips were spread out over a week or so based on my schedule and the heat.
As I was back filling I decided to fill the left side of the hole first and plant as I went along-can you say inpatient? That was me! When I say left side I mean of the new path area and where the pool used to be. You can clearly see where the left side of the hole has been partially filled in the picture above. When I got an area completely filled in I planted plants in that area. I surmised they'd do better in the ground than in the pots they had been sitting in all summer. I had had about 40 pots full of plants waiting in the shade near the water spigot just to be planted. The plants were looking rough as it is difficult even with regular watering to keep a shrub or even perennial alive in a small pot in 100 degree weather. I don't know how nurseries do it! After I planted I watered. Did you know a water molecule is a 'sticky' molecule? It will make a chain with other water molecules and try to fill up all spaces where there is no water. Hence, after watering the left side of the new beds I woke up in the morning to find that the water had spread to the center of the former pool area where the path was to go. Can you see the water line in the dirt in the above picture? This is where the water finally ran out and stopped moving. It had saturated all it could then gave up. The 'soil' I used for back filling is creek bottom soil and is a very fine particle soil. I have used this soil before and find it extremely heavy. The saving grace is that there is about 4-6" of sand under it (the former base of the pool). I'm hoping this will make drainage better since this area of my yard is naturally low anyhow and seems to draw water; not that we've had any this summer.
 |
| From In the Garden |
7 September 2010
Ah, here we go! We can now see my plan for the space. It took more than one month but it is coming together nicely. The grass path (six feet wide to allow for the lawn mower and easy access to the shed) is in place. All grass was removed from the area surrounding the old pool and transplanted to its new location. Just look at the pool picture (second picture on this post) to see the lovely grass that I worked so hard to fertilize, grow, and weed-only to rudely move it into a new location; all with my trusty shovel. The grass this time of the year is mostly dormant or mostly weeds. I grow fescue and I tell you this summer has been difficult for it. Nonetheless, the soil and sand are covered and the grass will settle in quickly. As an added good measure to get a good stand of grass in this area I sprinkled Rebel grass seed on top of the transplanted grass. By next spring you'll never know it had been transplanted.
 |
| From In the Garden |
7 September 2010
A word about the garden on the right side. Like I said before, I planted as I went along so that once one part of the garden was done I did not need to go back to it. Part of this new garden in the pool area encompassed the 'Greenhouse Garden' that was an already established garden. I needed to change this garden because my whole vision for this area had changed with the removal of the pool. The change involved moving some 'Annabelle' shrubs and perennials. This part of the job, while time consuming, was actually not difficult since I had a good idea what would work, what I wanted and how I planned to plant.First and foremost was the fact that since the garden area is about 75 feet from my deck I needed a big impact and onesies and twosies were not going to cut it. Nor would only perennials. My line of attack was to plant all shrubs in the old pool area and gradually step down to perennials as you come closer to the deck and up the slight hill toward the greenhouse. There are two trees in the greenhouse garden already (Crabapple and 'Burgundy Flame' Japanese maple) and these two trees did not move. In the planted right side of the garden are: 9 red astilbes (transplanted), 9 'Magnus' coneflowers, 9 'Ruby Star' coneflowers (all coneflowers purchased for $1 per pot markdown at Lowes), 9 'Golden Jubilee' agastache (also $1 markdown) , 3 'Striatum' geraniums (Jung Seed), 6 'Tango 4 You' lilies ($1 markdown), 15 great blue lobelia started from seed (thanks Catherine), 10 turtleheads (cuttings), 2 columbines (markdowns), 3 cimicifugua racemosa (divided and transplanted), 3 Japanese anemones (transplanted), 2 chrysanthemums (transplanted), St. John's Wort (gift from Naomi), 'Globosa Nana' cryptomeria (transplanted), 3 Annabelle hydrangeas (moved from next to greenhouse to under crabapple), woodland phlox, woodland asters, hardy ageratum (all transplanted), a variety of sedums (already there), 'Immaculee' peony (already there), asters (already there), 3 oakleaf hydrangeas (seedlings transplanted from elsewhere in the garden-they are now about 5 years old and 5 feet tall), iris cristata, 6 'Adagio' ornamental grasses (moved from around the pool and divided), several daylilies, little bluestem grass, 'Goldsturm' rudbeckia, 12 'Red Riding Hood' penstemons, a clump of heliopsis, and about 8 clumps of the 'Autumn Sun' rudbeckia. The area is quite large so though it sounds like a lot I list the plants mainly for my own records and not really for you all. I'll tell you why, most of the time when I read blogs I don't really pay attention to the lists of plants so I'm sure you all won't either. Just suffice it to say the perennials and shrubs are all massed in areas I think they will do best based on soil and light conditions. All plants are tiered from shortest to tallest in the garden based on the vantage point. I must say this though, there is another path behind this garden that separates a maple tree and groundcover from this particular garden so that other path has a completely different look to it from its side of the garden. The area is quite large but I seemed to have filled it up quickly. I can never imagine just how quickly until I plant.
On the lower end of the right side of the path (where you see mainly plain dirt) I planted: 4 'Limelight' hydrangeas, 3 'Tardiva' hydrangeas, 5 doublefile viburnums, and a 'Diablo' ninebark. The below picture shows a better view of all the shrubs. See the limelight? It is happy and hopefully will be happier next year now that it is in a moister area that receives more sun.
 |
| From In the Garden |
8 September 2010
 |
| From In the Garden |
14 September 2010
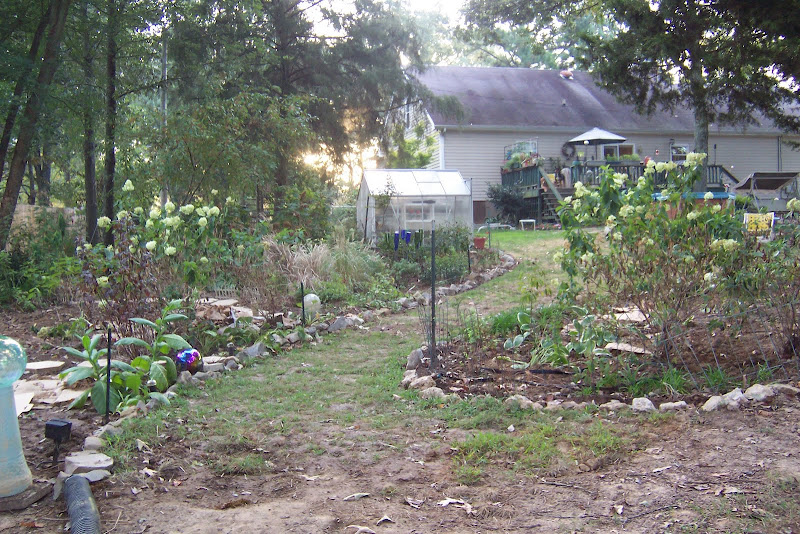
Here we are with all hydrangeas moved and in place as we walk along the path at ground level. Pictures just don't really give the reader the feel for the area unfortunately but walking along you can at least see it up close. Some cardboard has been placed for mulch. All cardboard was received via another Freecycler who just moved to the area. I find cardboard great for under shrubs where voles are not a major issue. The cardboard has since been covered by hardwood mulch. Prior to removing the pool this area would be inaccessible and the way to the shed would be to the far right and to the far left of the 'Limelight' hydrangeas. What a difference for me!
 |
| From In the Garden |
14 September 2010
Looking up toward the house we can get a different perspective of the garden. Paths are one of the most important features in a garden and I like my paths to be functional yet a bit mysterious and enjoyable when traversed. Coming up from the storage shed this is my view.
While I listed my plants for the left side of the path I did not list them for the right side. They are as follows: sourwood, three spireas, 3 'Limelight' hydrangeas, 'Duet' variegated beautyberry, 'Soft Touch' mahonia, yellow and orange daylilies (transplanted from around the pool-you can see them in the pool picture), hostas, pachysandra, and hellebores. I have intentionally kept this side simple due to an awful lot of shade and competition from a cedar tree. The sourwood tree will be the focal point once it gets larger (which will take years probably). It is situated in the curve of this bed where it is sandwiched between the canopy of an oak and a cedar tree. I have read where sourwoods do not like root competition. Right now there is none but in a few years I suspect roots will grow to fill in this garden area; therefore I've tried to use hardy plants here. I've found 'Limelight' hydrangeas actually do fairly well under trees because these large and mature ones were growing under a black gum tree. I was able to pull them out bareroot due to the drought. The roots surprised me because they spread more than four feet from the shrub's trunk. The problem I found that I did not like was the roots were not very deep; which is not good for survival in the typical drought conditions Tennessee seems to experience each summer. We'll see how they do in their new location where there are still roots, but the area is moister.
Wow, this is a long post and one I've been working on for a while now. I am not done with this area. I did do a landscape design for this garden but it is not quite finalized. I will share that at a later date....
in the garden....
While I listed my plants for the left side of the path I did not list them for the right side. They are as follows: sourwood, three spireas, 3 'Limelight' hydrangeas, 'Duet' variegated beautyberry, 'Soft Touch' mahonia, yellow and orange daylilies (transplanted from around the pool-you can see them in the pool picture), hostas, pachysandra, and hellebores. I have intentionally kept this side simple due to an awful lot of shade and competition from a cedar tree. The sourwood tree will be the focal point once it gets larger (which will take years probably). It is situated in the curve of this bed where it is sandwiched between the canopy of an oak and a cedar tree. I have read where sourwoods do not like root competition. Right now there is none but in a few years I suspect roots will grow to fill in this garden area; therefore I've tried to use hardy plants here. I've found 'Limelight' hydrangeas actually do fairly well under trees because these large and mature ones were growing under a black gum tree. I was able to pull them out bareroot due to the drought. The roots surprised me because they spread more than four feet from the shrub's trunk. The problem I found that I did not like was the roots were not very deep; which is not good for survival in the typical drought conditions Tennessee seems to experience each summer. We'll see how they do in their new location where there are still roots, but the area is moister.
Wow, this is a long post and one I've been working on for a while now. I am not done with this area. I did do a landscape design for this garden but it is not quite finalized. I will share that at a later date....
in the garden....
Words and Photos Property of In the Garden Blog Team,
In the Garden


