Showing posts with label Seedlings. Show all posts

Monday, October 3, 2011

Camellia Seedlings In The Garden

100_4007
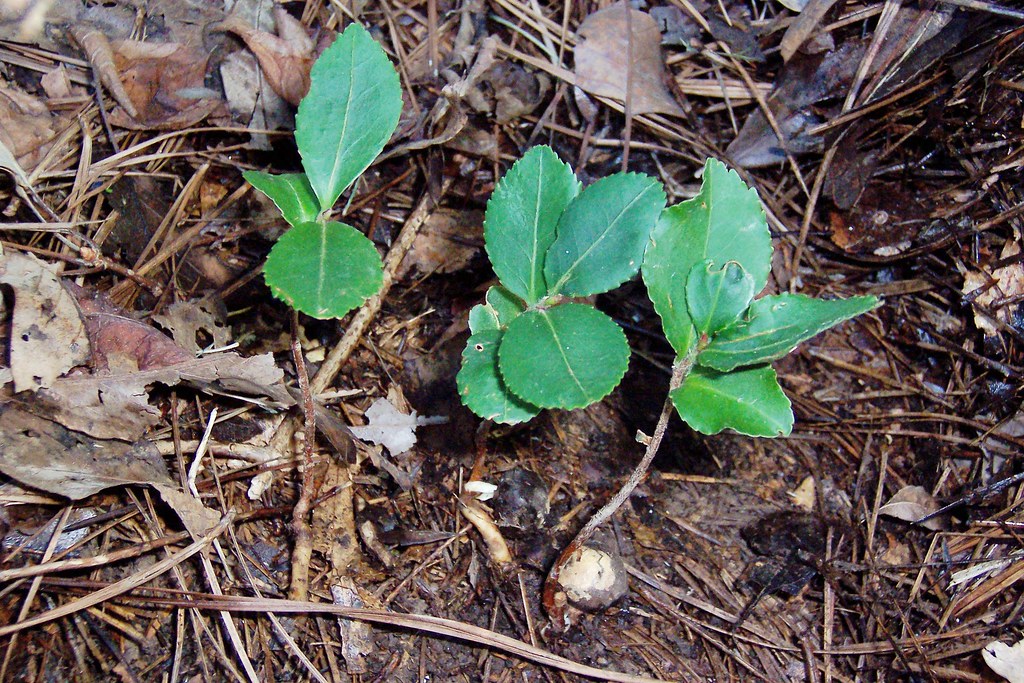
With the advent of fall things in the garden have been happening rather rapidly. I've been very busy planting many new plants, creating a new garden, dividing and filling in, and preparing the greenhouse for the winter. While scurrying about doing all my chores I passed by my very large fall blooming pink camellia and I happened to notice some evergreen plants growing below the tree. There were seven evergreen seedlings growing under the camellia and I thought to myself-dare I hope? Dare I hope for seedlings from the camellia? I have had camellia seedlings before and tons of camellia apple seedpods but I have not had luck really getting more camellias from the existing camellias-until now.
100_4006
Still skeptical these seedlings were camellias I dug through the pine needle mulch until I reached the seed. And sure enough! These seeds are clearly the apple seedpods I posted about a few years ago. I now had confirmation that these seedlings were indeed camellias. It seems the conditions were just right for the camellia apple seeds to sprout and give me two clumps of several baby camellias. And do you know what that means? Yup, another chore for me to add to my already long list of chores to be accomplished in the garden-and time is running out. Like I need another chore this time of the year. I now have to dig these seedlings and pot them up until they get big enough to either give away to friends or sell at a plant sale. Still, it was a delightful chore and one I surely should not complain about since mother nature did all the propagating for me....


in the garden....

Words and Photos Property of In the Garden Blog Team, In the Garden

Wednesday, March 16, 2011

Let's Talk Seedlings: Greenhouse and Winter Sown Seedlings and Propagation

Impatien cuttings, Sweet Woodruff, Zinnia, basil, Great Blue Lobelia seedlings
From In the Garden
I've been busy in the garden and it only promises to get worse with all these seedlings. I mean what was I thinking?? As gardeners we can get a bit carried away with starting seeds. Oh how our gardens must be filled to overflowing with abundance such as never has been seen before. Seeds, seeds, seeds! Cuttings, cuttings, cuttings! And what do you do when you have all of these overflowing cell pack and pots? Well, post about it of course. I'll figure out the planting part later:)

Ever since I found out you could start impatiens from cuttings I've been a cutting fool with all of these new plants. I can't wait to plant them out. Impatiens are one plant I can always find a spot for. I'm not so sure about the zinnia, basil, sweet woodruff, and great blue lobelia you can also see in the above photo though. That will be another problem all together. 

I must say my seed starting endeavors have been successful. I think the secret is in the seed heat mat providing bottom heat. This heat seems to work magic on both cuttings and seeds. I recently saw a very neat  idea that I thought most thrifty. The idea came to me by way of one of my gardening magazines in which a reader substituted Christmas lights in a plastic Tupperware container for the seed heat mat. The lights gave off just enough heat to keep the seeds warm and provided a neat focal point as well. One of these days when this old standby heat mat gives out I might just try that trick.
Outdoor sowing area on the deck table.
From In the Garden
I tried winter sowing a few years ago and was not happy with the results. I surmised that perhaps I didn't use the right containers and maybe it was my fault all the seedlings did not survive past the container stage. This year I decided to use all milk cartons for my containers and the "Hunk of Seedlings" approach. The hunk of seedlings approach says to just plant a clump of seedlings without worrying about separating all of the seedlings. You can thin them later once they have settled in So far so good because most of my seeds have sprouted and are doing very well.

The winter sowing method basically says to sow seeds during the winter and when the time is right for the seed to germinate it will germinate. The method made sense to me but again, I have only just learned about this seed starting method about three years ago. I like winter sowing seeds in containers because I can have control of the seeds and seedlings. If seeds are sown in my garden in the fall or winter they tend to get lost. Some seeds need cold and warm temperatures to help with the germination so winter sowing provides this service-passively. Not only do the temperatures fluctuate quite a bit here in my area; which mimics the action of nature when seeds fall naturally from the plant in the fall, but moisture is usually always present so I don't have to water the seeds I have winter sown versus greenhouse seedlings. Some of the seeds I have sown in my milk jugs include: lychnis, common milkweed (Asclepias syriaca), butterfly weed (Asclepias tuberosa), Mexican milkweed (Asclepias curassivica), sweet woodruff, hollyhocks, lilium regale, prunella, dames rocket (Thanks Darla!), and perhaps a few more I cannot recall at this time. So far these seeds have germinated: butterfly weed (tuberosa), sweet woodruff (also germinated in the greenhouse flats), hollyhocks, lychnis, dames rocket, and prunella. I am most excited about them all and expect the rest will pop up soon.
Sweet Woodruff winter sown seedlings.
From In the Garden
Now that I have all these seeds germinating what should I do with them? It seemed when I tried winter sowing before that the seedlings just kind of fizzled away in the containers so this time I have decided to be a bit more proactive with my new seedlings. Even though many of these seeds are used to germinating in cool weather and may do just fine, I wanted to baby them a bit. What I have done is separated these 'hunks of seedlings' into smaller sized hunks and transplanted them to a window box planter. I prefer window box planters because you can fit so many more plants in each elongated planter and there is a lot of soil available to each small plant. I do not like cell packs for propagating plants but do use them as well. The cell packs are okay if you buy the ones that have the large cell packs (no more than 32 cells per flat) and if you take very good care of them. Generally though I find the cell pack planting style to be a temporary way to start plants because the cells and trays wear out very quickly. The window box planters last a long time, usually have  a built in water tray, and are easy to handle and store. As of right now I have two window box planters full of three types of winter sown seedlings. I placed these pots in the greenhouse with the greenhouse sown seedlings and all are doing well. I am looking forward to everything getting a bit more girth so I can move all seedlings outside into a covered plastic germinating shelf I have stored on my porch. I have never used this little 'greenhouse' before but think it will be perfect for hardening off seedlings and cuttings this year.

One problem solved as to where I should put the winter sown seedlings, check. Greenhouse seedlings and cuttings doing great with bottom heat in the greenhouse, check. Now to find a spot for all of the cuttings and seedlings....

in the garden....

One note about the containers. When I cut my first milk carton I did not cut large enough drain holes. I think it vitally important these containers drain well so I had to go back and cut some large holes. I left the handle intact so I could close the top over the milk jug; which makes a small greenhouse that will protect the seeds from harsh weather like pelting rain. Pay close attention to drainage of your winter sown containers if you are getting  a lot of rain like we are here in Tennessee. 

Words and Photos Property of In the Garden Blog Team, In the Garden

Wednesday, February 9, 2011

Greenhouse Lessons and Advice

From In the Garden
I wanted to share some fun I've been having in my small 6' x 8' greenhouse but before I do let me share 'The Birds'. We have been inundated with what seems like millions of birds. I'm sure it is more like thousands-tens of thousands because it is a LOT of birds we've been seeing here lately. This time of the year is the time for birds to begin thinking about spring and large flocks of blackbirds are common during migrations. But have you ever just sat and watched them? They are really quite a sight. I wish my camera was better at capturing them but here I show you just a few of the birds here in Woodlawn. Some folks are concerned and even alarmed at the sightings of the all the birds but I think it is perfectly normal and nothing to worry about. Just watch your bird feeders because they will quickly wipe you out! Now on to the greenhouse and some busy seed starting and plant propagation fun.
From In the Garden
It was almost like a wondrous Christmas when I read in the most recent issue of The Tennessee Gardener that you can start impatiens from cuttings. I had no idea! I've started many impatiens from seeds over the years and of course impatiens self seed in my garden yearly but to be able to start them from cuttings was literally Christmas for me! Since I winter over a few mother plants in my greenhouse I figured I'd try the cuttings with impatiens. So I cut small 3-4" sections of plants from my mother plants, dipped the sections in rooting hormone and plopped them in a seedling tray with a good well draining seed mix for potting soil. Within two days the cuttings had roots! They look a little yellow and weak but it has only been one week since I took the cuttings and they will fill in soon. I was able to get about 40 cuttings from just three mother plants and haven't stopped yet. It will be so nice not to have to buy impatiens flats and to just bring out my flats and plant them. Impatiens are workhorses in my garden since I have a rather shady garden. These little annuals can't be beat for all season long color.
From In the Garden
Emboldened by my success with the impatiens I've been trying all sorts of plants as cuttings in the greenhouse and have begun some seedlings. So far I've sown only cold weather plantings of things like chard, kale, and lettuce. I'll soon be sowing seeds of spinach in the greenhouse and will begin hardening off the seedlings later this month so they are ready for planting in the vegetable garden within the next few weeks. I am very excited about my vegetable garden and will be talking about it in next week's post. The success with the vegetable seedling only adds to my excitement. 


This is my first year with the greenhouse and while my little greenhouse is only 6' x 8' feet it is an excellent size for all of my plants. I keep telling my husband it keeps me honest in that I am limited by the number of plants I can store in it so I am not tempted to overdo tropicals and tenders. They are just too much work even though I do enjoy them all. One fault of the greenhouse is that even though my plants fit in it comfortably, I am stretching for space for the new seedling and cutting trays. Additionally, there is not much room in it for me when I need to water by the time you factor in the space the rain barrel, shelving, a huge tree houseplant, and the heater takes up in the greenhouse-quarters are cramped. You can probably tell from the pictures above. 


Heating the greenhouse has been a very simple matter. The small 1500 watt radiant heater I have placed in the greenhouse works like a charm. I have it set to keep the greenhouse temperature above 50 degrees. During sunny days the greenhouse temperature can easily reach 80+ degrees! It is an awesome place to hang out on sunny days. No matter how hard and frigid the wind is blowing outside it is always toasty in the greenhouse on sunny days. The problem this winter is that we've had more cloudy days than sunny days and the heater has been running more than I'd like it to. Our electric bill has felt the pain as well. I'm not sure how much it costs to heat the greenhouse but I estimate between $30-$60 a month. The small size of the greenhouse makes it economical to heat but it also means the plants can go through some extreme temperatures (80 degrees during the day and down to 50 at night).One very nice note is that when we lost our power three nights ago from approximately midnight to 3:00 am, the plants did not suffer so I think that either the plants are quite flexible and adaptable (a great trait!) or that my greenhouse is well insulated and has enough passive solar heating to compensate. I'll soon be switching from the heater to only seed heat mats and passive heating as the days get longer. All in all heating the little greenhouse has been easy and rewarding. 

I must mention the bubble wrap I used as additional insulation. I covered all of the inside panels of the greenhouse with 4 foot wide large bubble bubblewrap. The only area I could not cover with bubble wrap inside of the greenhouse was the greenhouse door. I had to tape the bubble wrap to the outside of the door in its case due to the way the greenhouse door was configured. The bubble wrap along with the caulking and polystyrene panels has made my little greenhouse a well insulated cocoon. I am quite pleased with this fast as I was a bit afraid the cold of the snow and outside would penetrate inside, and vice versa that the heat from inside would be felt outside. That has not been the case at all. You can find bubble wrap in the wide widths (four feet wide was the widest I could find) on the Internet. I could not find any bubble wrap wider than two feet in any stores or shipping stores like UPS-and I tried, believe me. I finally had to order my wide bubble wrap from Starboxes and found they had excellent customer service and reasonable prices. I did not use the entire roll I ordered so I have some for next year. I will probably remove all of the bubble wrap from this year and may try to salvage some of it. A good amount of it is dirty from the plants though so I am not so sure how realistic that will work for me. If you ever use bubble wrap for insulation make sure you install it before it turns cold outside or you'll have a condensation problem inside the greenhouse. Condensation will cause problems with the tape if you plan to tape on the bubble wrap like I did. I will be cognizant of this mistake come this fall and will be sure to put up the bubble wrap before it gets cold. It was not fun insulating it in the cold. The bubble wrap has made a great difference. On some of the forums gardeners with bubble wrap recommend using solar pool covers. I don't like this method because the solar pool cover bubbles are so much smaller and thinner that it doesn't seem like the layer makes much of a difference. Not only that but large solar pool covers are hard to work with in cutting them to size. I will stick with large bubble wrap for my greenhouse. You can see the bubble wrap in the pictures but in case you missed or forgot how I insulated this greenhouse you can find those posts here.  


The plants in the greenhouse have adapted and are doing well. Most of the plants have remained in full bloom this winter. My best greenhouse plants have been: lantana, 'Diamond Frost', 'Slightly Strawberry' Cape Mallow (Proven Winners), angel trumpets, and geraniums. All of these plants are blooming non-stop. I have to remember to add fertilizer to the soil as I water so that these plants don't burn themselves out. Some of my other plants have had issues and don't look so great. Mainly the pineapple sage I wintered over as cuttings is mottled and looks like it is stressed even though the plants are about one foot tall and green. Perhaps the humidity is too high for the sage I am not sure. But now that I am thinking about it the same pineapple sage looked terrible last year when I wintered it over in my unheated garage. I think that particular sage just prefers a hotter environment in general. Coleus has been a problem for me as well. I've lost several plants from what I assume to be root rot. Once I realized there was a problem I stopped watering them and am letting them dry out a bit now. The lettuce seedlings I started back in November haven't grown any so I never was able to harvest lettuce from the greenhouse. Those seedlings will be planted in the garden soon and before I know it head lettuce will be ripe for the picking. A plant doing well in the greenhouse that I did not plant is love in a mist. I harvested seedheads from my garden last year and hung them in the greenhouse to dry. Unbeknowst to me many seeds fell out of the plants onto the brick floor of the greenhouse. Those seeds have germinated and are nice and green in the greenhouse. They grow alongside one area of the brick floor; which is unreachable to me. That is where they'll stay because I can't get to them to do anything with them and they aren't bothering anything anyhow.I do hope they don't flower and go to seed in the greenhouse though as I don't particularly want flowers on my brick floor in the greenhouse. Basically I can say the plants are doing well in the greenhouse and the expense and time I took to install the greenhouse was well worth it.

Pests have not been a problem in the greenhouse but there have been a few. Due to the lovely new growth on most of the plants aphids have had a field day. The aphids especially love the angel trumpets. I keep a bottle of houseplant pest spray on hand and spray as needed. Ants are a common presence in the greenhouse but there is not much I can do about them; they are everywhere in the environment so I just leave them alone.


The rain barrel I placed in the greenhouse to use as a water source has worked better than I expected. I filled it up once when it was about half way empty. It is a 55 gallon barrel and I estimate that between the fill up and what I've used thus far this winter I have used approximately 30-50 gallons of water. That sounds like a lot of water but this greenhouse is full of large and small plants and there is barely a free spot in it! I have to fill a two gallon watering can in order to water most plants since the rain barrel outlet hose is fed by gravity. I do have a short hose on the tap but since many of the plants are up on shelves the water will not flow to them. This is not so bad but when you are watering a great deal of plants filling the water can on the floor then watering all of these pots by hand gets old in such a cramped space. I may try to rearrange a bit next year in order to make watering all of the plants a bit easier. I do heartily recommend putting a water source such as a rain barrel (fill it with the hose) in a greenhouse if you do not have a hose tap close by. Not only is water close by but the heating of the water during the day helps to maintain a reasonable temperature during the night. The mass of the water also makes less space the heater has to heat.


I guess that is about it for the greenhouse this week. Next week I will be posting on my vegetable/fruit/ornamental garden. I may just begin calling it a potager due to the variety of plants I grow in it and I think it is quite pretty and functional, albeit a bit small....


in the garden....

One more note on the greenhouse, I garden in Tennessee just south of the Kentucky border. My zone is Zone 6B or 7A depending on what reference you use. Our low temperatures sometimes get down to 10 degrees but generally run around 25 degrees on average in the winter. We also are subject to strong winds. After gardening in this greenhouse for nearly one year I can honestly say it is good little hobby greenhouse and should work for most needs a gardener could desire.

I know this post is long and I apologize. Since I've cut down posting a bit I seem to be trying to fit so much more into my posts. I may pick up posting a bit more to see how it goes. The beauty of blogging is that it is quite flexible!
 
Words and Photos Property of In the Garden Blog Team, 
 
In the Garden

Wednesday, January 20, 2010

Veggie Garden Update-January 2010

Tina's Veggie Garden Update-Tennessee:

Now that the 'big arctic' freeze is over I had the heart to venture outside and explore the garden a bit. I must say I am most excited to see any green in the vegetable garden but to find as much as I did I am most excited! This Swiss chard (pictured above) is a keeper. It has been growing in the garden since last spring and seems to show no sign of letting up. I have purchased more seed and this is one vegetable I will always grow in my garden.
The Chinese cabbage is another keeper. This 'cabbage' is growing under a coldframe and has held up really well. I can't wait until it gets a bit bigger so I can start cutting the leaves for salads. The spinach that was also growing in this coldframe did not fare as well, but I am hopeful it will bounce back soon.
Finally-see those seedlings above? They are lettuce seedlings NOT growing in the coldframe. I planted these in November and they have all hung on despite the frigid temperatures. I am most excited with these!

I also have some elephant garlic, turnip greens, and onions growing and they are all doing outstanding. You'd hardly think it was cold here at all.

The Chinese cabbage, lettuce, spinach, and turnip greens are all growing in the vegetable bed where I buried manure 10" deep under the soil. I don't think the manure has generated any heat so it is simply not helping the vegetables with warmth. However, it will make a big difference come this summer when I plant gourds in the bed. I will continue to amend the soil with manure when I don't have compost available but I prefer compost. Next winter I may try something different in my coldframe. I read in a book (Brother Gardeners) where tannic acid can heat the soil in a coldframe. I've not done any research on it though so I need to research it further before I try it out.

It is nearly time to start your seeds here in Tennessee. I usually plant seeds for the summer garden mid to late February, but right now is the time to start your cool weather crop seeds like: lettuce, cabbage, cauliflower, broccoli, and chard. Next month I"ll be planting peas in the garden and may pick up some transplants once they come in. I am not big on starting vegetable seedlings since I think there is a pretty good variety in the stores but I will be starting a few.

How is your vegetable garden growing? And are you ready for it to ramp up real soon? I'm not!

Skeeter's Veggie Garden Update-Georgia:The gourds I grew in my Georgia Garden are hanging in the shed as they continue to dry. I will turn the larger ones into birdhouses while making other crafts from the smaller gourds.

Again, as in the past few years, we are receiving way too much rain in the yard. It was already a soggy mess and here we had over 2 more inches this past weekend! Ouch...We made a great attempt to have a vegetable garden the past two years but with little success. I am sad to say we are giving it up as it is too costly and time consuming for such little rewards. The fence you see above will come out of the ground and we will leave the pine straw and leaves as a natural area of water run-off. We will continue to incorporate sweet peppers, herbs and tomatoes into the flower garden as they do thrive there. We chose a bad spot for our Veggie Garden and we knew it would be a gamble. We have lots of land but no great area to dig a new Vegetable Garden without cutting major trees. We have just decided to dwell on the things we know we can grow with our current conditions.I have finally gotten around to playing with the smaller gourds from our 2008 crop. They have a coat of white paint on them and soon they will be snowmen. I will show the finished product at some point. I have put them on the back burner for now as we are going to be tied up for the next week or so.

This will be my last entry to the Monthly Vegetable Update as I don't see how I could keep anyone interested in peppers, maters and herbs for an entire year! Ha ha... Happy Vegetable Gardening in 2010, In the Garden...

Words and Photos Property of In the Garden Blog Team,

In the Garden
Saturday, May 23, 2009

A Gift from Dan

By Skeeter

It is always fun to read other Garden Blogs although I have not had the time lately to visit many. The spring planting season keeps me busy in my Georgia Garden and not on the computer so much. The Blogging world is full of fun and interesting people with wonderful new ideas. I learn something new every day while blogging! One of those new things I learned was there is such a thing as purple tomatoes! When Dan from the Urban Veggie Garden talked about them, I was intrigued. Dan offered to send me some seeds and just as promised, they arrived in the mail.
I put some of the seeds into small containers and moisten them well with warm water.
Then to the tray they went.
Plastic lid on top and in front of a sunny window in the sun room to sprout.
This is one of two reasons why I don't like to fool with seeds, seedlings and all plants in this house. Sheba (one of the two) was table-side as soon as I placed the tray in that spot. Those cats don't miss much!
I have never really had much luck with starting anything from seeds inside but was keeping my fingers crossed for Good Luck just the same. Oh happy day when two of the seeds sprouted for me!
I tried my luck with more seeds but to no avail. I am saving the last few to place directly into the soil once we get the Veggie Garden tilled.
The Veggie Garden soil remains too soggy to til so for now the tomatoes were transplanted into larger containers.
They did not handle the transaction well and I was worried that I was going to loose them.
But as you can see, one is taking off and doing really great now. The other one is still chugging along and hopefully it will survive the transplant and a second transplant into the ground once it is ready for planting.
I am hoping to sink my teeth into my first purple tomato this summer. And if I do, it is all thanks to blogging and A GIFT FROM DAN, In the Garden...

Again, thanks for this gift Dan. Even if I fail, it has been fun trying my hand at raising a purple tomato from such a tiny seed!

Friday, December 12, 2008

Love in a Mist and Other Fall Seedlings

A plant that completes its life cycle in one year is known as an annual. Everyone knows this right? When I think of annuals, I think of marigolds. Most everyone has grown marigolds at least once in their lives. You purchase the seeds in spring, plant them out, enjoy the bright orange or yellow flowers all summer, then pull the plants when fall arrives. But did you know some annuals begin their life cycle in the fall and complete it the following spring? It doesn't really seem like an annual when a plant begins growing in the fall, but I assure you, these plants pictured are annuals and I thought you might like a look to see if you have some growing in your garden this time of the year. I bet many of you do, including Cameron of Defining Your Home Garden. She has quite a few lovely fall seedlings in her yard. Take a look at her post and see if you have some larkspur and poppies growing right now. I am focusing on two that I have in my garden. They are Love in a Mist and Chamomile.

The first picture shows the seedling of Nigella damascena, aka Love in a Mist. This is a favored plant in the garden. It brings a bit of green to the winter garden and come February or March this plant spreads its wings and shows us a great deal of blue, light blue, pink, and even pale white blossoms. As if that were not enough, the seed pods are SO interesting and many gardeners grow Love in a Mist just for the seedpods.

The next picture shows chamomile. I am pretty positive it is German chamomile (Matricaria recutita), and not Roman Chamomile (Chamaemelum nobile) because my chamomile is an annual and the Roman type is a perennial. Thanks for your help Cosmo! This seedling will grow into a plant about two feet wide by one foot high and it will cover itself with blooms once early spring arrives. I love this plant for its filling capacity and ability to tie together all the bright and varied colors of spring time flowers such as: salvias, irises, azaleas, and the various bulbs. The bloom color is pure white with a yellow center. The flowers look very much like small daisies.

I have grown both of these annuals for over five years now and have been quite pleased with them. Once they flower they usually stay in flower for about three to four months (in my garden), then set seed and slowly fade away until the fall; where I once again have to be on the lookout for these seedlings. The seedlings come from the ample seeds the flowers leave behind when they fade away.

I have never ever collected the German Chamomile seeds but it has been a mainstay all on its own. Sometimes the chamomile finds itself growing far away from the mother plant in areas I would never have intended for it to grow. Fall is when you can either pull the plant and compost it (who would want to?), or you can transplant the plant to a better location. The German Chamomile is not picky about light; which is a lifesaver in my shady garden. It can happily grow under the pine tree, or out in the veggie garden.

The Love in a Mist reliably self seeds in the area where it is growing. I do collect the seed heads and sometimes use them in flower arranging. Most of the time though I just sprinkle the seed heads in areas I wish to have more Love in a Mist growing. Love in a Mist needs full sun in order to do well and will severely languish in the shade; as I have learned.

Do look for these annuals while you are out in the garden. If you all know of any other annuals that you might find seeding in the garden right now, please leave a comment annotating them. I have not included biennials in this posting, but there are tons of biennial seedlings you will find growing in the garden at this time. These are just a few of the biennials growing in my garden right now, and perhaps yours too: parsley, hollyhocks, and Queen Anne's Lace.

in the garden....

Thank you very much for the pink hollyhock seeds Linda! They arrived yesterday, well packaged and all intact. I look forward to seeing their pretty faces in the garden and they will become your signature plant in my garden-is that okay? I need to get them in right away too! Thanks again!!

On yesterday's Green/Gold Hosta Post we have a winner with the exact correct guess! It was Skeeter's mother who guessed our friend Delona, the Hosta Guru Lifetime (somebody!) Master Gardener. Great job and thanks for the guess. It is such a small world to learn the connections, both through blogging and through real world connections. Thanks again Skeeter's Mom!

Monday, August 11, 2008

Daylily Seedlings

We who live in the Clarksville area are lucky we have our very own daylily farm; which also has blackberries and blueberries. It is called 'The Tin Barn' and is located just north of Clarksville. On a gorgeous summer day (not too hot and humid and with a mild breeze), Mr. Fix-it, the Jimster, Vonna and her daughter, and I made the track out to the Guthrie area to pick some blackberries and blueberries. I was on a quest to purchase a few new daylilies.

As I often do, I reassessed the gardens and found a flaw or two. I have this habit of reworking the gardens quite a bit during each season in order to show off the blooms for that current season. My goal is to have year round interest in all gardens. Even when the flowers are not blooming I want the foliage to match with whatever else is blooming. My challenges are that I am limited by space and lack of the full sun many flowering plants require.


Daylilies are one of those plants that do well here at Tiger Gardens. They would like more sun than I can provide, yet they never fail to reward me with lovely blooms and great foliage. I have many colors and types, but very few named varieties. I have chosen to subscribe to the 'more bang for the buck' theory. Seedlings for sale at the Tin Barn in the Guthrie area cost the same as named varieties, but the clumps are so much larger (up to 15 fans versus the 2-3 fans you get with named varieties) that I always buy seedlings. Hence, the 'more bang for the buck'. Seedlings in no way mean my daylilies are inferior to named cultivars, it just means they have not been registered. Reasons for not registering all seedlings can be numerous. Maybe the seedling didn't meet all the criteria the breeder desired. Or maybe there was a better seedling with just the right traits. It matters not to me, because each daylily I handpick are uniquely suited to me and my needs. And, I am pretty sure no one else will have the exact daylily in their garden that I pick. We all know I like my garden to be different.


In reassessing my gardens, I have noticed the orange daylilies I have planted in front of my home are not working. They are too short and do not show up well against the stone we had installed last fall. My quest on this visit to the Tin Barn was to find a tall daylily, preferably with ruffles, and one which would show up well against the stone. Foundation gardens can be tricky to design. You want the flowers to make a big impact because they are usually viewed from the road. Not all colors lend themselves well to showing up from a distance. I find the reds and yellows work well. I wanted a yellow daylily to replace the orange daylilies.


You can see I wound up with three clumps of daylilies on this trip. A yellow ruffled one, a red one with a contrasting yellow throat, and a unique peach colored daylily. All three seedlings do have ruffles. The pictures show the daylilies as they were after being rudely dug from their beds, and transported the 20 miles or so to home in the back of Mr. Fix-it's truck. They were not happy and show their displeasure by wilting and looking ragged. The trauma is of no consequence though because these guys will recover and reward me with tons of blooms in the years to come. I have had great success with all of my seedlings purchased at the Tin Barn. They bloom and bloom and bloom and bloom. My current favorite is a mauve peach colored one which is a very strong and floriferous one.


I posted a picture of all three in front of the stone so I could get an idea of which daylily would show up best. I definitely know the red will not work. I am leaning toward the yellow, my original goal. The yellow will look especially good with the purple bee balm I plan to plant there as well. What do you all think? Yellow or peach?


in the garden....